2013-09-30

Bubble Shorts by DoGuincho Pattern Tour |and some great news|

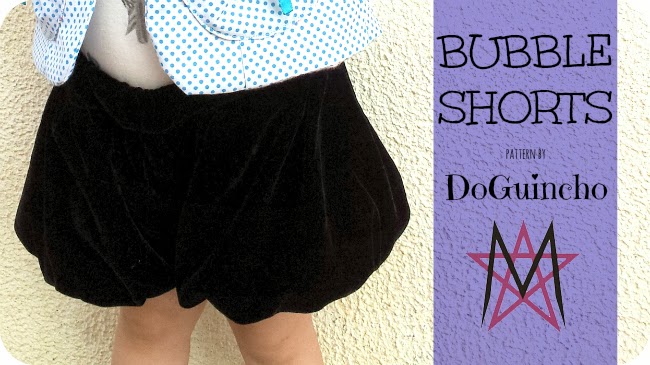
Today is my turn to show you my version of the Bubble Shorts; which pattern has been recently released by Marta from DoGuincho. I was really lucky, and feel honoured that Marta invited me for her blog tour.


Let me start by saying I really liked the shorts when I first saw them over at DoGuincho's blog, in their first version. And when I knew they'd make great winter shorts I even liked them best. But I always thought, that it was the kind of garment I most likely wouldn't be making for my child. I mean, I loved it on her kids, just didn't think I'd love it in mine. Does it ever happen to you?

... (and) Boy, was I wrong? ...


So, even though I thought that it would be a garment I would probably not sew for my kid, I was excited to be part of the tour and get my hands on it. In my mind, I was going to use it to make a few Christmas gifts. But then I started seeing all the versions other bloggers in the pattern tour were making. And weren't all of them so cute and different?! I had to rethink my goals. I changed my mind. I went to make one for my daughter. If I didn't like it, then I could always donate it or whatever. 


I carefully chose my fabric - black velvet (from my stash of course, this particularly one was given to me by my mother in law a couple of years ago). I wanted something different from what I had seen before, and I wanted something classy. If I wasn't so tight with a lot of projects I would have enjoyed making a matching jacket for those shorts and pair it all with a plain while top. But I had no time, and that will have to come later. 

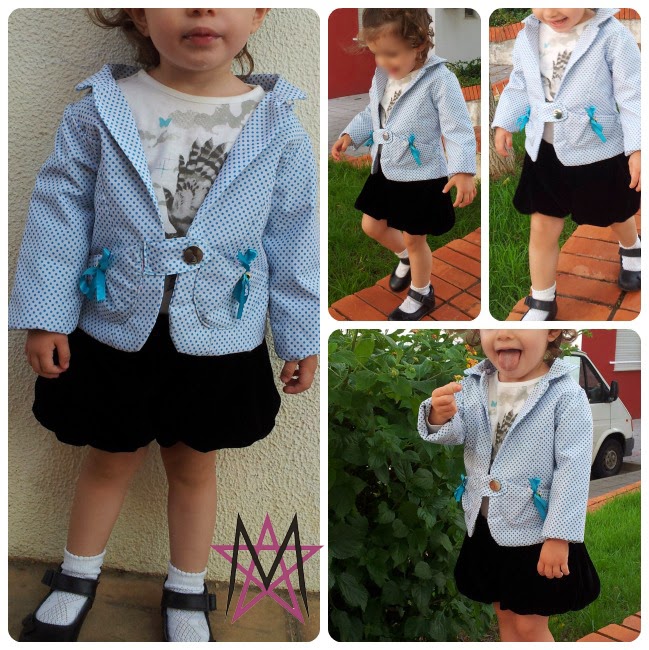
I had problems getting a decent picture of the details. Turns out black velvet isn't that easy to photograph, being I  not-by-any-chance a professional, having a broken machine that only works half way, the weather being as grey as ashes, this, my friends, was the best thing I got.

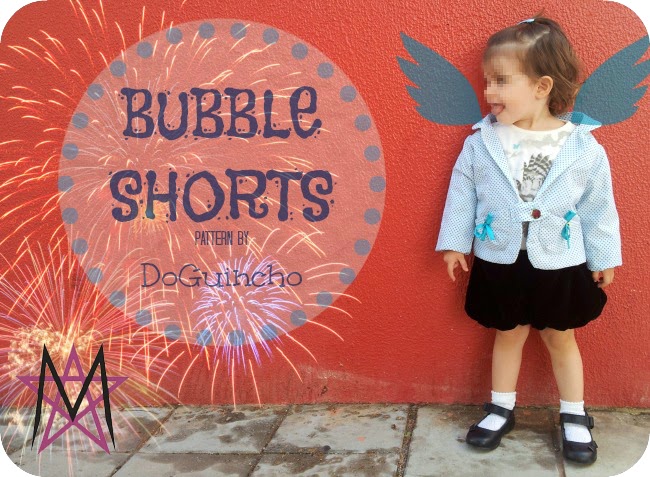
So, for this photoshoot I paired it with a shirt she was offered a while ago and surprise... my new Dreaming of Spring blazer, in a winter edition. Go figure! And all together make for my PR&P signature look. 


How come signature look if I wasn't even so sure about the shorts?! Well, yes. After all, this pattern proved to be one of my favorite from the latest I've tried. Everything went together perfectly. It was easy to tape the pattern together, I used a size 2 and it fits my daughter perfectly, which doesn't always happen, the instructions are clear and easy to follow, and I just loved the look of it all and the attention given to details and the entire thing by Marta. Oh, and one great thing about it... they were so quick to put together! I love the velvet shorts on my daughter so much. Hubby or my mom, can't tell anymore... called her little Camões, which made my day. lol 


I don't think I have a signature style. Not yet at least. Or maybe I do, some people have told me they like my style, so there must be something that defines me. What? I still didn't figure out. If you know what that is, then please let me know, so I don't get so freaked out with every Signature look week every season of PR&P. I have mentioned I like to do knock-offs, often refashion... but I believe the thing I really stick to is making wearable clothes for my kid. Clothes that I know will worn over and over. 


So, the big news?! I have created a pattern for this blazer. You might have heard about it, because I had 5 lovely and talented ladies testing it for me (thank you Suzanne, Al, RaeAnna, Max and Shannon), and helping me improving it before it is finally available here in the blog as soon as possible. I was actually hoping to share it today, but with all the sewing to do, and the Refashion Runway competition going, I'm sorry to say you have to wait just a few more days. Please be patient because once it is ready, you can have it for FREE! Size 2 only, sorry! 


Despite the original name, I made a winter version of this blazer jacket. When I first made the first, my daughter used it with a scarf and I really liked the look, even though it has a wide neck, meant for Spring weather. In this blue version, I used flannel inside to keep it warm. You will love the changes the first testers did to it, which I will be showing you pretty soon. 

Now, to the best part for you, and back to the shorts pattern, Marta announced on her blog that
Until September 30th the Bubble Shorts by DoGuincho will be for sale with a special price...Use code RELEASE1 to get 20% off. Grab it while you can!
You can buy the pattern on (my) Etsy Store and - good news - as it is a digital file, the pattern is immediately available for download after payment.

And if you've missed the rest of the tour, it's always time to visit each of the bloggers that have shared their own bubble shorts versions too. Let me tell you, you'll love it and you'll surely will feel the urge to make a pair too. So, visit them, buy the pattern, you're still on time to use the discount and share your bubble love too. 

Sorry, this turned out so long, but I really needed to say it all. I guess that's just me, anyway... 

2013-09-29

|Refashion Runway| Week 2: Emerald

Warning: long post, heavy on photos!


For this week's challenge I was a bit lost. I love emerald, but I had refashioned my emerald pieces already (if you're new here, you might want to know I made a challenge of not buying anymore fabric or clothes for this year; - for those who follow for a while, sorry I am mentioning it again). I made a pair of pants for my kid out of a women's pants first, and then I turned a very old and dated dress/skirt/whatever that was, into a lovely mini dress I'm terrible in love with. 

So, I turned into my own wardrobe, hoping to find something with that color. I found the dress I mentioned before, a tank top and a dress I made from scratch a few years ago. It's this one:


The refashioned dress was out of the list. I loved it too much to just refashion it again. This one was an option. I mean, I love it, but I haven't been using it much lately... And that fabric? I love that fabric... I even thought about cheating! AH! I still have lots of that fabric left... but, nope, no way! I couldn't do that even if I wanted! lol

So, I was left with the knit tank top. Now, I have to confess, even though I seldomly sew knits, I fear them. Really! So, I felt dissapointed that it was my only option for the emerald challenge... UNTIL it came to my mind that I still had a box somewhere which held a few more treasures meant for refashioning. YAY! And guess what? I found an emerald and white striped button up shirt! How lucky?!


It was a women uniform's shirt. I believe it came from my sister's in laws, from the time they had a restaurant many years ago (even though this is that old, the fabric is as new, perfect!). Apparently, I had done a few cuts to it already. It was missing a sleeve, all buttons and a scrap was cut on the back. Pffff... what on earth will I be able to do with this?! -  I thought!


I tried to get inspired by playing with the shirt on my dress form. I had fun, and I finally got to somewhere. I wanted a corset looking top, BUT I wanted to save the collar and re-use it too. I then put the shirt around (back to front and front to back), used the collar as a turtle neck and pinned the front, side and back darts. Since my dress form is a bit bigger than I am, I had to do it again with the shirt on me. I even played around with the tank top, I envisioned a dress, using it as the skirt. Then I realised the BIG stain on it and rested the top... not for too long though. 

I'm pretty happy with what I made. I don't sew for myself as often as I did before I became a mom, but everytime I do, I get oh so happy, that there is a little something new, for me, by me. 


I used the striped shirt for most of the piece but I also used a band from the bottom of the tank top to create a band on the waist, that is slightly tighter than the top. I love this effect. Then I cut two smaller stripes and used them as bias tape to finish my arm seams. I added green flower buttons to this that were already in my stash too. I thought about adding a 4th button down the back, but I actually liked the open effect it created without it. 

People, it was my first time using a twin needle. I wasn't quite sure if I should share it but I have to. I felt so stupid and just wondered Why, o WHY, did I wait so long?! I have my twin needle wraped in its original paper since I got my machine (it came with it), and that's well over 10 years ago. I took it out like three times, just to look at it... Who would have thought? Sometimes we're so scared to try something, and then we do, and we just feel stupid that we didn't before. 


I love the details on my new top. I love how the collar looks backwards, with the flower button in the middle. I love the bias tape creating a visual contrast, and I even love my scrappy flower added to the front. This, people, was a happy disaster. 


Well, I might have accidentily cut more than I should while constructing, and I did something really nasty to my top. I felt I had lost it! I cut it right on the front! How would I make up for that annoying mistake? Well, if you can turn something awful into something wearable, you must be able to cover up your mess. And that's what I did, of course! So, I just closed the hole with a few stitches, I didn't even bother to make them all pretty, I was going to cover them anyway. I used very small scraps to made a fabric braid, and from there I made a flower. Stitched it on top of the mess and my top became even cuter!


It was a fun sew for me. Then hubby and I had a lot of fun getting those photos taken. It was something we used to do a lot together before any babies arrived, and we felt old and untrained for this right now, but in the end, I think we got a few good ones. 

Oh, and did you recognise the pants I paired it with?! Yes, they are the no sew refashioned pants I showed you back in July!

Now, go to the Refashion Runway page, check what my fellow contestants did with the emerald theme, enjoy and vote for your favorite, please. 

2013-09-28

Fancy Pants Leggings from Titchy Threads

I was lucky to be one of the testers for the bigger sizes of the Fancy Pants Leggings from Titchy Threads. Well, actually, isntead of leggings I went with the shorts because it was still very warm in here when I made them, and I did them in a size 7 (though I went down 2 numbers on the waist) as Laura advised me to. And I'm glad I followed and sticked with her instructions. The shorts turned out the right size for my nephew. 


I used two knit shirts to make this. Now let me tell you, although I did sew my share of knits, I've never felt that comfortable about them. And this garment, required me to sew with knits. There was no way to run away from it. So I did. I used a red shirt (you've seen what I did with its leftovers here), and another green one, 10 years size I believe. 


The shorts were a very easy and quick sew. I had no problems at all with it. And again, Laura's instructions are the greatest ones I've ever come across with (as I learned when I sew the skinny jeans using her free pattern and tutorial). She has included a cheat sheet, for those more experienced seamstresses, and that's what I used to sew mine, since she told me she needed feedback on that. It was pretty clear, and I loved testing it for her. 

Now, the bad thing?! My nephew didn't like them. I even thought he wouldn't allow me to take his pictures with it on. My sister looked at them and commented they looked like cyclist shorts and that's how she convinced him to put them on. She also suggested to should add some foam to that panel and turn them into real cyclist shorts. Something I haven't yet, but wen to the to do list. 

2013-09-24

Pocket Sling Tutorial

I am guest posting for Tasha, over I Seam Stressed today, since my appearence there is due to Tasha's baby boy's birth, I thought I'd come up with something every mom should have. Especially when they are still newborns. I am talking about a baby pocket sling, of course.


2013-09-21

|Refashion Runway| Week One: Plaid

It is here. The second season of Refashion Runway is on going, I am a contestant and today I am sharing my first entry (let's hope it's not the one and only... hehehe).

This week's theme is Plaid, when I knew about it I was pretty happy, that meant I could sew one outfit only and enter two of the challenges in line, since it also fits perfectly the 3rd week theme of Project Run and Play. 

Let's talk about what I did though... Obviously, it is a refashioned outfit. I started with this:

I had these pants saved for a while, they were mine and I had bought them when I was still studying. We had to use a grey uniform and they suited the task perfectly. They were comfy and warm, since it's made of a soft wool. I had this saved with a note attached to it (turn it into pants for the little miss - it said). Mmmm... turns out I didn't want to make just another pair of pants for her. I saw potencial for more, and I came up with the shorts suit idea:


I started by cutting the shorts pieces. I used a self drafted pattern. I've been using this a lot, it is officially my most used pattern ever, it is the fifth time I use it and all those shorts look quite different.


For this I only used the bottom of the pants, I still had quite enough left to make the vest. Let's focus on the shorts first though.


Contrary to the 4 others I made before, this one has a waist band with a fly at the front. It closes up with a (showing) big black button (which matches the big buttons from the vest, though it is a bit smaller than the other 3), and two little snaps that are hidden when it's closed. 
I also added an adjustable waist elastic because my daughter is getting tall but skinny, so most of the other shorts she got for her birthday would not stay in her waist. This solves that issue. I used the pants original waistband for the shorts. I only had to cut a bit of this out, and adjust the side loops. 
For the side pockets and decoratice cuffs, I used a small scrap from a fabric I had for years. I actually would have loved to use it to line the vest too, but it wasn't nearly enough. 


So, I was happy adding a little detail to it using a tiny bit of that fabric that I still had left, and using leftovers from a white sheet for the linning instead. 

I traced the vest from an exisiting one and I really thought this would be too big for my G. and I was happy making something that would fit next year. After trying it on her, I wasn't so sure. It fits perfectly already. I believe she'll be able to wear the shorts next year, because of the adjustable waist, but I can't be sure about the vest. 


On with the vest... I added a front pocketwith the scraps. I was going to make it plain but it was a bit yeloow(ish) and as to cover it, I chose to add a bow to the pocket. I used 3 big black buttons on the front, that match the shorts button as mention above, and at the back I used a buckle that I had saved from an old bag I dismissed long ago. It allows me to adjust the vest fit too. 


Here's a few more shoots of the whole thing put together. G. was picking grapes at her grandparents and having a lot of fun. For the photoshoot she's also wearing a refashion shirt I made her for the Candy theme week over Project Run & Play. HERE

And that's it! Don't forget to check out my fellow competitors over Refashion Runway and vote for your favorite. 

2013-09-18

My candy girl

It's candy week over Project Run and Play, and at first, I wasn't really sure I would be able to sew along this week. I couldn't think of anything else but costumes when I thought about candy. Then one night, I had an idea, and I wondered... What is the first thing that comes to my mind when I think about the word candy

The answer is:


Then, it came to mind that I had bought a striped shirt in a thrift shopping a few months ago. That would be perfect for the look I imagined. Well, I didn't go all crazy about this week. I didn't even create a total new outfit (she doesn't need it, remember?), all I did was a new sweatshirt that I just love. 


To make it, I used two shirts. The one with the stripes and (actually leftovers from) a red boy's sweatshirt, I had cut to use in a short's pattern I've tested and might blog about one of these days. From the red shirt I had only sleeves and top left, and on top there was some boy (ish) embroidery that I didn't want to use, so because of that I wasn't able to re-use the neckline. I used a piece from the top back to make the front's red piece of my shirt. I used the stiped shirt for the full back and bottom front. 


For the new neckline, I used bias tape I had made from the mom & daughter's refashion leftovers back in July and red lace from my stash. I had just enough of the bias left for the neckline which was great! I added a button closure on the back. this was not planned, but when I firt finished the shirt and tried to put it on G. it couldn't go over her head. I had to come with a solution and that was it. The button is a bear's head I had bought a long-long time ago, and she picked it out of all my red buttons. It was a fun moment for us!

... and yes, red and stripes are our favorites around here... 


We gave her a treat for the photoshoot, she's been no colaborative at all, so this really helped! I managed to make two photoshoots all at once! HA! and she didn't even the whole things, after chewing one edge and then the other, she just gave it to me... "no more mom".

I've paired the shirt with a red tulle skirt she had been given last year and rarely uses. I think we will have a lot more use of this now, because we all loved the combination! And, the one last thing left is the hair acessorie I've made her... Sweet, right? 

Time to check everyone else's candy inspired looks HERE!

2013-09-14

Refashion Runway and the reason why I am freaking out

Oh yes! I am totally freaking out. If you read this post then you know I'm having a long list of sew alongs and other sewing events happening these weeks. 
What I didn't tell you is that Beth from The Renegade Seamstress, is hosting her second Refashion Runway competition, and she contacted me a couple of weeks ago. I had submited a project for the first challenge but I didn't make it to participate. 
This time, I had seen the submissions were open again but since I wasn't quite sure, I hadn't submit anything until I got Beth's e-mail. She was wondering if I'd like to submit again... and I thought why not?!, but honestly, I wasn't hoping to be selected so I kinda forgot about it until a couple of hours ago. 
I am competing in Refashion Runway and the first project must be up by Saturday. So, yes: I am freaking out pretty much. 


Here's the themes in case you want to sew along:

week 1: Plaid
week 2: Pantone 2013 Color Emerald green
week 3: Peplum
week 4: Leather
week 5: Halloween
week 6: Winter White

2013-09-09

It's that time again!

This can always get me so excited! Project Run & Play is back with the weekly challenges to push me harder. The link party for the first week is now open, so it's time for me to show you what I've done too. This week's challenge is a pattern remix, and that is  Oliver + S's Popover Sundress Pattern. 
Original Dress from Pattern
Mmmmm... I wasn't so excited about it when I saw it, I even thought about not joining this week's sewalong, I am trying to do a sustainable kind of sewing, more and more as days go by, and since my little miss doesn't need extra unwanted clothing, I thought I'd rather pass this challenge. BUT then I had a little cousin's birthday coming and a light was turn on in my head. I could sew something out of the Remix Pattern, but what?! Definately not a dress, I thought. I am sick & tired of dresses (honestly! and I don't even sew THAT many). 

Here's what I came up with after all:

Yes! A romper. I can't get enough of rompers. To make this I printed the original pattern and slightly adjusted it to what I needed, like cutting it lenght wise to make it a top instead of a dress, and adding about 1" on (new) bottom to make it a little wider. Even though you might get all dizzy from my cows' towel, I guess you can see these changes in my picture below. 

To get the romper bottom, I used Feather's Flights Harem Shorts pattern. I had used the pattern here and here before and am sure I will use it some more in the future. I wanted the top to get a bubble look and I think I made it just like I had imagined. I've added an elastic on the waist and pretty much this was all my changes. 

I was pretty satisfied with the results. Even though it's all pink! cough-cough For someone who keeps screaming out how much she doesn't like pink, I've been sewing pretty much with that color. But, you know... I have to sew from my stash, and that's a lot of pink in it (exactly: because I always refuse myself to use it!). 

Anyway, I'm going off subject (as usual - ooppppsssss!!!), so, the fabric used was polka dotted left overs from the trolley make-over I made for G. when she was born, for bias ties, shorts and yokes. For the top and cuffs I used knit from a huge pillowcase (so big that it is enough to make myself a whole dress - now that I mention that, maybe if a dye it?)... 

Since my little miss is nearly a year younger than our cousin and they are basically the same size I tried it on her and tried to take some nice shoots, but she's been so hard to photograph lately. She just won't stay still for a single second, or if she does it has to be when and where she decides to. Those were the best ones I could get from her. And honestly I didn't even try harder, I'd to almost anything to avoid unwanted tantrums. 

I love the final look of my new harem romper, and it was much approved by my 6 year old niece who has requested one just like this one for her own self. She does like pink, she's not like me or my daughter, who's following mom's steps and it's not a big fan of the color. My niece has also requested a dress with the pink hearts fabric I used for my first Bumblebee dress

now, go check the other remixes out there! I know I've been loving it!

2013-09-08

Sewing Challenges (& Sort of Wrap up)

New exciting things are on the way...

Operation Project $0 is on. Check it out HERE. I guest posted for the series too... YEY! Missed it? Go here!

Season 8 of Project Run & Play kicks off tomorrow! So excited to see what everyone come up with. The themes for the 4 weeks of challenge are: Pattern Remix - Candy - Plaid - and - Signature look. I have already done my Pattern Remix outfit, and will be blogging about it in just a few days. I'm still not sure about the second week, but I will join the other two for sure. 

Maratón Telaria - this is sort of a spanish version of PR&P, and I am in to sew along with. There are also 4 weeks, and the themes for this are: Retro - Knits - Bed Time- and - our choice. Starts next month, so I'm excited for this too. 

I might or might not join this one if I can get to sew it mixed up with another of the challenges. This is a challenge hosted by the Spanish blog La Pantigana. And we're supposed to use a really horrible fabric that we might have in our stash, and make something good out of it. Sounds fun and it's a great insentive to use that fabric that we always put back because it isn't just good enough. 

Click on picture!

Another fun series to follow - did you realise I'll be guest posting for this series too?!


Besides, I have a lot to do. My list is big, but I love it! I love to feel challenged, I love that I feel like I belong somewhere... In a near future I am: 

- Testing a pattern

- Reviewing another pattern

- Being part of a Pattern tour

- Doing a guest post for a bloggy friend

- Realising my first FREE pattern

And guess what? I am even considering a winter edition for a Refashion Month series. Is anyone in for this? 

Mmmm... It's been a while since I last blogged about my challenges. I am excited about the next couple of months. It's going to be pretty crazy around here, well, it has actually started already, but it's going to get extra busy since I can't turn down a good challenge. 

It's been a sewing challenging year. It did calm down for Summer though, but I needed to feel motivated and came up with the self Pinterest challenge. AH! I made that post and then never talked about it. The truth is that I didn't keep up with the weekly pin done. Buhhhh!!! But in my defense I have to say that I crossed most of those pins out of my to do list. 

Ever since, I did make the piñata cake, by the end of July for my niece's 6th birthday party. She loved it and everyone thought it was a great birthday cake. I didn't follow any tutorial, I made a cake (two actually) with a recipe I had from a magazine and then decorated as wished. And here's how it turned out.

I did make a pair of Harem shorts for my daughter and most recently I made a pair for my little niece M. Before those two, I made another pair but that was considered a failure and although I've been planning to still blog about it, I haven't done it yet. 

I didn't do the lollipops, I wanted to make them as party favours on my daughter's birthday (late June), but I didn't, so I don't think I will do that anymore. I did print the pattern for the potty training pants, but when I realised my baby was potty trained and those weren't needed anymore. It only took me a month for the whole process. 

And I didn't do the mat exactly, like the one on the pin I showed you, but I did the little pillows and we've used them on tree trunks. It looked so cute. Those were also for my daughter's 2nd birthday. The theme was ladybugs, I have mentioned that when I showed you her outfit for the party. 
That's it for now, but I might be up for something else!!! ;)

2013-09-06

Operation Project 0$ guest posting today

Operation Project 0$ has already started a few days ago. Don't know what I am talking about? GO to Winter Wonderings... Wanderings and Whatnot. Today I will be guest posting, sharing my own project. Go there to check what I've done and how much is costed me. Don't forget to check the rest of the projects from Suzanne and her guests. 

2013-09-03

Melissa's Baby Harem Pants

Do you still remember my first Harem Pants? Well, a few weeks ago I decided to make another pair, this time for the little niece. The one with the amazing blue eyes. My mother in law handed me down this tunic which obviously I wouldn't wear (and if you knew me better you'd know why!), so I started brainstorming... how will I use it, how will I use it?, I wanted to use the original embroidery, because I loved it, but I ended up going for the harem pants. 

To have a good use of the fabric I had to make a few adjustments to the original pattern, but I think it turned out just fine. I also added a new kind of pockets, so I could use a bit more of that embroidery and add something special to the pants. Even though I have them finished for a while, I didn't have the chance to have pictures taken with baby Mel wearing them. So, I'm sorry just one shoot. 

Labels

About us Acessories Adult Adults Advent Calendar Appliqué Baby Baby Acessories Baby Doll Acessories Baby Doll Sling Baby Shoes Back Warmer Pillow Backpack Bags Barbie Beading Beads Bedsheets Beret Bibs Bikini Blankets Blazer Bleached Blog Tour Blogs Blouse Bolero Book Covers Book Review Boots Bowling Game Boxers Boy Bracelet Bralette Breastfeeding Pillows Briefs Button Shirt Button Up Shirt Cap Cardigan Carnival Causes Cell Phone Stand Challenge Create Charger Support Chevron Christmas Clutch Coats Commitments Constant Change Contests cookies Corset Cose+ Costumes Cowl CraftingCon Crochet Crossstitching Cushions Dance Outfit dashiki Dia de Los Muertos Diaper Pouch Doll Clothes Dolls Drawstring Bags Dreamcatcher Dress Duvet Cover e-book E-Zine Review Easter Embroidery EnglishPaperPiecing Fabric Baskets Fabric Chess Game Fabric dolls Fabric Flowers Fabric Games Fabric Memory Games Fabric Printing Fabric Stash Fabric Three in a Row Game Fabric Toys Features Felt Flamenco Dress Flamenco pants Food Free PDF Pattern Fun Cakes Funny Fur Gifts Girl Giveaway Glasses Case Granny Squares Guest Posting Hair Clips Hair Clips Hanger Halloween Hand Warmer Pillows handbag Handmade Cards Harem Headband Henley Highlow Home Homemade Liquid Soap Hoodie How to Inspiration Jackets Japanese Sewing jeans Joggers Jumper KCW Keyring Kid's Choice Series Kid's Crafts Kimono Kleenex Purse Pouch knitting Knock it Off Leather lederhosen Leg Warmers Leggings lunchbag Maratón Telaria MashUp Series Maternity MeMadeMay; Men Mending Challenge Mini-Sofa Cover Mobile Mobile bag Mom's Monthly Wrap Up Needle Rolls Nightgown No Sew Nursery One Thimble Onesies Operation: Project 0$ Other Crafts Ottobre Overalls Pajamas Pants Paper Crafts Party Favours Party Time Patchwork Pattern Pattern Testing Pattern Tour Pear Puff Seat Pencil Case Pencil Rolls Peplum Peques de Cine Peter Pan Collar Pijamas Pillow Covers Pillows Piñata Cake Pinterest Challenge Pipe Cleaner Crafts Placket Pockets Plastic bags Dispenser Pleats Pocket Slings Podcast Pompoms Pouch Practising ´n Improving Project Run and Play Project Sewn Projects Pt Refashion Week Quilting Recipes Recycled Ribbon Organizer Recycling Refashion Month 2012 Refashion Month 2013 Refashion Month 2014 Refashion Month 2014 (2) Refashion Month 2015 Refashion Month 2016 Refashion Runway Refashioning Retro Reverse applique Reviews Ribbon Roses Robe Romper Romper Dress Romper Week Roots Round up Rucksack Saving Series Saving while Sewing Savings Made By Sewing Scarf ScrapsBusting Sequins Sew 20's Sew Along Sew Geeky Sew In Tune Sew-a-bration of Womanhood Sew-vivor Sewing Tips Shirt Shorts Skirt Skort Sleep Sack Slings Slippers Snowflakes & Lace Sock Monkey Socks Stitching Suit Surprise Sweater sweatshirt Swimsuit swimwear T-shirt The Hearties The Sew Off Thrift shopping Tights Tips Tissue Case Toddler Top Top 12 of 2012 Top 5 of 2013 Top 5 of 2014 TOP 5 of 2015 top 5 of 2017 Top Stitchers Trousers TSNEM Tunic Tutorial Tutu underpants Underwear Upcycling Vest Videos Vintage waistbag Wallet When things go wrong WIP Women Wreath Year Wrap Up

Cose +

Cose +
Magazine de Costura em Poruguês