2014-03-31

Challenge Create Week One Kicking Off Today!

The competition I am taking part in as one of the contestants has officially started today. The Sew Along link party is now open and I can't wait to see what my fellow contestants (and sew alongers) have to show for all the themes. Each of us will be featured in a different day of the week from Tuesday to Friday. If you want to see what I did, my post will be up on wednesday. Tomorrow you get to see the first creation... exciting, right? 
On friday, you get to vote for your favourite contestant/look and also for your favourite entry in the sew along group. I'm sure there will be a lot of talent and hard decisions to make. Enjoy!!!

2014-03-30

The Liebster Award


A few days ago, nearly two weeks ago already (oh dear, I'm sorry!), Teri Olson (Climbing the Window author) surprised me with the Liebster Award, which is a blogger-to-blogger award meant to recognize blogs with small readership and to help widen their audience. 

So, when nominated for a Liebster award, the nominee must answer the questions from the nominator and provide 5 random facts about her or himself.  Then the nominee pays it forward by nominating more small blogs for the award and sending them more fun questions, normally by leaving a comment on the blog with a link to the nominating post.

I will play by the rules this time... so I'll start with...

My blog nominations go to (randomly):

And Questions for the nominated bloggers (if they choose to participate):

1. What's your main inspiration when it comes to sewing?

2. What do you like to sew the most? 

3. How did you learn to sew?

4. Have you teach anyone to sew in your life?

5. What are you working on at the moment?

Then answer the questions from Teri:

1. What is your favorite part of blogging?

The sharing. I love to read the comments people leave about the things I make. Also, I love that it has allowed me to learn so much through other's tips, tutorials, etc. 


2. When you were younger, would you ever have imagined that you would be sewing as an adult? Why or why not?


Well, I was already sewing for my dolls back then. and I started sewing for myself as a teenager, so I guess it has always been part of me. 


3. How many unfinished projects do you have laying around?  And if you don't have any, what's your secret?

Not many right now. I used to have dozens of projects started. But one day I decided "no more" and when a project gets "stuck" I simple ignore it, throw it away, undo it and start a freash new one. I am more disciplined now and always try to finish one thing before I start another one. 


4. What's your favorite movie?
Mmmm... there are a few... most of them by Tim Burton. 


5. Do you still see yourself doing some form of blogging/sewing in one year? In five years?
Yes, one or 5 years... I love it, but... you never know!

TERI thank you for thinking of me for the award and sorry it took me so long to play along. Did you see my take on your Izzy pattern? Everybody, if you haven't seen it or tried it yet, I totally advice you to. I will surely use it again, and again. 

2014-03-27

Who made you clothes?


A couple of weeks ago I was contacted by Laura - Behind the Hedgerow inviting me to join other fellow bloggers in a Fashion Revolution. We're all asked to wear and post a handmade item inside out on the 24th of April and ask brands/retailers, ‘Who Made Your Clothes?’

Abby from All Things Boys, Celina from Petit a petit and family, and Laura from Beyond the Hedgerow have joined forces with Fashion Revolution to get out the word of their movement. Visit their blogs to read more about this event. 

Last year a factory in Bangladesh collapsed, killing 1133 people. Next month will be the first anniversary since it happened. So in honour of these people that lost their lives, because of the precary condicions they were forced to work under, let's all take the pledge and have a revolution. 

2014-03-25

House full of Pandas |PR&P9#1|

Season 9 of Project Run & Play has kicked yesterday with the first theme being Take me to the Zoo. Goal: create an outfit inspired on our/our kid's favourite animal, trying to stay away from costumes though. 


Ever since I saw the themes, I've spent a while thinking about it. I wanted to make something for the baby, then something for G. and just couldn't decide. I thought about the elephant shirt idea (maybe later, because it's really cute), then cats because we've got two, the shark hoddies and then I kept seeing teenagers wearing cute Panda hoodies... 

And it hit me! I want to make Panda inspired clothes for my kids too. They are just too cute and sweet, and they are black and white and G. loves Pandas because of Canal Panda. I only had to decide what to do. I wanted to do something quick and easy because, you know, I've been having lots to sew (with a couple pattern testing in the middle too). So, I didn't get to be that creative. I used other's creativity and just made my takes on some things I had seen online.


First thing on the list. I had to get that Panda hoodie done for one of my kids. Which one? Well, let's start with the baby, shall we?! Now, if you still don't know it... because I have mentioned it to some friends but haven't said it clear out here, the baby that's on the way is a... roll drum... baby BOY! And my first sewing project for him and him only was this hoodie. You can imagine how much I love it, right?!


Especially because I have used one of his sister's shirt that doesn't fit anymore and I wasn't going to put him on. It was all fury, with finishing details in pink, such as the ruffles in the sleeves and hem, the pink bias in the collar and the flower embroidery in the front. 


So, the first thing I did was to deconstruct everything. I used the back of the original one to make my hoodie's front. Lucky for me, instead of pink too, the snaps on it were white. I then used the sleeves to draft new, without the puffiness of the original ones (another girly feature I wanted to get rid of). Those original white sleeves were transformed into the Panda's head. For the black parts I used some velvet I had in my stash for years. And I used rib knit for the cuffs that I had saved from previously refashioned (men) hoodies. 


When I was done with it, I just knew I had to make something for my big girl. I had seen an online Panda look that I loved and wanted to re-create that too. I was running out of any refashionable item to make the mismatched striped leggings, but I had this t-shirt from dad in my pile, and the word fashion standing out caugh my attention. I still could make a mismatched pair of leggings for her. 


But before I made the leggings, I finally made an Izzy top (free PDF pattern). I've been wanting to try this pattern since the day I first saw it over Climbing the Willow. I've seen wonderful pieces created with it, but was always postponing it. No more. I finally tried it myself and am a fan. I didn't line mine though, I used a white t-shirt from my stash to refashion, and the black ribbon knit for the bias again. I also made mine about 2-3 inches longer than the pattern. So it looks more like a dress than a top. I still haven't tried it on my girl.


I followed instructions and used the button tab and everything. But I forgot I wasn't lining, I was using bias instead and the tab had to go over it. I don't dislike it though, looks different but in a good way. I should have made the button tab just a bit longer for it to look better. It almost didn't have enough lengh to actually close. I've used a metallic snap.


For the eyes and ears of the Panda, I used sequined fabric I had in my stash, I added interface to make it stiffer. I embroidered the muzzle in a light pink. Half way through it I thought I could use a slightly darker thread but was too lazy to undo and redo it all over.

And that's it from me. There's a lot more inspiration for kids animal inspired clothes at the link party over PR&P. 

2014-03-21

Challenge Create: Adult Edition

Skirt Fixation

A few days ago, I told you about my backstage work, and how sometimes we have to wait to share what we create. Although, this isn't all I've been keeping from you, today I finally get to spread the word on one thing. ..

What I didn't tell you, was that I had just known I was one of the 4 lucky contestants to compete in Challenge Create. I was happy, excited and then just terrified when I looked at my fellow competitors. 
All the ladies are super talented and more, they are all excellent photographers (auch!). 

Visit Skirt Fixation (click button above) to read more about this competition. You can sew along and support us all. It will officially last from March 31st to May 2nd. 

I was planning to sew along even before I knew I had been selected. It has motivated me to finally sew myself a few maternity clothes, so that's what you'll get from me. When I knew I'd be competing, I thought being huge right now would be a disadvantage for me, but on a second thought, I was just glad I get to have this experience. Share the lights with such talented ladies, and just get to sew for myself in this special moment of my life, when i was getting ready to welcome my second child. 

So, I hope you'll all stay around, sew along, vote for your faves and enjoy the competition. I surely will.  

Good luck to us all and let's get sewing... 


Oh, and don't forget that if you're interested in guest posting for my series, you can go HERE to read about it all and sign up too. Thanks!

2014-03-20

Refashion Month July: Guest Call!!!


I know, I know... We are only about half way through March, but I am already thinking about July's edition of Refashion Month. 

No idea what am I talking about? Well, it is the series I started as a self challenge in 2012, then grew to a whole month of guests in 2013 and in 2014 it came back in January for a winter edition. Right now, I want to start planning the usual edition for July. 

But, I am pregnant now, and my baby's due date is exactly in July. Which means I might not have the time to take care of things then. I have considered skipping the series, but then, there is always the chance to have it all settled and ready before, right? 

I will make things a bit differently this time, usually I send personal invitations to guest post for the series to bloggers I've admired for a long or short period of time. In 2013 I even had a few spots for people who would like to guest post, I called them sew along guests and it was a great chance to get to know knew (to me) bloggers. This time though, I will leave it up to anyone who wants to join in the fun. 

Yes, I am calling for you. if you are reading this and think it'd be fun to write an article about what refashioning is to you... if you want to share your tips and advice... or if you are new to refashion and want to get motivated... if there's a tutorial you want to share... or just share an item you have transformed into a new one, then I am calling for you. 

EDITED: All spots are taken! Thank you everyone who signed in. You can still sew along and share your refashions in the flickr group that will be created a but later. 

2014-03-16

My dress was featured

Threading My Way_Featured

Go over Threading My Way. Pam featured my cow printed Bumblebee Dress.

Backstage working...

It is extremely hard for me to finish projects ahead and then have to wait so long to share them. I am the kind of seamstress that enjoys sharing whatever I create right away. But sometimes we compromise to other people, and sharing what's been made has to wait.

So, that said, let me tell you I've been like a busy bee, not only sewing, but sorting patterns, searching for inspiration... There are a few great things coming... have you heard?! Here are a few I can share for now... 

The 9th season of Project Run and Play is now starting with the introduction of the designers. The first link party will be open March 24th. Challenge Create starts March 31st, an adult sewing edition, organized by the ladies from Skirt Fixation

Themes for Project Run & Play (click link to read more on blog):
- Take me to the Zoo
- Spring Break 
- Design your own fabric
- Signature style

Themes for Challenge Create (click link to read more on blog):
- Inspired by Nature
- Refashion
- (a hint of) Vintage
- Destashing

Also, Kids Clothes Week is coming back (April 7th - 13th) with something new. It is a themed edition... Mini Me... And this time I am planning to do things right. I have signed in the site already, I am trying to pick my patterns already, and decide what I want to get done through that week. I hope I'll be able to share my creations on time too. I am planning to exclusively sew for the baby during KCW, and am trying to keep the list short, though it's hard. I get all excited and want to do it all, but I know that if I put high expectations into it, I might end up dissapointed, so let's do the best not to.

What about you? Will you be sewing along any of these too?

2014-03-11

Basic Leggings Testing


Last month I was able to test the Basic Leggings pattern by MamaNene from Serger Pepper. They were released last Sunday, and you can click the link above to read more about it by the designer herself. 

As for me, I had the idea of making two leggings since January, when I visited my dad's town in Spain and bought this beautiful washed out blue, with polka dots knit fabric. Then, Irene made her call for testers and I thought it'd be a great oportunity to get done with it. 

I got a meter of that fabric for 3€, and it was just enough to make one pair for my daughter (size 3) and one for my niece L. (size 7). They were so easy and quick to sew together that I wish I had enough fabric to make a third pair for my grandniece too. 


This pattern is made to be very long and very high waisted, so I might have to adjust it a little next time I make it, because, my girls are short and they turned out just a bit too long for my taste (and my niece's too). I think they will get to wear the leggings a lot next year, but we'll just leave it waiting for now. 

The pattern includes a mark line though, so you can shorten yours if you want to, which is great. Also, Irene, has shared a very nice and usuful tutorial on how to make your own colorblocking leggings. And I love the cuffs and that they are tight on the bottom. 

The pattern goes from size 3 to 14, so I might as well make a pair for myself one of these days. I think size 12 would be pretty much enough for me. That would be interesting to see. =D

2014-03-10

The Renegade Seamstress & Burdastyle

Photo source

I believe Beth Huntington from The Renegate Seamstress doesn't need much introduction, but I still will make a little one for you, just in case you don't know who I am refering to.

Well, Beth is like a refashioning superstar, she also hosts the great sewing competition I was part of last year, the Refashion Runway. Besides, she is a contributor to ehow and she has a book on the works.   

She was recently invited to host a live Web Seminar for BurdaStyle about refashioning. So if you've been wanting to get some inspiration/help to start refashioning your wardrobe, and have some fun along the way, this will be a great oportunity for you. 


Live Web Seminar Date: March 31st
Start Time: 11am EST (4pm GMT)
Length: 60 minutes
for more information visit BurdaStyle here

2014-03-09

Sunshine Award


A few days ago, my bloggy friend Desarae from Gladness at Heart, nominated me for the Sunshine Award. I was surprised and so happy and honoured to be one of her choices. Thank you dear!

This talented lady, was one of my fellow competitors in the Rafashion Runway competition later last year, and she was also one of my guests during the last series of the Refashion Month. 

First of all I will start by answering her questions... 

Questions from Desarae for her Nominees:

1. What are some of your 'accomplishements'
(in the Jane Austen sense of the word: i.e. sewing, crocheting, drawing, instrument, singing...)

Many years ago I'd come up with an endless list. apparently I thought I could do anything and had to be always creating either way. Noways, it all comes down to sewing, my passion, one of the things I love most in life. 

2. Where do you get your inspiration (sewing, crafting, outfits etc.) OTHER than Pinterest?

Pinterest isn't really my first stop when searching for inspiration. Usually, when I plan to sew something, I get inspired by everything. Maybe a collar I saw someone wearing when I stepped outside, or maybe that new pattern someone reviewed in their blog, or a theme, I love to get sewing with a theme as inspiration... it pushed my imagination and creativity a little further and I love it. 

3. Name one new thing you want to make/try this year.

Finally learn how to use my serger... it's March already and I haven't given it a single try. Not happy!

4. Given the choice of anyone in the world (presently living),
whom would you want as a diner guest?

This isn't an easy one. But I guess (after a little thinking) that having Tim Burton and his wife Helen to have dinner with, would be terribly interesting. 

5.  What are some things that make you really happy?

My family above all. Sewing, days spent in the country side, lakes, a hot chocolate, a good movie, reading...

6. Favorite book series?

I have too many, but Marion Zimmer Bradley ones have been some of the best I've read. =) 

7. Favorite book made movie.
"The Perfume" - just too good. 

8. Pet Peeves?

(sorry but I am not quite sure I understood the question - translating issues, perhaps - so I'll just pass here)

9. If you could visit any country in the world, where would you go?

Greece... no doubt!

10. When you were a kid what did you want to be when you grew up?
Would you still choose that?

I wanted to be a singer. I guess not anymore. I don't want to traumatize anyone... ahahaha


* And now, I'm just copy pasting from Desarae's blog (hope you won't mind!) *

The Sunshine Award is..

"For bloggers who positively and creatively inspire others
in the blogsphere." 
Those who bring a little sunshine into our day!

THE RULES:
  • Thank and recognize the blogger(s) who nominated you (link back)
  • Post the award on your blog
  • Answer the questions given you by your Nominator.
  •  Nominate 5-10 other bloggers (no tag backs) and let them know you nominated them
  • Set 10 questions for your nominees to answer

But, since I am a little cheater I will not pick 5-10 blogs to nominee. There are too many blogs I love, and inspire me everyday for years. I don't want to leave anyone behind, I just thought it'd be fun to share my answers with you. 

2014-03-07

My Carnival (and other) Costumes Round Up

And we've come to the last day of my mini Carnival series... if you just arrived here today, I've shared, for the past week the costumes my daughter wore this year and the last one. I also have put up two turorials to make two of them, Snow White and Sock Monkey. They were both refashions. Today, I am bringing a small round up of costumes from previous years. 


Not all of them were meant for Carnival. There's two Santa Claus Costumes (boy and girl) obviously made for Christmas. 

There's also a Flamenco Dress and a Flamenco Boy's Outfit that weren't made for Carnival either, but they are used as Carnival costumes around here too... I have blogged about them before. HERE

On top, there is a little Devil's Costume. I made it for a costumer last year and have never blogged about it before. My daughter was about the same age and I tried it on her to check the fit. She looked just too cute. 

Then you have the Sock Monkey Costume I shared with you (and tutorial) yesterday, followed by the very first costume I ever made. It is a Dalmatian Dog Costume, it is only a 3M size and it was made for my nephew, eight years ago. My sister still has it, so when G. was about the same age I used it to make a little photo shoot with her. Adorable! It's all I could say. But as I was checking it back, I was just too ashamed with the finishes in it. Eight years ago I wasn't that good sewing as I am today, and that is a huge prove. 

The Prisioner is my nephew's costume too... one of my faves I'd say. It turned out just too cute and fitted him perfectly. He loved it too. The same year, I made his sister a 20's Lady Costume (picture below), she was so happy with it and all the feather's it had (and lost too). 

And the last costume above, is the Ant Costume I made for G.'s first Carnival. Making her an ant costume was a family joke, and I have blogged about it, and also shared a tutorial too. HERE

Not on the pictures, I have also made a Minnie Mouse Costume for my niece last year, and many years ago, I made four adult Medieval dresses. I might have to search photos of these and share sometime in the future. it's all for the Carnival theme now. I hope you have enjoyed it and perhaps you found some inspiration for the next costumes you'll make. 

2014-03-06

Sock Monkey Costume Tutorial (the refashioned way!)

Since last year, I never got to blog about the costume I made my little girl for Carnival, and since we are already celebrating it again this year, I thought I could bring home, the Sock Monkey Costume tutorial that I first shared over at Get Your Crap Together for her 31 Days of Halloween Series. Enjoy!


Hello! My name is Magda E. and I blog over House of Estrela. I live in Portugal, and we don't have a strong tradition on Halloween. It might have become popular to celebrate it from 10 years to now over here, mainly school parties, bars having themed parties, etc. Trick or Treat isn't that common, and the costumes are mainly witches, vampires, zombies... We called it "Dia das Bruxas" (Witches day) and I love it. It also happens that my birthday is just two days before Halloween, so I get to make wonderful themed parties if I want to. I actually only made one great Halloween themed party, but it was huge and I had a great time preparing it and having it. 

Back to the costumes, around here, they are more popular around February, for the Carnival. And this year, I have made a sock monkey costume for my daughter. Don't know why, I never blogged about it so far, but with Halloween approching I think it is a wonderful time to not just blog about it, but to share a tutorial on how I made it. 

Following my self challenge of not buying any new fabric for the year, I tried to work with what I had.

I made the little one a sock monkey and it has become her best friend, which she carried all around, so we all thought it was a great idea to dress her up in a sock monkey costume.


The sock monkey I made her was this one HERE, and I wanted to make her one that would look the same. I visited a second hand market in search of some used clothes with similar prints but I couldn't find exactly what I wanted, so I had to stick with plan B instead, and just find a shirt we all liked. I came home with two shirts I was able to use. They both, together, costed me 1€. So, if you want to know how I made a sock monkey costume out of one euro only, then keep reading!


I used a grey shirt for the main body and a red one for the details.
The first thing I did, was to use a shirt that fitted my daughter to draft a pattern for the top of the monkey outfit. Then cut a front, a back, and two sleeves on the grey shirt. I started by sewing the shoulders together and added the sleeves, as shown on image above. 


I then closed the sides and attached the original collar, resized, which I had previously cut from the shirt and saved.


The next step was to make the pants, and for that matter I, again, used a pair of existing leggings (in this case) to cut the leg pieces (2 of them). I pinned them together inserting one inside the other with the right sides facing, and then sewn it. Since I reused the original sleeves from the grey shirt to cut them, I didn't have to worry about making a hem.


For the monkey's tail, I cut a long stripe from the grey shirt and a rounded edged (on the fold) piece from the red shirt. Then I sewn the grey into a tube and sewn the red all around leaving an opening on the opposite to the rounded edge. I've inserted the red piece into the grey tube (right sides facing) and sewn them together. Turned it around and stuffed it.


I've grabbed the pants again, and handsewn a red patch that I've previously cut from the red shirt - no measuring and no pattern for this, just followed what I thought to be the rightsize. I've zigzagged the edge of the seam, folded it and inserted an elastic at the waist. To finish it off, I handsewn the tail to the pants, right on the seam line, on the center of the back.


The last thing I made was a matching hat. Used an existing one for size. Cut 2 red pieces for main hat part, then cut 4 ear pieces from the grey shirt.also cut two smaller ear pieces from the red shirt. I've sewn one of the red pieces on one of the grey ones. The grey was right side up and the red has wrong side facing the right side of the grey. Once it was done, I've put one of the other grey pieces facing right sides together over the pieces I had just sewn and pinned the ears on each side. Put the two reds together, right sides facing, with ears sandwished in between, and sew. Turned around and my monkey hat was ready.

Here's how to cut the two shirts in order to get the best of existing seams and keep the hemming away.


This is a very quick project, so if you've been waiting until the last minute to make your costume, just start now and you'll have one in no time.

2014-03-05

Butterfly Costume for/from school


Yesterday's the official Carnival day here. But for my daughter is has started a couple of weeks ago when they started preparing it at daycare. 

In my child's classroom, each kid picked an animal to identify their stuff, and mine chose the butterfly. When Carnival was peeking through the corner, their teachers decided to choose the animals theme for their costumes. Each would wear the animal of their identifications. 

So, as I said, mine is a butterfly. I was requested to take a pink shirt and a pink pair of leggings. In fuccia pink. Well, she actually had both, but the tones of pink weren't really matching and I wasn't feeling like buying any of the pieces. What to do then? Refashion of course. 


I went to the usual charity shop and their had the right tone of pink (matching the shirt she already had) for 0,50€ in the form of a child's dress. I bought it with the idea in mind of transforming it to leggings, but then it had a little tulle ruffle and I knew the teachers were going to make a tulle tutu for the costume. 

I was already cutting when I notices I didn't take a before picture, so I did then. 

I took it to school and shared my idea with the main teacher. What if I did a dress instead and she'd wear it with some tights in the same colours as the wings (which they did at school)? She liked the idea, but then I realised that G. had no tights to match it so we went back to the leggings. In yellow for contrast. I knew I had a pair of (shorts) leggings of my own in yellow so I used them to rezise and make it for her. 

When I finished the whole thing, I took it to school to school together with the scraps and some pairs of tights of my own that I wasn't using anymore. One of them was the stars printed one that they have used to make the wings of the butterfly, which we all loved. The fabric scraps, were used to make the antennae. The school costumes were simple but they were all just too cute. 


As soon as she was outside and saw me and daddy, she was really dissapointed, telling us how she couldn't fly. The wings weren't working. She spent the previous day believing butterflies did fly because of their wings and now that she had hers, she couldn't. 
But don't worry... daddy and I found a way to make her fly... she couldn't be happier!

2014-03-04

Snow white Costume |Tutorial|


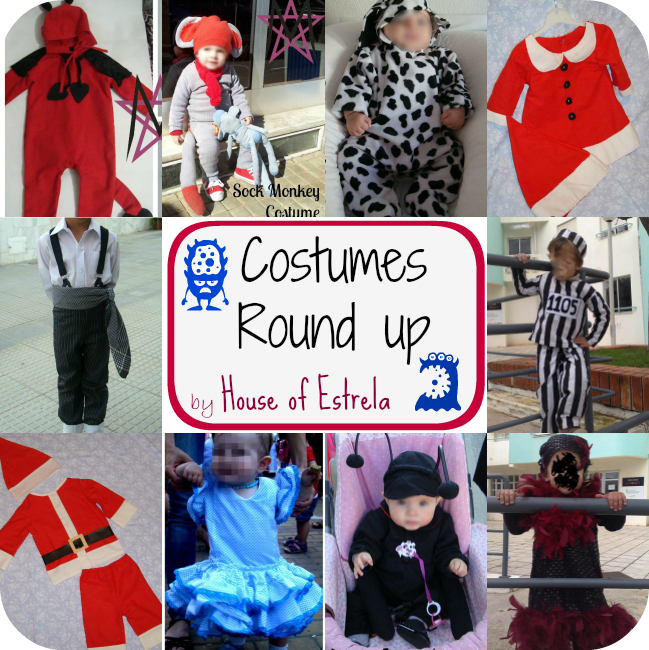
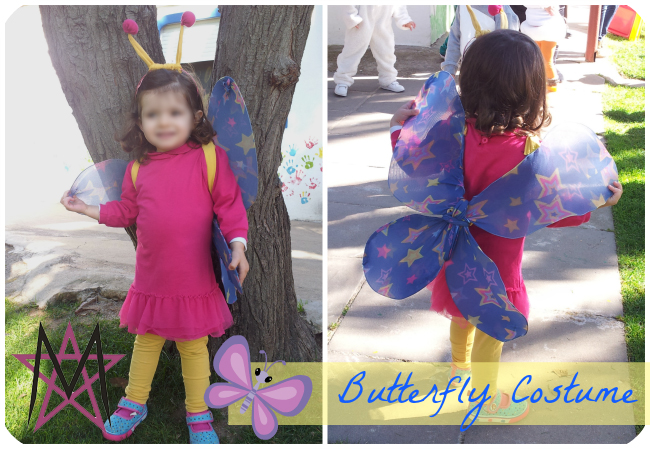
Yesterday I have shared the Snow White costume I made for my 2 year old daughter. Today, as promised, I will share the tutorial on how to make one on your own. I realised I haven't put together a lot of tutorials in this blog lately, and I came to find why. Sometimes, I'd start taking pictures as I start a project, but as I get my hands on the sewing, I get excited and forget to picture some steps. That nearly happened this time again, but I think I got enough to walk you through on your own costume construction. 

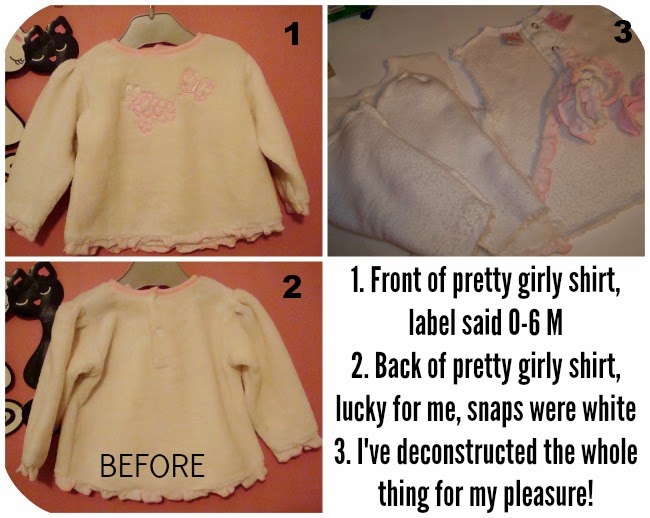
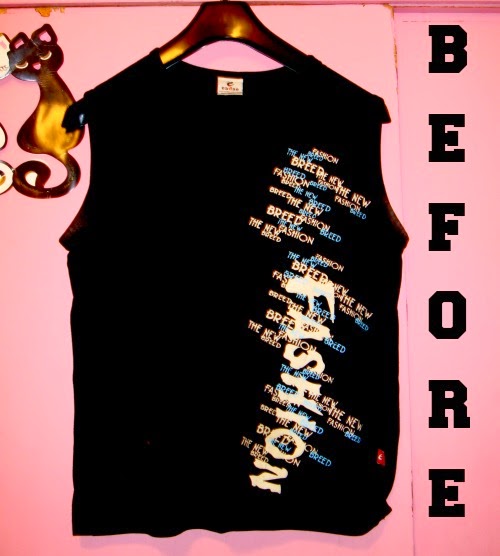
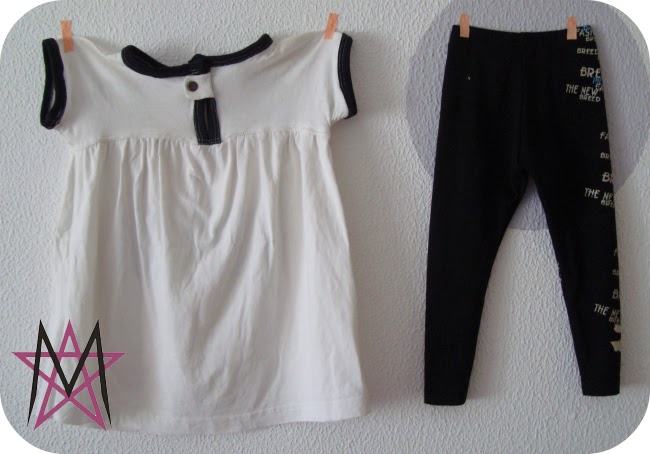
So, as said before, I started buying clothes in the colours I needed to sew my dress. I skipped the white collar and the cape... I know G. wouldn't feel comfortable with them so I just didn't get to the trouble of making them. 

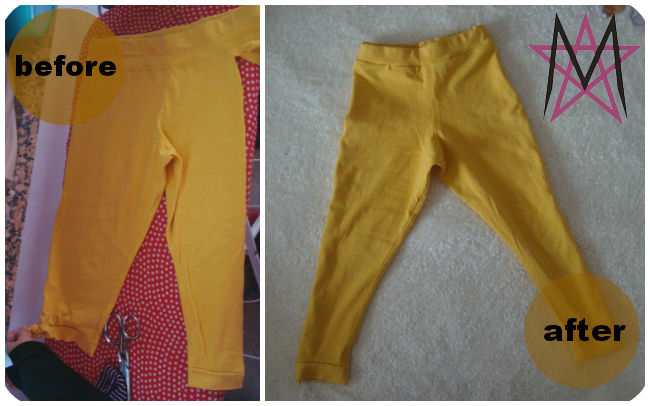
When I got home, I knew I would have to make a second skirt. The yellow I picked was so beautiful, it had some shining parts, but it was made of a very thin fabric, see through, and not appropriate for the low temperatures we're getting right now. Also, since I fell for the velvet dress I bought and decided not to use it, I had to search for another kind of dark blue and found a pair of pants and a dress that I added to the project. 


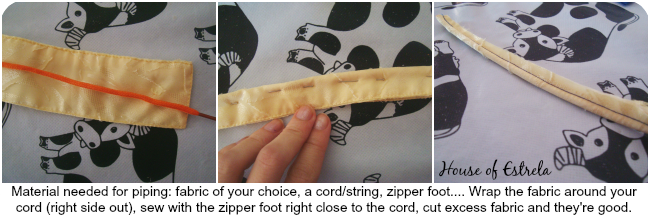
I started with the piping for the bodice. I made my own, but you can buy it ready made. I used one of the shirt's cuffs to make mine.


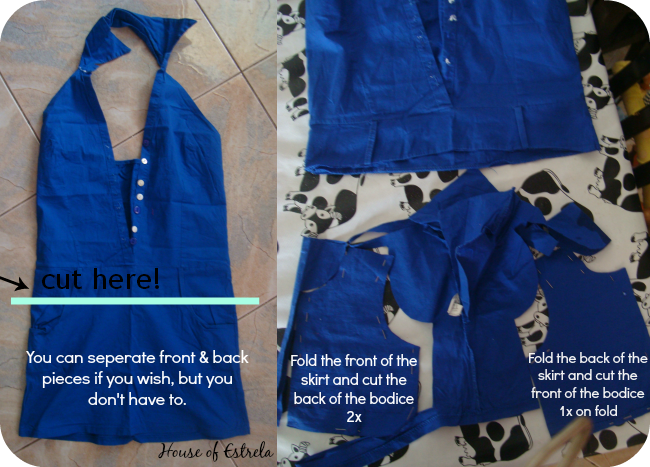
I cut the skirt from the dress and saved the rest, I didn't need it, the skirt was just enough for my kid's size.


And then put it all together. Pay attention, in my picture below, step 6 comes before step 5, the images weere switched, just follow the number order. After those 6 steps, we'll leave the bodice aside for now.


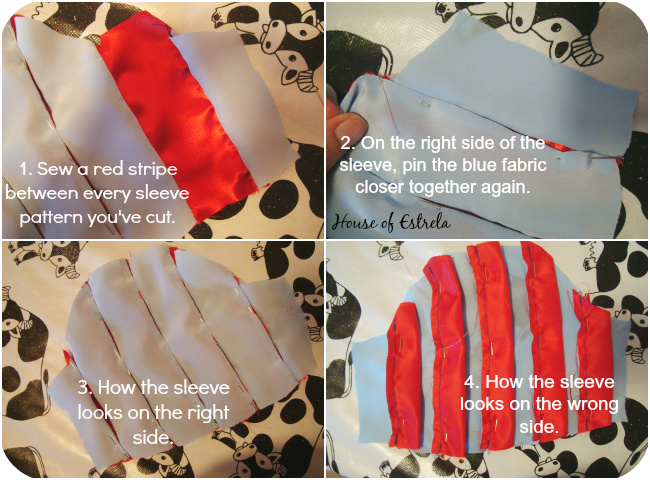
Now comes the trickiest part... at least it was for me. I had to alter the sleeves, so they could have the red peeking out of the blue. I had never done it before, so it was a try it out and see thing. It worked pretty well I guess. Because I was so focused on trying to get it right, this was also the part I started to take less photos. 


First I had to alter the sleeve pattern in order to make it more puffier. This pin might help you. Then I had to cut my pattern into 6 pieces (just measure the lenght and divide it by 6 and you know where to make the 5 cuts). You should had seam allowances to those new cut pieces of the fabric in order to get the sleeve in the right size. I felt lazy and didn't, crossed my fingers and hoped it wouldn't look too bad. It didn't! You should also cut 5 stripes of the red fabric for each sleeve... I made mine 6 cm wide and 20 cm long but you have to check it with your sleeve lenght.


I am sorry I don't have more photos of the process to share. But you know that if you have any doubts you can just ask me and I'll do my best to help you.

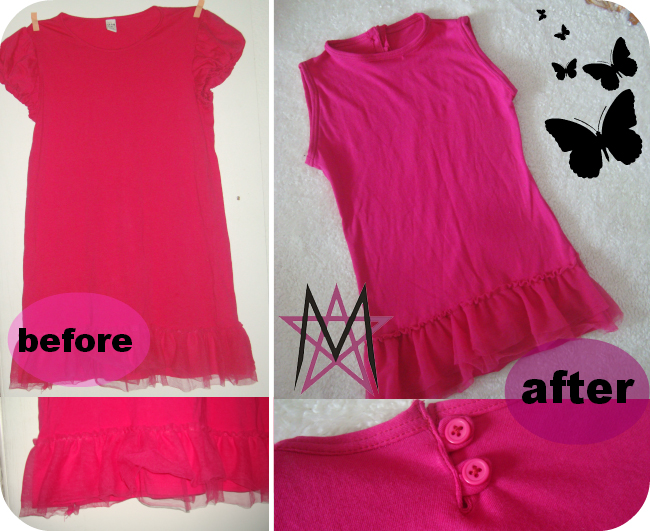
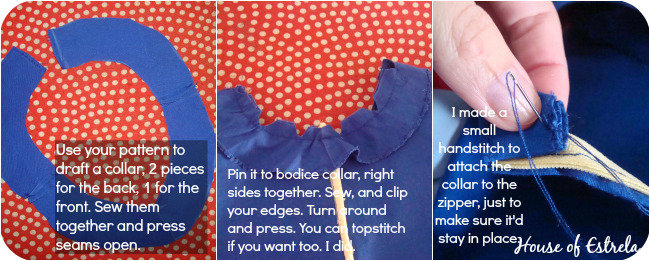
By now the top of your dress is finished. Well, not actually, we still need to finish the collar, I left it for last, because I was undecided. I didn't know if I should add a white peter pan collar or just leave it like this. I ended up with the second option, but I will show you how I finished the collar in a few steps ahead.

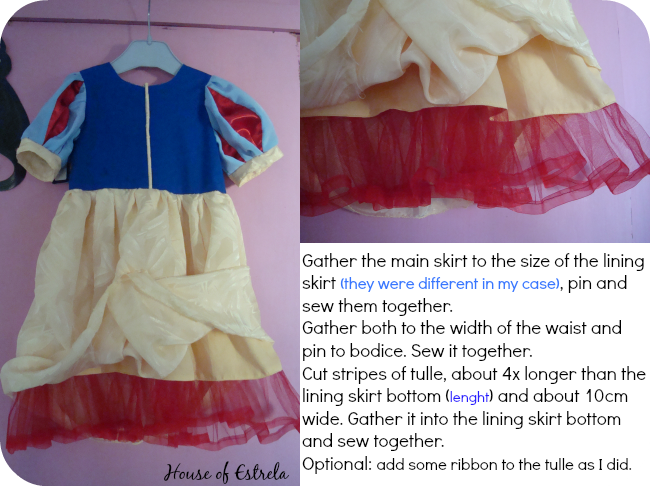
All we need to do now (apart from the collar) is the skirt(s) of the dress. And this is the easiest part. As you know I used the yellow pieces (shirt and pants) to make a two layer skirt for the dress. Here's how I cut them to create my skirts...

the shirt first:


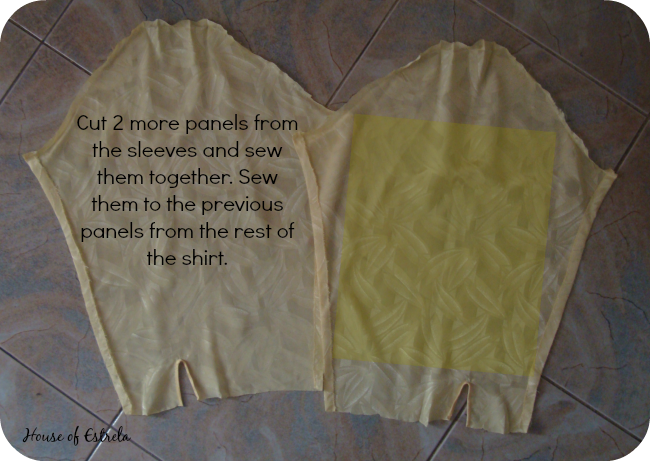
Then the sleeves from the shirt... 

All these together made for the main skirt. 

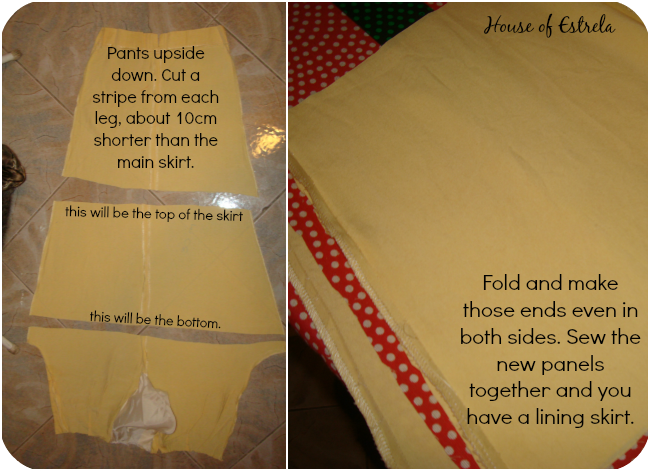
Then I had to cut the pants to make my lining skirt. Here's how...


My costume was almost done. I just had to add some details as the tulle, and finish the main skirt seam with a small tight zig zag stitch. Since it was a very light fabric is worked pretty well and I didn't need to do anything else. You can finish your own seam as you'd wish, of course. 


The last thing to do, is to finish the collar. And then you can go and play pretend in your own new, handmade Snow White costume (or your daughter as in here).


And done! I hope you've enjoyed it and found it helpfull. 

2014-03-03

Snow White Costume

A few days ago, I came here to tease you with my thrift finds. I told you I was going to make my daughter's Carnival costume and dared you to guess what was it from this photo... 


Congratulations... you all guesses well. 

But that was quite easy, wasn't it? 

I made her a Snow White costume and today's the big reveal - as if it was something that important... erhmmm... just play along 'k? As you can tell, I didn't use the velvet dress, I didn't find the courage to cut it. My mom was in love with it too when she saw it, and she also told me it would be a shame to cut it to pieces. 

I used the Bumblebee pattern by Sewing Mama RaeAnna as a base for this, mainly for the bodice, since I had to adjust all the rest to what I wanted. Because I have made a dress and a tunic for my daughter with this pattern before, I knew this would be the perfect fit I was searching for. 


Besides the items I bought at the charity shop, I also used a dress (to make up for the velvet one I didn't use), a pair of yellow pants (used as a layered skirt because the main one was too thin, and see through), a scrap of red satin and a piece of red tulle. Oh, some red ribbon too. I used the tulle on the linning skirt, hoping this would give a better look to the dress, more opened. 

It worked better than I hoped and G. is just so happy with her dress. She's wearing it today for the school Carnival party, and she wore it yesterday for a parade. 

If you wanna know how I made this, step by tomorrow, when I will be sharing a step by step to make your own. 

2014-03-02

Carnival (sort of) Series

photo source

The official day for Carnival over here is March 4th, next Tuesday. But celebrations have already started. On friday morning, some schools made parades with their classes. Each class usually picks up a theme and all kids are dressed up according to the theme, while others just go free. 

My kid's class theme was animals, and they have made their costumes too, but they didn't make it to their school parade because they are so young and two of the carers are away. I was sad when I knew about it, but at least they got to wear they costumes in school and play around. 

I am not one of the biggest Carnival lovers on earth, but I enjoy it too, so in celebration of the season, I have prepared a few posts for this week, according to the theme. I will be sharing how it was for my daughter is school last friday, I will share a couple refashioned costumes tutorials, I will reveal the costume I made G. this year and will also show you some of the past costumes I've made. 

I hope you all follow me in this mini-series of mine and enjoy the fun that Carnival is supposed to bring! 

Labels

About us Acessories Adult Adults Advent Calendar Appliqué Baby Baby Acessories Baby Doll Acessories Baby Doll Sling Baby Shoes Back Warmer Pillow Backpack Bags Barbie Beading Beads Bedsheets Beret Bibs Bikini Blankets Blazer Bleached Blog Tour Blogs Blouse Bolero Book Covers Book Review Boots Bowling Game Boxers Boy Bracelet Bralette Breastfeeding Pillows Briefs Button Shirt Button Up Shirt Cap Cardigan Carnival Causes Cell Phone Stand Challenge Create Charger Support Chevron Christmas Clutch Coats Commitments Constant Change Contests cookies Corset Cose+ Costumes Cowl CraftingCon Crochet Crossstitching Cushions Dance Outfit dashiki Dia de Los Muertos Diaper Pouch Doll Clothes Dolls Drawstring Bags Dreamcatcher Dress Duvet Cover e-book E-Zine Review Easter Embroidery EnglishPaperPiecing Fabric Baskets Fabric Chess Game Fabric dolls Fabric Flowers Fabric Games Fabric Memory Games Fabric Printing Fabric Stash Fabric Three in a Row Game Fabric Toys Features Felt Flamenco Dress Flamenco pants Food Free PDF Pattern Fun Cakes Funny Fur Gifts Girl Giveaway Glasses Case Granny Squares Guest Posting Hair Clips Hair Clips Hanger Halloween Hand Warmer Pillows handbag Handmade Cards Harem Headband Henley Highlow Home Homemade Liquid Soap Hoodie How to Inspiration Jackets Japanese Sewing jeans Joggers Jumper KCW Keyring Kid's Choice Series Kid's Crafts Kimono Kleenex Purse Pouch knitting Knock it Off Leather lederhosen Leg Warmers Leggings lunchbag Maratón Telaria MashUp Series Maternity MeMadeMay; Men Mending Challenge Mini-Sofa Cover Mobile Mobile bag Mom's Monthly Wrap Up Needle Rolls Nightgown No Sew Nursery One Thimble Onesies Operation: Project 0$ Other Crafts Ottobre Overalls Pajamas Pants Paper Crafts Party Favours Party Time Patchwork Pattern Pattern Testing Pattern Tour Pear Puff Seat Pencil Case Pencil Rolls Peplum Peques de Cine Peter Pan Collar Pijamas Pillow Covers Pillows Piñata Cake Pinterest Challenge Pipe Cleaner Crafts Placket Pockets Plastic bags Dispenser Pleats Pocket Slings Podcast Pompoms Pouch Practising ´n Improving Project Run and Play Project Sewn Projects Pt Refashion Week Quilting Recipes Recycled Ribbon Organizer Recycling Refashion Month 2012 Refashion Month 2013 Refashion Month 2014 Refashion Month 2014 (2) Refashion Month 2015 Refashion Month 2016 Refashion Runway Refashioning Retro Reverse applique Reviews Ribbon Roses Robe Romper Romper Dress Romper Week Roots Round up Rucksack Saving Series Saving while Sewing Savings Made By Sewing Scarf ScrapsBusting Sequins Sew 20's Sew Along Sew Geeky Sew In Tune Sew-a-bration of Womanhood Sew-vivor Sewing Tips Shirt Shorts Skirt Skort Sleep Sack Slings Slippers Snowflakes & Lace Sock Monkey Socks Stitching Suit Surprise Sweater sweatshirt Swimsuit swimwear T-shirt The Hearties The Sew Off Thrift shopping Tights Tips Tissue Case Toddler Top Top 12 of 2012 Top 5 of 2013 Top 5 of 2014 TOP 5 of 2015 top 5 of 2017 Top Stitchers Trousers TSNEM Tunic Tutorial Tutu underpants Underwear Upcycling Vest Videos Vintage waistbag Wallet When things go wrong WIP Women Wreath Year Wrap Up

Cose +

Cose +
Magazine de Costura em Poruguês