2014-05-28

Nursing Nightgown

So, here's something I've never made before. A nursing nightgown. And there's always a special feeling attached to accomplishing a garment we've never tried before, isn't it? 


I already had two nursing friendly nightgowns to add to the maternity bag I have to carry to the hospital, but I thought a third would be pretty good. Besides, I know I'll spend my baby's first week, pretty much wearing nightgowns only. So, it was worth giving it a try and make myself a new one. 


And all I spent on it was 1,45€ (elastic and "clips" - don't really know the proper name for them). I was able to re-use what I already had once again. I used a baggy nightgown that I got in that huge pile of clothes I just blogged about a few days ago. The print was awesone, and it was made of a 100% cotton knit, so it was perfect for what I wanted. 

I didn't use a pattern. One of the other nightgowns I said I already had, was used to help me cut the new pieces. I sort of drafted the pattern for the chest part though, because I wanted it to work just right. I used 2,5cm wide elastic as bias and it worked just great. I had the elastic in my stash, but since I used pretty much the whole thing, I bought some more to replace it, if I hadn't it wouldn't cost 1,45€ but 0,50€ only. That's a good thing! 


The straps are a little darker than the elastic because they were reused from an old bra I wasn't using anymore. And, the two other changes I made, was adding a pleat in the front to allow for the belly... we all know it doesn't just dissapear after a baby is delivered, right?! 

And, I shortened it a bit, doing a new hem.I would keep the original one, I liked it, but there was a hole close to the hem, and I was forced to cut it a bit. It wasn't much though and it still is a modest gown I can wear in public (read: hospital). So, it is already packed in my bag and waiting for the day this little boy decides it's time to meet the world outside. 

2014-05-27

The Firecracker Dress (test)

I was one of Chelsea's lucky testers for her latest pattern The Firecracker Dress/Tunic. I was assigned the dress lenght, in size 2, because, you know, this is a little skinny girl I have here. Can't believe she'll be 3 next month.


This was a pattern I had to try first to find out that I love it. I liked it when I first saw it, of course, and that's why I wanted to test it for Chelsea in the first place. But not until I finished my own, and be closely aware of the details, and the possibilities, that I've actually fell in love with it. In fact, I have started another one already, in a bigger size.


Anyway, I was so happy to test such a quick dress to make. Three pattern pages only, no piecing or anything... that felt great for a change. I'll admit that patterns with too many pages to assemble together, make me a little annoyed. Of course, when the final garment is done, most of those times I just forget about how boring and time consuming putting them together was in the first place. And, of course (too), we only have to tape pieces together once. 


When I started sewing my dress, I had already seen a few tunic lenght options poping in the testers group, and because the tunic is a long one, I thought it would turn out a little too long as a dress, but NO, the dress is the prefect lenght for my little girl. She loved it so much, but I just might have to make her another one, in a different fabric because I made this as a gift for her little cousin - who's actually turning two next month too. 


Pattern calls for contrasting fabric in the bodice, since it is made of 3 separate pieces sewn together. So, sides and center should be in a different fabric, but I had this fabric I was given in a blog swap, and I wanted to use it, and I used it for the entire piece. I really liked to see my one-only-fabric-version, and I also thought maybe someone else was curious to see how it'd look like this. In the original pattern, the dress ties on the back with two bows, also in the pattern you will find different ways to tie it. I also did mine differently from any of the exemples. Here's how I did it...


And because my niece (who the dress will go to) is still on diapers, I also made a matching cover up. I am not so satisfied with it. I used a pattern I self drafted when my own daughter was 18 months, but it has no front or back, it is the same pattern piece for both, and it looks a bit weird. Not too mention I think this will be too tight on her legs... we'll see.


Oh, this is such a little dancer approved dress. She loved to move and swing and twirl in it. All in all, she was excited the day we shoot the photos (daddy did), and most of them are just too cute.

2014-05-26

WIP: maternity

I thought I wouldn't be sewing anymore for myself. Not until after I gave birth to mister S. but here I am currently finishing another garment for mommy. And this is a very handy one... any guesses? I just need to buy some little supplies to have it ready. I think I'll be able to finish this today! Yey! I'm excited!


2014-05-21

Pinterest Inspiration


Because I feel like sewing something and don't know what to sew... I have been going through my Girly Inspiration board on Pinterest. These two photos did get my attention (click on them to get you there, if you want to)... Do I feel inspired? I might feel inspired! 

I should start my Pinterest Challenge again... I should do so much, but,where's the energy? There are some things happening backstage again, I wish I was able to show them all right now, but I can't. 

2014-05-20

featured

Click image to take you to the post. 

Pam over Threading my Way featured my bag on her blog. 

2014-05-18

Let's talk about (piles of) clothes

It's been quiet here in the blog. I am 32 weeks long by now, the weather got warmer, and I feel more and more tired by the day... 

I've been sewing - a little - though. But most of all I spent a lot of time doing laundry. Lots of it, until I started to notice some water was coming out from the back of my machine and flooding my kitchen floor. It took us a whole week to get the problem solved and yesterday - finally - everything was ok again. Now there's a whole lot of laundry to do, because, even though I had washed most of what I had to, the pile grew in a week of impossibility to do any laundry at all. 

But why did I have so much laundry to do in the first place? Oh yes! Guess what?! I was donated lots and lots and lots of clothes. I have gone through it all, I first washed and fold it all, then count it. There were 89 pieces total (not to mention the ones I've put away to donate after a first selection as soon as I got home). My refashion pile has grown a lot and I don't want to keep it in stock for too long, I already have some ideas for someof the pieces I got. I might even make my first fedora hat... Some of those clothes went straight to my closet as they were, and some are waiting for me to get my after pregnancy body to see if they even fit me at all... the rest, of course, is part of the refashion pile right now. 

With the warmer weather, I've also been sorting through G.'s clothes, putting away what doesn't fit anymore, so many winter clothes. I've donated so many already and try to sell others, but I am not yet ready to part from my handmades. Not yet! It's funny, I can easily donate my own stuff, but I just can't pass away the things I did for her (or the baby once he grows out of his pieces too). The good news is that LOTS of the things I made her, are growing with her, and others are perfectly suitable for her brother to wear. 

I do have too much clothes in this house at the moment though. LOTS of bags, and boxes, and clothes on every single piece of furniture. I don't want my refashion goals to become too obsessive and lately I've been wondering if all these items and the "I won't give it away because I can turn this shirt into a pair of leggings" aren't cluttering too much already?! I guess I am feeling overwhelmed and I need to get rid of some of these bags of clothes. Actually I just took 3 bags to a charity shop on one day plus 5 more are waiting on my car to follow. They were mostly pieces from this last amount I was donated and G.'s clothes that actually still fit and some that don't... (you just wouldn't believe how many shorts my G. has - hence giving away things that still fit - and no, I am not talking about handmades). 

2014-05-12

When everything goes missing over here!

I usually spend most of my mornings online. Wasting my time, going through blogs, fb, e-mails, etc. Today, I took G. to daycare, went on buying some zippers and came home determined to continue working on some pillowcovers I was ordered. I pinned the first zipper to one, and went to my machine. Was just getting ready to change my zipper foot and start sewing when I realised, my zipper foot went missing. 

I don't know why it keeps happening to me lately, but apparently, in every single project that I put my hands on, something goes missing... It started with the snaps, which I found the day I got my post up. I bought two more colours by the way, and can't wait to add them to the onesies (one and two) I made for my baby boy and were still snapless. Then, I lost the elastic for the romper I did for G., and that one hasn't appeared yet. To finish that romper, I had to reuse some elastic from some old tights. 

Today, as said above, was my zipper foot. Because of this, I was able to organize my entire sewing/crafting space. I've put everything in the right place, some things were waiting for that for months. It felt good. I was looking for the zipper foot as I went but I wasn't that worried about it though, I have another sewing machine which foot I was counting on. I found it, and am ready to start working now. I have no clue where that other foot went to. I wonder if any of my cats decided to play with it and its hidden under any furniture or something?!

2014-05-09

My Bubblicious Romper |Kids' Choice & MashUp Series|

* Edited on the 11th with new photos!


Don't you just love when one project allows you to cross two different challenges from your to-do-wish-list? I do! I really do, because if I could, I would sew along every single online challenge I come across... just for the fun of it. 


I first posted this entry with a single picture of this romper. The one I've kept under these lines. I had just finished the piece and wanted to share right away, because it was the last day to link to Heidi's series Kids´ ChoiceThe sun was gone already, so I promised new daylight photos to be added the next day. it wasn't possible the next day, but here they are now. Back here (on photo below) I still had to add the elastic to the waist band too... again, I couldn't find the one I needed... just like with the snaps some days ago. It is frustrating to know you have those things, but still, you can't find them. Pregnant brains, what can I do?!


As I mention above, this project fits two challenges... the second is the Monthly MashUp series from the lovely Ajaire. I've been wanting to sew along for a while, and I am glad I finally did and will be linking to the series flickr group


I should tell you a little about my piece now. So according to the first challenge, I had my kid going through my stash and pick whatever she wanted to. I might have made her change her mind about some warmer fabrics, but she was free to pick any other fabric and to my surprised, she picked a solid purple pinkish, very light cotton fabric. I wanted to add some print, so again, I showed her the smaller fabrics/scraps... Her tendency was again solids. But then the flower printed fabric caught her eye and she picked that one. It was just enough for what I had in mind. I tried to ask her what she wanted (skirt, shirt, dress, etc) but she wouldn't give me a solid answer. I think she didn't really care. 


So, I guess it was in my hands to choose. Which was great, I could make what I had in mind to go along the Mash Up series. I picked my patterns. The Popover dress by Oliver +S (it's a free pattern) and The Bubble Shorts by DoGuincho. My idea was to make a bubble romper... I made a similar before, but instead of using the Bubble Shorts Pattern, I used Feather's Flights' Harem Pants pattern... you can see it here. I used the same pattern - with adjustments that I used back then for the top of the romper. 


I used the size 2T for both top and shorts part of the romper, and it's fun to compare how much she has groen, because the same size for the shorts, layed right above her knees just a few months ago when I did my first pair for the tour. The best part about it? She gave me a huge smile and a huge hug when I asked her "Do you like what mommy made with the fabric you chose?". I guess her reaction was a "Yes". I love to see it on her, and she loves to wear it, so we might do this kids' choice thing more often. 

2014-05-06

Cupcake Top |Sew Fab Bundle|

My blogging friend Sewing Mama RaeAnna has her Cupcake Top pattern as part of the Sew Fab Bundle. If you plan to purchase, please use her affiliate link: https://www.e-junkie.com/ecom/gb.php?ii=1340680&c=cart&aff=238015&ejc=2&cl=200637 (affiliate).

I was a lucky tester for this pattern, and have made two more after. Definately a pattern I will turn to again in the future. 


I messed up the collar of the last one... but that was my fault! =( 

Muse of The Morning Pattern Tour |Billy Bright Eyes Snappy Tee Shirt|

Note: I was provided with a free copy of the pattern by the designer, but all opinions are my own. 


I was so happy at the chance to try and review one of the Muse of The Morning Patterns for this tour. I have to be honest, I didn't know them before and having the chance to pick one out of them all, was exciting. Chrissy has lovely patterns, and I was about to claim another one for myself, but I will have a boy soon, so after all, I picked the Billy Bright Eyes Snappy Tee Shirt

I didn't have any basic pattern for a snappy shirt and this one comes with four different options for the sleeves. Not to mention that it has 9 different sizes - from 3 months to 6 years - and it's perfect for boys and girls. I love it that it starts at 3 months, because it is so hard to find good patterns for such smaller sizes. 


I've cut two of these actually, but for today, I have only the one I made for my little girl (you'll have to come back here later, whenever I get the refashioned long sleeved one for the boy, done)... this one I am sharing today is a 2y sized one, and it fits my daughter perfectly. I picked the size according to the measurements chart, so I am happy we got such a good fit. 

Because there is the Kids Choice series going on, I allowed her to pick the fabric (she had picked some other before for another piece, where she could chose from my entire stash). I gave her all the knit options I had, and to my surprise, she picked a solid pink/salmon knit I dyed and had used just a few days before to make a pair of shorts for her (pattern testing, I will share later too). 


I was going to make the entire tee with that fabric, but when the time came to attach the neckline band to it, I felt blue. My fabric wasn't stretchy enough to allow it to fit the entire neckline. But it wouldn't stop me, of course. I've picked the same rib knit I used for the (previously mentioned) test shorts, cut it to the pattern piece and it was just right. Everything was ok. I really liked how the collar looks.


That wasn't everything that went slightly wrong with me (and I want to make sure you read it right: me, not the pattern itself). I had purchased a whole new bag of plastic snaps. I have never used them and was excited to have a project to try them on... if I only knew where I've put them. I just couldn't find the damned bag of snaps, so I've taken the time and have sewn some metallic ones as I have been doing before. I know they are not as pretty, but it works.


This has everything to be a quick and very satisfying project, but it took me hours - no kidding - to get it done. I was waiting for bedtime to sew it, but guess what?! In between the collar that I had to re-cut, the poor quality thread I picked and was constantly breaking when using my twin needle, sewing snaps AND a kid that just wouldn't fall asleep for more than 2 minutes and then start crying and calling for her mommy, I thought I wouldn't get it done ever. But once the little lady fell asleep, the thread behaved and everything seemed to start working as it should. When I finished, I was happy at how professional it looks. 


I loved this pattern, I am sure I will be using it again and again, and it's a basic pattern that we can also easily adapt to our needs, and patterns like that we all should have in our collections. The little miss was happy about her new shirt too. I think it's the the genes, but I am realising lately that she'll choose solids over patterned fabrics. Maybe she's just used to it?! 

If you want to get any of Muse of The Morning patterns, here's a coupon code BLOGTOUR30 to get you 30% all patterns sold through the website until May 15!!! And if you rather try your luck, don't miss the giveaway HERE.

2014-05-05

Maternity Bag Tutorial & free pattern |Sew-a-bration of Womanhood||


You might have heard about the Make for Mom Series last year. It was hosted by the Shaffer Sisters, and this year it's back with a brand new name (see why they have changed it here), and it is co-hosted with Ajaire from Call Ajaire (she's got her own series going on too, called Monthly MashUp, have you heard of it?).

I feel more than honoured to be part of this Series, and join all these wonderful and talented ladies in a celebration of the womanhood. Because we are just more than moms, and because we deserve to love ourselves the way we are.  

I first thought about making myself an outfit, but because I've been participating in Challenge Create, I was able to sew myself some brand new pieces to fill my wardrobe. So, I quickly knew I needed to make something else. Apart from the clothes I made through the competition I mentioned above, I don't get to sew much for myself lately... or ever since I became a mom. My daughter, and now the baby that's making his way into our family pretty soon, take all my attention and sewing time. I was happy I had to make something for myself this time. It forced me to sew what I really needed. And I made myself a maternity bag, to take to the hospital when delivery time comes. It will also work great as a sports bag later, or other purposes. 


I confess it turned out better than I had expected. Only one thing went wrong, I tried to home-laminate my fabric (I have done that before for small wallets), and was planning a tutorial for that too, but my fabric just wouldn't take the plastic. It would fuse to the iron board fabric, or the fabric I had betwen the plastic and iron, and still wouldn't fuse with my polka dot fabric. After two tries I gave up. I was just hoping to get my bag a little thicker but it worked just as is. 


This bag is quite easy to sew, simple. There are only a few features to point out... the long hangers and the side pocket, perfect to hold a bootle of water or anything else you need on hand when using it. I picked this fabric I had in my stash since my daughter's birthday last year. It is the same I used to make her birthday outfit, and more recently a skirt. The hangers were recycled from two men hoodies and the zipper was previously part of a leather bag I destroyed a few months ago. 

Of course, making a pattern to share was on top of my intentions, so a pattern was created. And, you can find it HERE. If you want to make your own bag too, grab the pattern in the previous link, check out the supplies needed and follow the next steps to make it. 

* My measures are in metrical system in the picture, but I'll add it in inches in the steps, so pay attention. *

Let's start our bag, shall we?! Just one more thing, you can do option one which is exactly like mine, or option two with an extra pocket on the other side. If you chose to make option two, note that you should cut two pocket pieces. 


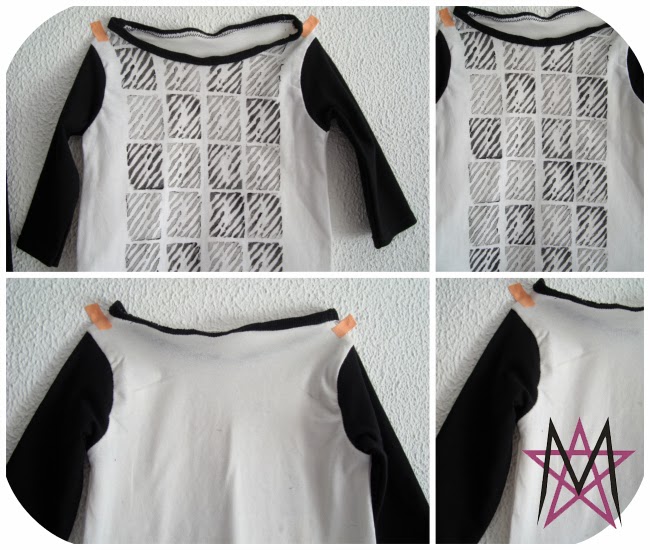
Start by cutting all your pieces. Grab pieces number one, it will be the zipper "panel" on top of the bag; and press 1cm (3/8") towards the wrong side as shown in image 1. Get your zipper (21" or longer - you can cut the excess later) and sew the pattern pieces you just pressed to it. First one side (2) and then the other (3). 


Let's get pattern piece number two now. It will make the side and bottom of our bag. Press 1cm (3/8'') to the wrong side again at each shorter edge (4). Pin one edge to the previous pieces you sewn to the zipper and sew too (5). and the other edge to the second edge of the zipper pieces too. You'll get like a full circle piece. 


We'll go to the pocket now. Pin and sew the corners with a 1/6" seam (6), fold about 2,5 cm (1'') - as marked on pattern piece, press (7) and sew in place (8). 


With a savety pin, inssert your elastic (5 1/2'' long, and 5/8'' wide) in the seam you just sewn (9), pull it carefully until it reaches the edge, pin in place (10), and keep pulling your elastic until it reaches the other edge (11), pin too and take your savety pin off. The red from the fabric in the photos, doesn't make it really easy to understand, but I will try my best to explain it to you. Grab the previous pieces you've sewn together. Match the top of your pocket (the elastic side) to the edge right before where your zipper starts (the pocket should be lined with pattern piece number two). Pin it in the sides (12) and bottom (13). Sew the bottom of the pocket. If you want to add a second pocket, just repeat the steps. 
I did this before I sewn those previous pieces together while making mine, and then I realised it hasn't been the greatest idea ever), so I am trying to show you the easiest way to make it. 


Not much left to do, right now. Get pieces number 4 ( I call them side panels) and your ribbon/hangers. Start by pinning one edge to the bottom of the bag piece, following the pattern marks (14) and sew in place. Note that you don't sew all the way up, only until the marking on the pattern. Then add the other edge to the second marks, and sew in place too. Repeat with the other piece. Find the half of you bottom piece (pattern piece number two), and the half of the side panels too. Pin them together (with right sides together) and start pinning the rest of the patterns from there. Sew them in place. Once you get one side panel attached, repeat for the next. Your bag is done. All you have to do is to finish your seams. I did a zigzag stitch, but you can also finish it with a bias tape, it will look prettier on the inside. 

And that's it. We're done. I hope these instructions were clear enough. You can always contact me if you have any doubts. 

Don't forget to follow the series, on Shaffer Sisters and Call Ajaire... looks how many guests they have all along:

2014-05-02

A week of features?

Yes! This makes me so happy when unexpectedly I see other bloggers featuring my projects in their blogs. Well, I know, I link to their parties and of course there is always a chance to be featured, but most of the times, there are so many great projects shared in such links, that we don't expect to be picked. 

This week, my tiny clothes were featured over Feather's Flights


and my latest look for Challenge Create was featured over The Inspired Wren and Peek-a-boo Pattern Shop.

Labels

About us Acessories Adult Adults Advent Calendar Appliqué Baby Baby Acessories Baby Doll Acessories Baby Doll Sling Baby Shoes Back Warmer Pillow Backpack Bags Barbie Beading Beads Bedsheets Beret Bibs Bikini Blankets Blazer Bleached Blog Tour Blogs Blouse Bolero Book Covers Book Review Boots Bowling Game Boxers Boy Bracelet Bralette Breastfeeding Pillows Briefs Button Shirt Button Up Shirt Cap Cardigan Carnival Causes Cell Phone Stand Challenge Create Charger Support Chevron Christmas Clutch Coats Commitments Constant Change Contests cookies Corset Cose+ Costumes Cowl CraftingCon Crochet Crossstitching Cushions Dance Outfit dashiki Dia de Los Muertos Diaper Pouch Doll Clothes Dolls Drawstring Bags Dreamcatcher Dress Duvet Cover e-book E-Zine Review Easter Embroidery EnglishPaperPiecing Fabric Baskets Fabric Chess Game Fabric dolls Fabric Flowers Fabric Games Fabric Memory Games Fabric Printing Fabric Stash Fabric Three in a Row Game Fabric Toys Features Felt Flamenco Dress Flamenco pants Food Free PDF Pattern Fun Cakes Funny Fur Gifts Girl Giveaway Glasses Case Granny Squares Guest Posting Hair Clips Hair Clips Hanger Halloween Hand Warmer Pillows handbag Handmade Cards Harem Headband Henley Highlow Home Homemade Liquid Soap Hoodie How to Inspiration Jackets Japanese Sewing jeans Joggers Jumper KCW Keyring Kid's Choice Series Kid's Crafts Kimono Kleenex Purse Pouch knitting Knock it Off Leather lederhosen Leg Warmers Leggings lunchbag Maratón Telaria MashUp Series Maternity MeMadeMay; Men Mending Challenge Mini-Sofa Cover Mobile Mobile bag Mom's Monthly Wrap Up Needle Rolls Nightgown No Sew Nursery One Thimble Onesies Operation: Project 0$ Other Crafts Ottobre Overalls Pajamas Pants Paper Crafts Party Favours Party Time Patchwork Pattern Pattern Testing Pattern Tour Pear Puff Seat Pencil Case Pencil Rolls Peplum Peques de Cine Peter Pan Collar Pijamas Pillow Covers Pillows Piñata Cake Pinterest Challenge Pipe Cleaner Crafts Placket Pockets Plastic bags Dispenser Pleats Pocket Slings Podcast Pompoms Pouch Practising ´n Improving Project Run and Play Project Sewn Projects Pt Refashion Week Quilting Recipes Recycled Ribbon Organizer Recycling Refashion Month 2012 Refashion Month 2013 Refashion Month 2014 Refashion Month 2014 (2) Refashion Month 2015 Refashion Month 2016 Refashion Runway Refashioning Retro Reverse applique Reviews Ribbon Roses Robe Romper Romper Dress Romper Week Roots Round up Rucksack Saving Series Saving while Sewing Savings Made By Sewing Scarf ScrapsBusting Sequins Sew 20's Sew Along Sew Geeky Sew In Tune Sew-a-bration of Womanhood Sew-vivor Sewing Tips Shirt Shorts Skirt Skort Sleep Sack Slings Slippers Snowflakes & Lace Sock Monkey Socks Stitching Suit Surprise Sweater sweatshirt Swimsuit swimwear T-shirt The Hearties The Sew Off Thrift shopping Tights Tips Tissue Case Toddler Top Top 12 of 2012 Top 5 of 2013 Top 5 of 2014 TOP 5 of 2015 top 5 of 2017 Top Stitchers Trousers TSNEM Tunic Tutorial Tutu underpants Underwear Upcycling Vest Videos Vintage waistbag Wallet When things go wrong WIP Women Wreath Year Wrap Up

Cose +

Cose +
Magazine de Costura em Poruguês