

2012-04-26
=)
I was featured... with my Maternity Tunic from a Man's Shirt Tutorial
for the second time at Mine for the Making. Thanks a lot Kara!
2012-04-22
Isn't she so lovely?
I've got a thing for the Barbie doll... I do, I've always had. Perhaps because my parents couldn't afford a genuine one when I was a child, I found myself buying one in my late teens. I just had to have one. And this was the first real Barbie I had. I didn't like the outfit she was originally wearing, so, I have made her a new one, of course. I guess I made this in 2010, but I am not 100% sure anymore. I did sew it by hand entirely.

I still haven't decided for a name for her. Any ideas?
Later I bought another one. One day I'll get around to finally make her a new outfit too and then I'll introduce her to you.
2012-04-18
Tutorial: Maternity Tunic from a man's shirt
I know I have my blog a little abandoned. It's just that I've been so busy with baby G. lately. She's been crying out for attention more than usual, and honestly, I spend too much time online. I want to follow all the posts from the blogs I follow and when I realise, I haven't even made the post I was thinking about, and it's too late, and I am completely tired and I go to sleep.
Besides fixing a pair of pants for myself, another one for my V. man and sewing the hems from G.'s bedroom curtains, there's nothing I've done worth sharing.
I've been trying to take photos each hour during one day but I always mess up at some point... so, I haven't made the A DAY IN PHOTOS post just yet either.
So, to keep it a little busy, I was searching for something I would like to share, and I thought it'd be a great idea to share a tutorial from a refashion I made while I was still pregnant. I've turned a man's shirt into a maternity tunic... Though I still wear it a lot, it's so comfy!

So, here's how I made it:
1. First I've separated all the shirt pieces. I am sorry I don't have photos of that process or from the original piece (the before). I tried to make nice pleats on the front piece. I don't know if you can understand by the picture, but I folded on each square from the fabric print to make 4 pleats. I started making them on the right side of the fabric but soon realised it had a mark from the front pocket... So, I used the wrong side as if it was the right side... no one could tell after all.
2. After pinning I linned it to sew it on the machine later.
3. The pleats were from the top to about the nipples. I ironed it flat before I sew.
 4. Then I sewed front pieces together (after cutting off the bottons and botton holes).
5. On the wrong side I basted it and ironed.
6. sewed all pleats into place.
 7. Then I grabbed the back piece and cutted it into shape to fit me.
8. Sewed front and back pieces together on the sholders. Basted and ironed.
9. I played around with some lace and ribbon to decide what to add to my tunic, in order to cover the front stitch (from sewing front pieces together).
10. Then drew and cut the sleeves, they were a 1/3 sized sleeves.
 11. Folded each sleeve, sewed it and basted.
12. Folded the sleeve's seam allowance twice (13) and pinned it.
 14. 15. 16Sewed it but left a little entrance to add some elastic.
 17. Then I cut a stripe about twice longer than the front piece.
18. Added some lace on the middle of the front piece, from top to botton. Sewed it in place.
19. Made a bias tape out of the same fabric and added it to the neck line of the tunic. And it was done.
 I know this isn't the best tutorial out there, but I just hope you enjoyed it, and maybe helped in any way...

So, here's how I made it:
1. First I've separated all the shirt pieces. I am sorry I don't have photos of that process or from the original piece (the before). I tried to make nice pleats on the front piece. I don't know if you can understand by the picture, but I folded on each square from the fabric print to make 4 pleats. I started making them on the right side of the fabric but soon realised it had a mark from the front pocket... So, I used the wrong side as if it was the right side... no one could tell after all.
2. After pinning I linned it to sew it on the machine later.
3. The pleats were from the top to about the nipples. I ironed it flat before I sew.

5. On the wrong side I basted it and ironed.
6. sewed all pleats into place.

8. Sewed front and back pieces together on the sholders. Basted and ironed.
9. I played around with some lace and ribbon to decide what to add to my tunic, in order to cover the front stitch (from sewing front pieces together).
10. Then drew and cut the sleeves, they were a 1/3 sized sleeves.

12. Folded the sleeve's seam allowance twice (13) and pinned it.


18. Added some lace on the middle of the front piece, from top to botton. Sewed it in place.
19. Made a bias tape out of the same fabric and added it to the neck line of the tunic. And it was done.

2012-04-10

2012-04-07
Featured again!!! Happyyyyyyyyyyyyy...
This time I was featured at Blissful and Domestic, from Danielle. I love her blog and it's amazing that she featured me too... =) Thank you deeply!


2012-04-02
Baby Boots
Hey there!
Here's something I've been planning to show you for a few days now.
G.'s new pair of boots:


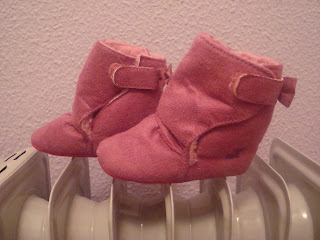

But this is what I got:

 And those were the best pictures she allowed! A 9 month old won't stop for a minute!!! ;)
Here's something I've been planning to show you for a few days now.
G.'s new pair of boots:

Yes! I made them matching the shorts and out of an adult pair of pants. But unfortunately it didn't turn out as well done as I'd wish.
I had in mind how I wanted them to be, and had started tracing a pattern for them, but then I came across the Boots Tutorial from Rose (A Rosie Sweet Home), and it was easier, so I followed her tutorial but still altered it to look more like the boots I had in mind.
This is what I wanted:


But this is what I got:


I thought about making the tutorial for these too, but I gave up half the way, since I was messing it all. Hope you like it though, they are weareable, though a little too big for her yet. She's got this very very very little feet, even for her age! Cindrella feet as I usually say!
2012-04-01
Gab's Blouse: The Tutorial
Well, I've been short on time to make this tutorial, that's why it took me longer than expected to post it. But I really wanted to make it, and when we really want things done, we always find the time to make them. so, it said, here's the promised tutorial of Gab's Blouse. Enjoy it! And don't forget to let me know if you use it. I'd love to see it.

What you need:
paper and pencil (to trace your pattern)
fabric of your choice and bias tape of a contrasting colour (you can buy ready made or make it yourself). I've told you how I make mine in the Ant Costume Tutorial.
elastics
Thread, a needle and a sewing machine
Scissors
Your kids fitting shirt and pins.
Note: I use cm in my tutorials, so click here to convert cm into inches! (if you need to).
I used a slightly bigger t-shirt from my baby girl to make her new blouse. I wanted it to fit for a little longer, that's why. So, trace the front and back pattern (1). You need to adjust it to the shape you want. I made the bottoms a little larger, as seen on picture (2). Also, draw a little line on the neckline (4), down a few cms (as many as you'd like, mine has about 10cm), cut it out and save that little piece, it is a pattern too (for the neck detail). Then trace the sleeves, and add lenght (3). Use 1,50cm seams allowance to all, except the neckline and bottom of sleeves (they don't need a seam allowance), and the bottom of the blouse, you'll use a 2-3cm seam allowance here.
 |
| I'm all about recycling, so I use the papers from the shops that they put on my mail box. |

Now, you have to do the boring part of the project. lol Cut a piece of fabric 10cmx20cm. Fold it in half and draw a line on the wrong side of the fabric (1). From that line you'll measure a few more to each side, with 1,50cm between each one. Get a needle and thread all the lines (2). Since we'll sew on the right side of the fabric, this will help us knowing how to fold it. A look on the right side of the fabric (3). Now, the boring part, fold each of this lines and make a seam at about 0,30cm from the edge. You'll end up with half the size your piece first had (4).

Press it, and make sure all the pieces are laying the same direction. Mine aren't perfect, but so wasn't the original one from where I copied this one... lol ... This is a picture of the wrong side.

Fold that little piece of fabric and use the piece of paper you've cut from the front piece of the pattern. Cut two of this, follow the pictures. No seam allowance on the rounded edge (2), and about 0,5cm in all the other. Cut on the fold (3) and add bias tape on this sides you've just cut, on the wrong side first, then turn it and sew on the right side.


There's no picture of it, but I've cut the corners into a round shape too. Get the front piece of the fabric and a sew this application into place. Make sure, the bias tape fabric, gets one on top of the other, like you see in the next picture.

Here's how it looks on the wrong side of the fabric. Baste it.

Once the hardest part of the project is done, let's get to the sleeves. Pin them like you see in the next picture, I made mine a little wider on the top so I could pucker it a little. Then sew it into place.

You can now add your bias tape to the neckline and the bottom of your sleeves (1). Cut the elastic to be confortable enough and introduce it in the bias tape of the sleeves (2). Then, you will pin from the bottom of your blouse, all the way to the wrist (3). Sew it and baste (4).

Only one more step and you're done. Baste, fold the seam allowance, on the bottom, pin it and sew it. I haven't because I was a little lazy (and only did it when G. used it the first time), but you should press it with your iron afterwards to make it look better, and have a nice finished look.


Subscribe to:
Posts (Atom)
-
 Today is the day The All Star Season over at Project Run & Play starts. I've been waiting for this day to post my own Art Inspire...
 -
PR&P's week two theme is " Spring Break "... We're suppoused to choose our dream vacation place and make an outfi...
-
 Back in September, I guest posted for Tasha over I Seam Stressed, while she was adjusting to her new life as mom of two. For that post, I...
 -
 No need to say: I went the punk way! I've put so much thought about this week that I nearly ended up with no time to join the w...
 -
Auditions for Sew-vivor season 2 at Family Ever After... have started today and I have been waiting until the very last minute to make up...


Cose +

Magazine de Costura em Poruguês