2013-11-22

16 things you didn't know about me

After reading Maegen's post, I suggested that she should have given a number to her readers too, so we could play along with it in our blogs. A bit later, I got an e-mail from her, she gave me the number 16, so here's sixteen things that you might have not known about me before (or maybe you did):

self portrait by me. 

1 - I'm half Portuguese and half Spanish. 
2 - Though my first year in school was in Portugal, the first language I learnt how to write was Spanish (the next year). 
3 - When I was about 5, I had dozens of people around me, trying to get my foot out of a wheel. I ended up in the emergency room. 
4 - When I was younger, I used to say I wanted to be a mother by the time I was 19. 
5 - Although we announced a wedding, I and "husband" have never done it after all. We're together though. 
6 - I had planned to become a mother by the time I was 23, but fate didn't want me to, and I was forced to "wait" until I was 27. 
7 - I love tattoos and I have got 5 of them. 
8 - I don't wear earings on my ears very often, but always wear a nose piercing. 
9 - I've never had my hair cut too short. 
10 - I have a birth sign/spot in my back. 
11 - I have no religion. I believe in Love. 
12 - I used to work in a health shop until my baby was born. I'm now unemployed trying to sew for a living. 
13 - I sew since I was a little girl, but only got better at it when I was about 18-19. 
14 - I am a very difficult person when I want to. 
15 - I'm the youngest of two girls. 
16 - I have a female cat named Wicca and a male cat named Lord Lestat. 

I hope you enjoyed it, and if you want to play along, I give you the number 22 and you should write 22 things about yourself.

2013-11-13

The Bumblebee Dress Pattern Tour & Giveaway

I've already said a lot about the Bumblebee Dress Pattern by Sewing MamaRaeAnna, but that's never enough or too much. If you still don't have your own pattern, RaeAnna has it available for 5$ until the 18th, or you can try your luck on the giveaway below. 


As I mentioned before, I was a tester for this pattern, and I fell in love. What I like best, is all the options and possibilities from this pattern. 


my first Bumblebee view B, my second Bumblebee turned into a tunic with pockets (find a tutorial to add pockets to this pattern here), and the unblogged third Bumblebee - just a peek for now

So, I am really honoured that not only I was able to test the pattern, I am also part of this wonderful tour. Seriously, have you seen the dresses that the other ladies in the tour have been sharing? There's a lot of creativity going on... Make sure you visit them, after reading all about my latest Bumblebee, which I confess, it's my fave of the 4th I've made. Actually, that and the blue one. 


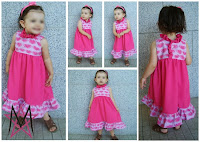
I refashioned again! My mom brought me this gorgeous green dress just a couple of weeks ago and I was in love with all the details. But it was too big for me and I wasn't in the mood to just resize it for myself. I had better plans for it. I started by cutting the buttom to make the skirt of the tunic, and guess what? It had exactly the same measurements that I needed for the 2T I was going to sew. I had another good and similar surprise when I cut off the ruffles out of the original dress and again, they were exatcly the same size the pattern called for. They were just too wide so I cut it to the right side. I also used scraps from the dress to cover up regular buttons and make them matching the rest of the tunic. 

I didn't make that many changes to the pattern, I have enlarged the sleeves and even though the pattern doesn't call for sleeves lining, I did, the fabric is so light and fresh, and I wanted it to be a little warmer, so she was able to wear it on warmer Fall or Spring days. I skipped the ruffles though. She has actually used it yesterday for daycare, a big success. 


The day we took the photos was a little cold so she had a the jacket put on most of the time. I just snapped a few quick pictures of her without it. She had a lot of fun posing again. She's getting all pro about it. hehe


And then she found a spot, it was perfect for her to sing us a song and play her show!!!


Cute or what?


2013-11-06

The Bumblebee Dress Pattern Tour

Last monday, the pattern tour for the Bumblebee dress by Sewing MamaRaeAnna has started and it will last until the 15th. I was one of the lucky testers for this pattern. I loved it so much, I did 3 dresses in just a couple of days. I have shared them here, here and a little turorial to add pockets to it, over here. The third dress was never blogged about. I will though. Don't worry, especially because it is one of the cutest little dresses I've ever done. I will also be part of the Pattern Tour, so if you want to check out what I did, step by on the 13th to see what I have for you. And make sure what everyone else has made with the pattern. 


2013-11-05

Pocket Sling Tutorial

Back in September, I guest posted for Tasha over I Seam Stressed, while she was adjusting to her new life as mom of two. For that post, I've put up a tutorial on how to do your own pocket sling. Today's, I am bringing it home, since all we think about now is Christmas and all the handmade presents we have to make, i think this should be a good idea to gift a new mom or a pregnant relative/friend in your life. Enjoy!

Since my appearence here is due to Tasha's baby boy's birth, I thought I'd come up with something every mom should have. Especially when they are still newborns (even though I used mine until my little one was around one year old, then she just wanted to walk everywhere and we slowly left it aside). I am talking about a baby pocket sling, of course.


I prefer pocket slings over ring slings by far, it gives me a better sense of security, but that might be just me. And today I will share a tutorial on how to do your own.


So, the first thing you have to do is take your measurements! - a bad thing about the pocket sling is that it will only fit you, in my case I had to make one for me and one for hubby, since he's much bigger than I am. To take the measurements correctly, you should use a sewing tape, place the edge on your shoulder's bone (the highest on your shoulder, it is), and cross the tape from your shoulder to the opposite hip bone. Like in the picture below.


For my sling I used a 28" measurement because I made it for a friend, and she's a large size, contrary to me, I believe my sling is 22", so if your measurements are somewhere between these, you probably got them right. That is important so your sling won't become uncomfortable when you use it.*

You'll need two cordinate or contrastic fabrics. I used linen for the lining and a plaid cotton for the main (though it is reversible, you can pick pretty fabrics and use them both ways - my advice is use as much natural fabrics as you can, because the skin of your newborn will be highly in touch with the fabric and you'll want the baby's skin to breath (I would often use flannel for winter babies). 

Start by folding your fabric (check image 1). The black arrows measurement should be at least 4" longer than your measurements (the one we took above). And between those two white arrows it should be 21" long. Fold again, this time the 21" in half (clearer on image 4 I believe). 
Start from the first fold and mark your measurements, in my case it was 28", add seam allowance (3/8" is enough - image 2). In the raw edge, the other one is folded. You should measure it in that side too, and add about 3" more (image 3). If you plan to make a few of these than it could be a good idea to make a pattern, I made one out of cereals cardbox (image 4) a while ago when I was selling slings and would make a lot of them. This was really handy. Pin it and cut off excess fabric (image 5). Unpin and open that last fold. Pin rounded edges and sew with a 3/8" seam allowance. Repeat it all over again with the other fabric. Press seams open. 

The next step is optional, you might just skip it. I don't usually add loops to my slings but I thought I should show you that option and besides, for people who get really confused (first times) on how to use your sling, it might help to know how to place it. 

Cut a small stripe of fabric (really as long as you wish, and about 1 1/2 wide). Fold it in half, and press. Open, fold one edge towards the center, press with your iron, do the same with the other edge (image 6). Fold in half again, press and sew as close to the edge as possible (image 7). You can do another row of stitches in the folded edge, but it's up to you. Place your loop and fold like shown in pictures 8 & 9. Press it. 

After sewing your two pieces of fabric you have created two tubes. Turn them to the right side, and pin your loop on the stitched line (image 10). Put fabric together wrong sides (one will be inside the other), pin and sew all around (image 11). Turn it right sides again. One edge will be sewn together the other will look like picture 12.
This can get tricky now, you have to put the seams together (right sides), but not turning the pieces inside out. I really don't know how to explain this in a better way, but I hope the pictures help (image 13 & 14), it will look all twisted but that's how it should be. Just keep pinning all around. We will sew this edge too but you might need to leave a little hole to turn your piece the right wy later.

HINT: I usually use two pins together to mark my opening starts and ends (image 16). 

Sew until you get to your opening, then switch to your longest lenght stitch (image 17) and sew the opening too. This will only be used to help you later, when it comes to hand stitch your opening. Once you've sewn, press your seam (the opening bitonly - image 18), open the seam and press to one side (image 19), and then to the other (image 20).  

 You can rip the stitches from your opening and turn the sling to the right side (image 21). Pin your opening (image 22) and close it with an invisible stitch (image 23). Press your seams flat all around (image 24) and topstitch it (image 25). And you're ready to carry your baby anywhere. I remember I would make household duties with my daughter in the sling, or I would breatfeed her as we walked in a market - no one could tell and she was always so happy.
Slings also make a great gift in baby showers. Just make sure you know the correct size for the person you'll be making one to.


* you can see in my dress form, the sling is too big for it, so it looks like the baby is about to fall down at anytime. That shouldn't happen when you get the right size. 

2013-11-03

Maratón Telaria | 2. Knits |

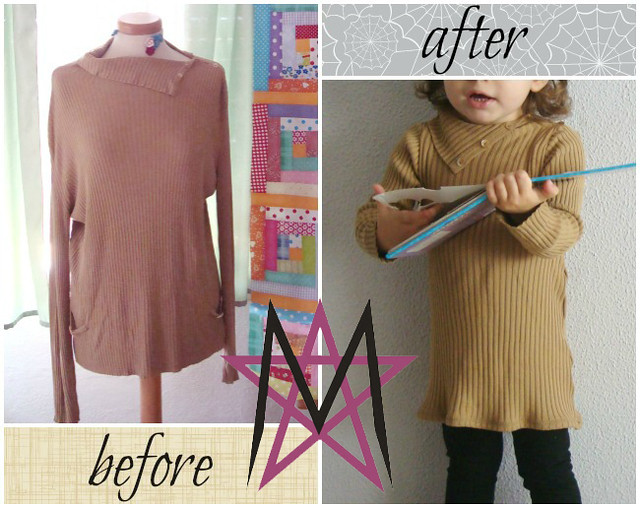
Again, on the deadline to enter the sew along group, here I am with my own entry fot the Maratón Telaria challenge. This week's theme, as you read in the tittle of this post, is knits, and I wanted to participate, but also wanted to do something that was quite easy and quick. 

For some reason, I've been feeling a little unmotivated to sew, and been leaving lots of planned sewing behind. Anyway, since I wanted something easy and quick I immediately thought I'd have to refashion, of course. And so, I grabbed a very large sized knit shirt that my mom brought me a while ago, it had been handed down to her neighbour and all the unwanted clothes always end up here, for me to choose from them all. I always have a good stash of clothes to recycle thanks to them. 

the real colour is the one on the little girl, which picture was taken on daylight

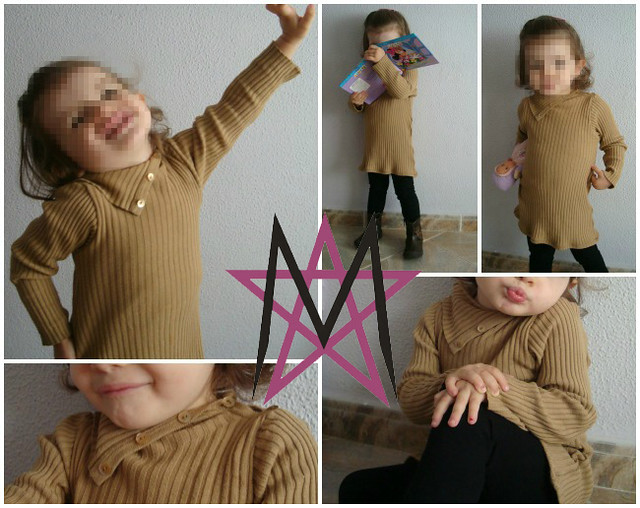
All I had to do, was to cut new, much smaller sleeves from the original ones, then cut resized front and back pieces. Stitched everything together with a zig zag stitch and a double needle stitch on the hem. Because I had to sew inside the neck turtle, which would then lay open on the outside, I cut a little stripe of the same fabric, and handstitched on top of the zigzag to cover the ugle stitches. It looks so good, you can't tell there is a fixing piece. 


The greatest part is that it can either be worn as a dress or a tunic. In those photos we paired it with leggings, but yesterday she actually wore it tights and it still looked adorable. I just thought it was a tiny bit shorter than expected, but it's still approved. And it is so great that she's finally enjoying getting her pictures taken. She even plays, and pretends new poses. I love it!

Oh, I did something else from the bottom of the shirt, I had a regtangle left and decided to make a little acessory, but I'll leave that for a future post, since I still don't have a picture to show you. 

2013-11-01

The Dreaming of Spring Blazer | day 4 of the Sew Along |

It's the first day of my sweet November, and our final entry on the blazer sew along. Yes, we are finishing it today. There's not much left.

New to the sew along? Here's what we've been doing...
day 1 
day 2 
day 3


Today is time to attach main fabric an linning together, and add the final touches. So, let's start by pinning main fabric piece and linning piece, with right sides together. The sleeves will be facing out on both pieces. Sew all around the edges but leave an opening on the bottom to turn your piece around. Turn it around. Pull sleeves, lining inside main fabric. Fold about 3/8" in each sleeve, and press it. Pin it and sew with an invisible stitch.
Close the opening you left on the bottom with an invisible stitch too. Press your blazer everywhere it need a good press, including pressing your lapelson the front. Put button placket pieces right sides together and sew. Make sure to clip the rounded edges, turn it around, press and add a stitch if you want to. I did as shown on image. Sew a button hole on the rounded edge. Sew it to the right side of your blazer front. On the other side, sew your button. And you're done!


And, here it is. My latest version of my Dreaming of Spring blazer. Which happens to be, as well, the first handmade Christmas present of the year. Now that the full tutorial for the blazer is here, I hope to start seeing a couple of blazers showing in the flickr group, and get a chance to get a free copy of Marta's Bubble Shorts Pattern. You have until the end of the month to participate. 

Labels

About us Acessories Adult Adults Advent Calendar Appliqué Baby Baby Acessories Baby Doll Acessories Baby Doll Sling Baby Shoes Back Warmer Pillow Backpack Bags Barbie Beading Beads Bedsheets Beret Bibs Bikini Blankets Blazer Bleached Blog Tour Blogs Blouse Bolero Book Covers Book Review Boots Bowling Game Boxers Boy Bracelet Bralette Breastfeeding Pillows Briefs Button Shirt Button Up Shirt Cap Cardigan Carnival Causes Cell Phone Stand Challenge Create Charger Support Chevron Christmas Clutch Coats Commitments Constant Change Contests cookies Corset Cose+ Costumes Cowl CraftingCon Crochet Crossstitching Cushions Dance Outfit dashiki Dia de Los Muertos Diaper Pouch Doll Clothes Dolls Drawstring Bags Dreamcatcher Dress Duvet Cover e-book E-Zine Review Easter Embroidery EnglishPaperPiecing Fabric Baskets Fabric Chess Game Fabric dolls Fabric Flowers Fabric Games Fabric Memory Games Fabric Printing Fabric Stash Fabric Three in a Row Game Fabric Toys Features Felt Flamenco Dress Flamenco pants Food Free PDF Pattern Fun Cakes Funny Fur Gifts Girl Giveaway Glasses Case Granny Squares Guest Posting Hair Clips Hair Clips Hanger Halloween Hand Warmer Pillows handbag Handmade Cards Harem Headband Henley Highlow Home Homemade Liquid Soap Hoodie How to Inspiration Jackets Japanese Sewing jeans Joggers Jumper KCW Keyring Kid's Choice Series Kid's Crafts Kimono Kleenex Purse Pouch knitting Knock it Off Leather lederhosen Leg Warmers Leggings lunchbag Maratón Telaria MashUp Series Maternity MeMadeMay; Men Mending Challenge Mini-Sofa Cover Mobile Mobile bag Mom's Monthly Wrap Up Needle Rolls Nightgown No Sew Nursery One Thimble Onesies Operation: Project 0$ Other Crafts Ottobre Overalls Pajamas Pants Paper Crafts Party Favours Party Time Patchwork Pattern Pattern Testing Pattern Tour Pear Puff Seat Pencil Case Pencil Rolls Peplum Peques de Cine Peter Pan Collar Pijamas Pillow Covers Pillows Piñata Cake Pinterest Challenge Pipe Cleaner Crafts Placket Pockets Plastic bags Dispenser Pleats Pocket Slings Podcast Pompoms Pouch Practising ´n Improving Project Run and Play Project Sewn Projects Pt Refashion Week Quilting Recipes Recycled Ribbon Organizer Recycling Refashion Month 2012 Refashion Month 2013 Refashion Month 2014 Refashion Month 2014 (2) Refashion Month 2015 Refashion Month 2016 Refashion Runway Refashioning Retro Reverse applique Reviews Ribbon Roses Robe Romper Romper Dress Romper Week Roots Round up Rucksack Saving Series Saving while Sewing Savings Made By Sewing Scarf ScrapsBusting Sequins Sew 20's Sew Along Sew Geeky Sew In Tune Sew-a-bration of Womanhood Sew-vivor Sewing Tips Shirt Shorts Skirt Skort Sleep Sack Slings Slippers Snowflakes & Lace Sock Monkey Socks Stitching Suit Surprise Sweater sweatshirt Swimsuit swimwear T-shirt The Hearties The Sew Off Thrift shopping Tights Tips Tissue Case Toddler Top Top 12 of 2012 Top 5 of 2013 Top 5 of 2014 TOP 5 of 2015 top 5 of 2017 Top Stitchers Trousers TSNEM Tunic Tutorial Tutu underpants Underwear Upcycling Vest Videos Vintage waistbag Wallet When things go wrong WIP Women Wreath Year Wrap Up

Cose +

Cose +
Magazine de Costura em Poruguês