2013-07-31

|day 30| Refashion Month Guest: Stacey from Boy Oh Boy, Oh Boy Crafts

Yes, technically I know it is the 31st already, my own fault that I couldn't bring it sooner to you. Today, the last guest from this series is Stacey from Boy, Oh Boy, Oh Boy Crafts! she's been one of my favourite bloggers for a while. She's a very talented mom of three! Go there and check for yourself!

Hi, I'm Stacey and I blog over at Boy, Oh Boy, Oh Boy Crafts.  I'm so excited to be a part of Refashion Month. I love the idea of taking something less than stylish or worn out in a few places and remaking it into something fabulous.  We've been living overseas in Europe where the thrift stores are more like outlets, so most of my previous refashions have come out of our closet.  I've very excited to be moving back to America, where I can utilize the amazing thrift stores in our area.
Here are a few of the refashions I've done this past year:  T-shirt Hoodie, Men's Dress Shirt to Kimono PJsT-shirt to Pullover, Lumberjack Pants, Ninja Kit, Pillowcase R2D2 Costume

Today, I'm sharing a super simple tutorial for changing an ill fitting maxi dress.  I've had this strapless maxi dress for a few years now and never wear it.  I had ordered it on-line and should have returned it.  It was just not flattering for my body.  Too much bulk on the top and who wants to go around wearing a strapless bra when they're wearing a comfy knit dress? 


To make the new dress while keeping the nautical style, I simply cut directly above the drawstring. 


Then I grabbed a ribbed tank, put it on inside out, marked where I wanted the tank to merge with the knit skirt, and cut 1/2 inch below this mark.


With right sides together, I pinned the tank and skirt together and sewed using a 1/2 inch seam.


And that's it!  A quick and simple refashion that takes a too frumpy dress and transforms it into something comfortable and cute. Thank you for having me today!  Feel free to stop by any time in our neighborhood.

2013-07-29

|day 29| Refashion Month Gues: Kaitlin from Wunderbar

Again, found Wunderbar by sweet Kaitin, through Refashion Co-op community. I loved her style, and besides that, I enjoyed a lot her small link party. Because it was a small one, we did really visit each others and get to know great refashionists. 

Hello! I'm Kaitlin from Wunderbar. I've been sewing since I was a child, but it wasn't until last summer that I realized the power of refashioning. I've had so much fun learning new techniques, opening my eyes to see different possibilities, and getting to know the incredibly gifted ladies of the Refashion Co-op. Thanks, Magda, for inviting me to join in on the fun! 
This was one of my early projects, but it's remained a favorite. 
This project was born when I fell in love with an over-priced Anthropologie dress and decided to recreate it for a fraction of the price. It turned out to be even simpler than I imagined!
I found an oversized denim dress at the thrift store for $4…
Then shortened the dress to the length I wanted the back (the front becomes slightly shorter in the next step) and took in the sides. 
To create the shirtdress look, I cut out one side to get the desired effect. (I played with pins first to make sure the arch was the right height – the nice part about creating your own shirtdress is you can make it a length that looks good on you! My arch was 4.5" at its tallest point, and it tapered to 1.5" in the front.)
I then pinned this cut out shape to the other side, cut again, and hemmed to finish the bottom. To finish the look, I made faux rolled cuffs and a belt from the excess fabric I cut off the bottom.
Take that, Anthro!

2013-07-26

|day 26| Refashion Month Guest: Kat from Sew Chibi

I'm so glad that Kat from Sew Chibi accepted my challenge to be part of the Refashion Month. I got to know her blog (better!) when we both competed in The Sew Off. I am pretty sure I had been checking her blog before, but I've only started following her by that time, when I realised I was missing great and colourful projects posted by her. What I like most about her style is that she does what I am most afraid of when sewing: risk it and mix bright and powerful colours! And she does it good! I am sure her kids are the happiest kids on earth! 

Greetings everyone!!!  I'm really quite pleased to be guest posting here at House of Estrela!  Truth be told, I am not an avid refashioner, but I do love a good challenge.  I have a reject box....err.. "box of good intentions" in the closet of my sewing room that I dabble in every now and again when I am in need of fabric.  Most of the time, I'd say I refashion old bed sheets into everything from custom piping to full blown outfits.
But this time, I took a sweater that I have been itching to refashion since it came into my possession.
My mom had hopes that I would just wear this sweater.  It was a bit big for me to ever consider wearing it out, so I started thinking of what I could make it into.
Originally I wanted to make it a hoodie but I didn't have the right size zipper nor the proper fabric for a hood.
So.

I made it into a sleeveless tunic for Azriella!!!
Only her head didn't fit in it.
So I chopped off my original neckline.
Enter the Bimaa cowl!  
I found a dress that was an ancient sewing fail, and I used it to fashion a cowl.  And wouldn't you know, the piece fit the neckline like a glove!  
 After that I figured I needed to do something with the sleeves.
Capri leggings!

I used a self drafted pattern from a pair of slim-fitting leggings.
And super quick, I had a comfy, hip refashioned outfit for Azriella!!

She loves it.

She loves it so much that she wore it for the next three days!  She was so sad to take it off!
 Nice!


Thanks so much Magda, for giving me the incentive to make this adorable little outfit for my girl!  I might never have gotten around to it if it weren't for you!
And come stop by sew chibi sometime and take a look around!


2013-07-24

|day 24| Refashion Month Guest: Mikelina from Mikelina Makes

Mikelina from Mikelina Makes, is our guest today. Another lady I met through Refashion Co-op not long ago. The reason why I wanted her to guest post in this series is simple: I love her retro style and her quite simple refashions that make all the little difference. I knew she would add something different and special, unique like herself. And look at what she brought us; don't you just feel like getting all retro too? 
Wow,

You know I'm still kind of reeling from being a part of this list of so many talented, incredible ladies! I feel like rookie of the year.
For those of you (most of you) who have no idea who I am my name is Mikelina and I like to make things but if you read the title of this post you probably guessed that. See, my creativity is already shining through.
Since my son was born I have been looking everywhere for a cute bathing suit, or tankini that will discretely hide the new-mommy belly I still have and support the new-mommy boobs that don't seem to be going anywhere anytime soon.
There are tons of retro suits that match this description...however none of them met my new-mommy budget. Since I'm generally not inclined to theft I did what I almost always do in these situation. I turned to my beautiful, very old, but still running.... I just realized my sewing machine doesn't have a name. I am not usually prone to oversights like that. Shall we make a commitment? By the end of this guest post my sewing machine will have a name!
Ready?
Steady?
Go!
I made a swimsuit top. A retro swimsuit top with a big bow. And, not only did I make a swimsuit top I made a swimsuit top out of an old maternity dress and an old, ill-fitting bra! Are you still with me? Okay!

Linda?
Step One:
Gather your materials.
Grace?

I started out with a bra that fit nicely before my son was born, and a dress that was a purchase of convenience on an incredibly hot and pregnant summer day last year.
There is nothing inherently wrong with the dress, it's just not me. If you've ever visited my blog you may be aware that "me" leans in the general direction of flourescent animal prints and graphic Ts and away from conservative blue stripes. So, what's a girl to do?
Luckily I have a (as of yet unnamed) sewing machine!
Anastasia?
Note: Make sure the material of your to-refashion garment is not cotton jersey, as it is easily waterlogged and can become heavy and shapeless. Ideally bathing suits would be made out of lycra but this polyeter/viscose combination has worked well for me.


Step Two:
Cut the bottom of the swimsuit off so that it measures from your hips (as high or low as you want it) to just below your bust. I also took it in so it fight tighter. Loose fabric in water is not so good unless your filming an overly-romantic scene in movie. In which case maybe just wrap a flowy white sheet around yourself?


Step Three:
Using the top of the dress you'll want to cut out four pieces for the bust. Since I had stripes to work with I cut them on the bias and got a cool chevron look. You'll also need a waist band to creat a more finished look and to support the girls.

Step Four:

Bra destruction! I cut the straps and waist band from my old bra so that it was ready for it's big transformation!

Step Five:
I sewed the two halves of the cups down the middle with zig zag stitch then pinned them around the ouside of the bra cup and folded the hem in so that it looked clean from both sides. I ended up sewing this piece by hand. The thought of trying to manipulate a bra in that tiny space under the presser foot was daunting. Plus I can hand sew an invisible stitch pretty well, little pat on my back (my hand sewing used to be atrocious).
Analiese?


Luanne?


Step Six:
Next I sewed the waist band from the outside of one cup to the outside of the other so that it had it's own support seperate from the body of the bathingsuit.


Step Seven:
Sew the former-bra-now-bathingsuit-bust to the body of the suit with zig zag stitch.
And for that final touch I sewed a tightly stretched piece of elastic up on side and sewed two long ties just underneath so that it looked like it was gathered but without the danger of unpleasant ungathering.
Oh, and we'll need some straps.
Ta da! Done right? Oh, wait...wait a minute what is that?


Ah! Proof that my refashion is a refashion. The bane of my refashioning existence. You can tell that this bathingsuit top used to be a bra because of that tiny little rose. Damn you little fabric rose. I will defeat you! With uh...

Scraps apparently. Not particularly menacing? Fortunately I have some wonder friends here to help me out!


Allow me to introduce Benny the Pincushion Beaver and The Fabric Shears of Doom!


Sewing powers unite! Form off...


Wait for it...

(Name? Name? Name?)


Step Eight:
Big retro girly bow! And now for a much more appropriate...

TA DA!!!


I want to thank Magda once again for inviting me to be a part of this group of extremely talented women. I'm pretty sure I'm stilll blushing.
-Mikelina

Mercedes! Her name is Mercedes. And Perhaps my serger will be Edmond. How romantic!

2013-07-23

|day 23| Refashion Month Guess: Melissa from Melly Sews

Melissa's blog, Melly Sews, must be one of those blogs I follow for years and can't get enough. Not only does she refashion, but she shares a lot of sewing tips, tutorials, blog tips... And, do I need to mention she's the owner of Blank Slate Pattern Shop? I'm pretty sure you've heard or used her patterns before, right?!

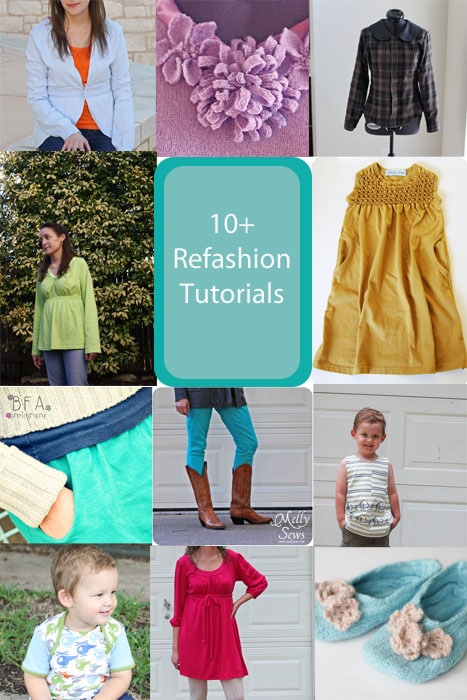
10 Refashion Tutorials 

Hello House of Estrela readers! I'm Melissa, from Melly Sews, and I love to refashion. I didn't realize how much until I started looking through old blog posts to find refashioning posts I've done. So I'm so excited to be here during Refashion Month.


So, click on any picture to go to the post and see some of my favorite refashions.

   
flannel feltedslippers24 dyedjeans
violetflowers1 mellysews033copyweb Snail t-shirt knock off with free printable iron on t-shirt transfer by Melly Sews
gold3 Melly Sews dress refashion

Labels

About us Acessories Adult Adults Advent Calendar Appliqué Baby Baby Acessories Baby Doll Acessories Baby Doll Sling Baby Shoes Back Warmer Pillow Backpack Bags Barbie Beading Beads Bedsheets Beret Bibs Bikini Blankets Blazer Bleached Blog Tour Blogs Blouse Bolero Book Covers Book Review Boots Bowling Game Boxers Boy Bracelet Bralette Breastfeeding Pillows Briefs Button Shirt Button Up Shirt Cap Cardigan Carnival Causes Cell Phone Stand Challenge Create Charger Support Chevron Christmas Clutch Coats Commitments Constant Change Contests cookies Corset Cose+ Costumes Cowl CraftingCon Crochet Crossstitching Cushions Dance Outfit dashiki Dia de Los Muertos Diaper Pouch Doll Clothes Dolls Drawstring Bags Dreamcatcher Dress Duvet Cover e-book E-Zine Review Easter Embroidery EnglishPaperPiecing Fabric Baskets Fabric Chess Game Fabric dolls Fabric Flowers Fabric Games Fabric Memory Games Fabric Printing Fabric Stash Fabric Three in a Row Game Fabric Toys Features Felt Flamenco Dress Flamenco pants Food Free PDF Pattern Fun Cakes Funny Fur Gifts Girl Giveaway Glasses Case Granny Squares Guest Posting Hair Clips Hair Clips Hanger Halloween Hand Warmer Pillows handbag Handmade Cards Harem Headband Henley Highlow Home Homemade Liquid Soap Hoodie How to Inspiration Jackets Japanese Sewing jeans Joggers Jumper KCW Keyring Kid's Choice Series Kid's Crafts Kimono Kleenex Purse Pouch knitting Knock it Off Leather lederhosen Leg Warmers Leggings lunchbag Maratón Telaria MashUp Series Maternity MeMadeMay; Men Mending Challenge Mini-Sofa Cover Mobile Mobile bag Mom's Monthly Wrap Up Needle Rolls Nightgown No Sew Nursery One Thimble Onesies Operation: Project 0$ Other Crafts Ottobre Overalls Pajamas Pants Paper Crafts Party Favours Party Time Patchwork Pattern Pattern Testing Pattern Tour Pear Puff Seat Pencil Case Pencil Rolls Peplum Peques de Cine Peter Pan Collar Pijamas Pillow Covers Pillows Piñata Cake Pinterest Challenge Pipe Cleaner Crafts Placket Pockets Plastic bags Dispenser Pleats Pocket Slings Podcast Pompoms Pouch Practising ´n Improving Project Run and Play Project Sewn Projects Pt Refashion Week Quilting Recipes Recycled Ribbon Organizer Recycling Refashion Month 2012 Refashion Month 2013 Refashion Month 2014 Refashion Month 2014 (2) Refashion Month 2015 Refashion Month 2016 Refashion Runway Refashioning Retro Reverse applique Reviews Ribbon Roses Robe Romper Romper Dress Romper Week Roots Round up Rucksack Saving Series Saving while Sewing Savings Made By Sewing Scarf ScrapsBusting Sequins Sew 20's Sew Along Sew Geeky Sew In Tune Sew-a-bration of Womanhood Sew-vivor Sewing Tips Shirt Shorts Skirt Skort Sleep Sack Slings Slippers Snowflakes & Lace Sock Monkey Socks Stitching Suit Surprise Sweater sweatshirt Swimsuit swimwear T-shirt The Hearties The Sew Off Thrift shopping Tights Tips Tissue Case Toddler Top Top 12 of 2012 Top 5 of 2013 Top 5 of 2014 TOP 5 of 2015 top 5 of 2017 Top Stitchers Trousers TSNEM Tunic Tutorial Tutu underpants Underwear Upcycling Vest Videos Vintage waistbag Wallet When things go wrong WIP Women Wreath Year Wrap Up

Cose +

Cose +
Magazine de Costura em Poruguês