Showing posts with label Coats. Show all posts

2020-11-12

Rerelease of The (Buzz Puffer Coat and) Mackinaw Coat by DbCA


I just had the chance to work with one of my favorite people of the sewing community, again, that is Ajaire, from Designs by Call Ajaire... and it was great. I had my mind all set on sewing only the things that were really necessary for my kids, but somehow I found myself signing to sew yet another coat for my daughter... of course, she has at least 5 more, but I just couldn't pass on the chance to try on the Mackinaw coat. 


And it payed off. The girl loved it so much! She's been a picky rat and it kinda makes me frustrated when I think she's gonna love something and then she doesn't. Oh well, so happy it wasn't the case, because, this little fellow here needs a little love, time and dedication to be finished. 


I won't lie and say it is the easiest project out there. It isn't, but IT IS one of those so worth the time and work you spend on them! Besides, in case I just scared you away because you've only sewn a t-shirt in your life; don't worry, you can still sew it, the pattern comes with great instructions you just have to follow, and with patience, you'll end up with a great coat for your little one, and you can drool over it.


Don't believe me? Just look how beautiful it gets on the inside? It is fully lined and depending on your choice of fabric it can be pretty warm and cosy too. I used a medium weight cotton for the main, and this absolutely adorable polka dot satin in one of her fave colors. I actually bought this one and the same day, I knew where I'd use it. Not what I bought it for - as I had a cute set of top and shorts, as in pajamas for me, but well, I gave it a use use anyway. 


What about this back? I love the back. I love when I sew a pattern and it has something new to me. I had never sewn a belt loop like this before, so interesting. And just one more thing... How did this girl grow up so much? Or when? Because I look back and it seems she was just a tiny little human not long ago. Her shoulders are nearly as wide as mine, I know I am small, but gosh, she's 9. I made her a size 10, which fits her as you can see, BUT, if it wasn't for the too short sleeves, it would fit me to - as a shorter kinda coat, of course (yes, I do like to try her clothes too...ahahaha). 


And there you go. Happy girl, happy mom. Check out all the features of the coat on Ajaire's shop, both the Mackinaw Coat and the Buzz Puffer are on sale until November 15th, 50% off people!!

2020-05-04

Wool Vintage Dress into Long Coat

Scroll down for English,please . 


Há alguns meses atrás vi um casaco de lã bastante parecido ao da foto abaixo. Forreta como sou, achei que o mesmo custava mais do que eu estava disposta a pagar, principalmente porque eu não estava mesmo a precisar de um novo casaco, e além disso, sou baixinha e tanto os casacos como os vestidos compridos das lojas nunca me servem. Porém, levei uns dias a pensar nele, o que significa que gostei mesmo dele.

A few months ago I saw a coat at a local shop pretty similar to the one below. Cheap as I am I thought it costed more than I was willing to spend, especially because I really didn't need a new coat, and to add to it, I am too short to buy ready to wear long coats. I kept thinking about it for a few days, which is a sign I really liked it. 


Depois passou-me algo pela cabeça. É que eu tinha este vestido de lã vintage na minha pilha de "para reciclar", a cor bem parecida e tudo. Era ainda "novo"- com etiqueta. Comprei-o por 1€ mais uma vez, na tal loja maravilha a que eu ia e que agora fechou de vez. Comprei-o porque era muito tecido, e bastante quente para o preço. 

Then something crossed my head. I had this wool vintage dress in my "to refashion" stash, color very similar to the one I saw. It was "new" - tag on. I bought it for 1€ again, at that wonderful shop I used to buy from, and can't anymore because it''s closed for business. I bought it because it was a lot of warm and heavy fabric to use for that price.


Não era a coisa mais bonitinha, mas vi-lhe potencial. Originalmente tinha duas pregas em cada lado na frente e na parte de trás, com punhos e carcela num veludo castanho. As mangas também têm as pregas, mas não lhes toquei, e ainda não estou muito convencida. 

It wasn't the prettiest thing but I saw potential. It originally had two pleats on each side of the front and the back, with cuffs, collar and button placket on a velvet brown fabric. There were pleats in the sleeves, which I didn't change, but I'm still not sure about it. 


E ficou assim depois das alterações que lhe fiz. Um casaco longo em lã como eu queria. Bem, na verdade sinto que poderia ter algumas melhorias, mas já lá vamos. Deixem-me guiar-vos nas alterações feitas. Para começar, descosi as costuras da feia carcela e desfiz as pregas. Cortei o que sobrou do tecido, usando-o assim nos grande bolsos que adicionei na frente e nas vistas. 

After the changes I worked, this is what I got. A new, long wool coat just like I wanted to. Well, actually I feel like I still could work on it a bit, but we'll go there. Let's me guide you through the changes done first. To start, I unpicked the ugly button placket and undid the front pleats. I've cut the extra fabric I got after doing so, and used it for the new big pockets I added on the front. I also used the rest of that fabric to make the bindings.


Atrás, desfiz as ditas pregas e criei uma mais larga no centro. A principio queria apenas coser no centro e usar o tecido sobrante para outra coisa qualquer, como punhos novos ou um cinto, mas ficava muito estranho. Optei por fazer assim e acabei sem tecido a mais para o resto. Os punhos originais foram à sua vidinha, e consegui dar um bom valor de costura na bainha dos mesmos, que costurei à mão. 

On the back, I unpicked those pleats too, and created a single one in the middle. At first, I thought about just adding a seam in the middle and cut the excess fabric to use elsewear, as new cuffs or a belt, but it didn't look too good. I chose this option though and was left with no more fabric for the rest. The original cuffs were gone, and I was able to sew a nice size hem, which I sewed by hand. 


Precisa de cinto. Eu sei. Estou a ponderar cortar um pouco da altura depois de ver as fotos, mas entretanto o tempo aqueceu, por isso não creio que o faça antes do próximo inverno (ahahah). Essa bainha foi toda ela costurada à mão, tal como o acabamento nas vistas. Mantive o colarinho feioso, já não tinha tecido para o substituir, no entanto, consigo viver com isso. E esta foi uma das primeiras coisas que costurei quando começou a quarentena, tal como a primeira transformação em meses, já tinha saudades. 

A belt is needed. I know. I am considering cutting a bit on the bottom after doing these photos, but in the mean while the weather got warmer and I don't think I'll do it until next winter (ahahah). That hem was also hand sewn as well as the binding finishes. I kept the ugly collar, I had no fabric left to swap it, but I believe I can live with that. And this was one of the first things when quarentine started, as well as my first refashion in months, I missed it. 

2018-03-16

PR&P15 |Temple of Artemis inspired|

Scroll down for english, please!


Estou a costurar a par do Project Run & Play outra vez! Tive que ir espreitar a última vez que o fiz porque já nem me lembrava. Desde que vi que vinha uma nova temporada fiquei bastante empolgada e ansiosa para que começasse. O tema para a primeira semana são as 7 Maravilhas do Mundo e eu inspirei-me numa das Antigas: O Templo de Artemis. Fiz uma pequena pesquisa para saber mais sobre ele e encontrei infinitas possibilidades de o representar na roupa da miúda. 

I am sewing along Project Run and Play again! I had to check what my last entry about it was because I couldn't even remember. Somehow, I felt quite excited about this newest season, and couldn't wait for it to start. First week's theme is 7 Wonders of the World and I went with one of the ancient: The Temple of Artemis. I did a little research just to get to know more about it and I saw endless ways to represent it in my kid's clothes. 


Para vos ajudar a perceber por onde fui, ficam aqui os tópicos pelos quais me guiei. Então, é um templo Grego (embora tenha sido construído na Turquia) e foi dedicado à deusa Artemis, deusa da caça, florestas e dos animais selvagens. É frequentemente representada a carregar arcos ou setas. Eram-lhe oferecidos itens valiosos como jóias, etc. 

To help you understand, I listed the topics I noted before coming up with a design. So, this is a Greek temple (though it was built in Turkey) and  it was dedicated to the hunt, forests and wild animals goddess Artemis. Artemis is often depicted carrying a bow or arrows. People used to pay tribute to her by offering valuable items as jewellery, etc. 


Primeiro pensei em fazer um vestido, com inspiração nos drapeados e tecidos da antiga Grécia, depois mudei de ideias e procurei um look mais descontraído. Um casaco de pêlo pareceu-me uma boa maneira de começar,  representando os animais selvagens e a caça. Só tinha este tecido em pêlo meio esverdeado em casa ( que comprei a pedido da miúda!) e foi mesmo este o escolhido.

I first thought about making a dress, using greek-like fabric and drapes, then I changed my mind for a more daily look. I thought about making a fur coat to represent the animals and the hunt. I only had this greenish fur available (which I had previously bought under her request) and that's what I used. 


Para o forro usei dois tecidos diferentes, o verde que tem uma tonalidade linda e que me foi oferecido, e o de xadres verde e branco que usei no pequeno bolso secreto e também nas mangas porque não tinha suficiente do verde sólido. Para que o xadrez não se visse, coloquei uma barra do verde sólido no final das mangas.

I used two different fabrics for the lining, the solid green, which is gorgeous and was a gift, and the chess fabric which was just a scrap from my stash. I used this one on the little secret pocket and also on the sleeves because I didn't have quite enough of the solid green. I added a solid green band on the bottom of the sleeves though so the chess wouldn't be noticed. 


Usei o molde #11 Super Sweet da Ottobre 4/2015 para o fazer, e alterei-o mudando a frente e adicionando o forro. Os tamanhos deste molde vão do 86 ao 122 cm. Fiz o maior para ela, ainda não está bem nos 122 cm mas também já não tem apenas 116 cm e não quis arriscar, mesmo porque estamos em Março, supostamente entramos este mês na Primavera e o casaco terá mais uso no próximo inverno do que propriamente neste.

I used the #11 Super Sweet pattern from Ottobre 4/2015 to make it, and changed it by lining it, and slightly altering the front. The sizes start at 86 and go up to 122 cm. I made her the biggest one, she's not quite 122 cm yet, but she's not 116 cm anymore either, and it was saver like this, especially because we are in March now and Spring should be just around the corner, so this will get to be used more often next winter. 


Depois queria fazer-lhe um top e pintar algumas setas nele, mas encontrei por entre os meus tecidos um resto deste com a penas que usei para mim anteriormente (aqui) e que também me pareceu bem, e então em vez do top fiz-lhe uma t-shirt com o molde Hickory and Spice Henley, já que a vontade de a fazer vinha desde que fiz a versão menino para o meu filho.

I then wanted to make her a tank top and paint some arrows on it, but I found this feathered fabric in my stash and that I had used on me before (here) and figured this would look good too, so instead of the tank top, I made her a Hickory and Spice Henley, which I had been meaning to since I made the boy's version for my boy. 


Porém não fiquei lá muito satisfeita, e deve-se à minha escolha de tecido. Este é demasiado fino para o molde, e escorregadio, por isso não fiquei satisfeita com o resultado - as expetativas estavam lá em cima mas não correu tão bem. Penso que também deveria ter brincado mais com os diferentes tecidos e ter usado o preto na gola e no acento dos ombros como fiz com a dele. O modelo perde-se um pouco quando usado apenas o tecido principal. 

I wasn't so happy with how it turned out after all, and that was because this fabric was too thin and slippery and I disliked how it turned out. Expectations were high and it didn't meet them. I also think I should have used more color blocking on the shoulders and collar details, as I did with his. The designs gets a bit lost because I used the same main fabric. 


Tinha planeado fazer uns calções também, mas esqueço-me sempre que a vida se mete pelo meio e nem sempre o tempo chega. Já não consigo sacrificar horas de sono, ficando a costurar noite adentro como fazia quando só tinha a mais velha pequenina e não trabalhava fora, nessa altura apesar de tudo, era mais fácil costurar. Agora já não consigo, não chego a tudo, e os calções ficaram ali, cortados e meio costurados, na minha mesa de costura. O molde que estou a usar é da Burda. 

I had also planned a pair of shorts to go along, but I always forget how life can get in the middle and time is never enough. I just can't stand very late night sewing as I did when I had just one toddler and was a stay at home mom. It was easier to get some more sewing time back then, when I sacrificed hours of sleep. I just can't do that anymore, I can't reach it all, and my shorts are cut and started, but unfinished on my sewing table. I am using a Burda pattern. 

2016-02-22

Bella Sunshine Designs Birthday Blog Tour

Scroll down for english, please. 


Já devem ter reparado que tenho publicado muito menos, quase que inconscientemente tenho-me obrigado a parar, ou pelo menos a abrandar. Praticamente, deixei os testes e os tours mas quando passa por mim a oportunidade de experimentar algo que realmente gosto, tento agarrá-la. E foi precisamente isso que aconteceu com o que vos trago hoje. Quando vi que a Melissa estava a celebrar o primeiro ano da Bella Sunshine Designs, e procurava bloggers que festejassem com ela numa tour, inscrevi-me e escolhi fazer o Gabriella Winter Coat, que é, um dos moldes mais mimosos que já vi e sem dúvida o melhor da designer. 

As you might have noticed, I have been posting so much less than I used to, it is like I have unconsciously been forcing myself to stop in an way, or at least slow down. Basicly I have left the tests and tours aside, but every time a very good oportunity to try something that really pleases me comes across, I still try to grab it. And it's exactly what happen with today's post. When I noticed Melissa was celebrating her Bella Sunshine Designs first year birthday, and she was looking for bloggers to join her in a tour, I signed and chose to sew the Gabriella Winter Coat, which is one of the sweetest patterns I've seen and not doubt to me, it is the best one from the designer.


Para este tour, foi-nos pedido para brincar com o molde, o que se revelou um pouco difícil para mim. Primeiro porque gosto tanto dele como é, que simplesmente não conseguia pensar em nada que pudesse fazer diferente. Comecei por escolher o tecido. Para o exterior, usei o resto que me ficou de um outro casaco, que era na verdade uma toalha de mesa comparada em saldos há uns anos com o intuito de a transformar em corpete. O tecido é puro poliéster, leve e fino, portanto ai já eu estava a inventar, uma vez que o molde pede um tecido mais pesado. Para o forro, escolhi a cambraia com borboletas azuis que comprei ainda este ano e que a minha G. adorou. 

We were asked to hack a pattern for this tour, which turned out to be a bit hard for me. First of all because I love this pattern just as is, I just couldn't think of any ways to hack it. I started by picking the fabric. For the main, I used what's left from a previous jacket, which was in fact a table towel I bought in sale a few years ago, wanting to make a corset with it. The fabric is pure poliester, it is light and thin, so it was a hack already, since the pattern calls for heavy fabric. For the lining, I chose the batist I bought already this year with the blue butterflies that my daughter loved. 


Continuei sem saber muito bem como dar um toque meu ao molde, por isso lá andei a ver imagens do molde costurado por outras pessoas para me inspirar, e no meio de tantos comecei a formar uma ideia. Ideia essa que passava por adicionar uma capa ao casaco - as duas peças cosidas juntas, e uma gola em pêlo. Mas este meu plano foi por água abaixo quando comecei a cortar no tecido e vi que não tinha suficiente. Assim que tive de procurar uma outra solução, que acabou pela gola do casaco. No original apresenta uma gola de pé (ou mandarim), que eu dispensei e substitui por esta que desenhei - pequeno passo a passo de como o fiz, no fim deste post. 

I still didn't know how to give it a touch of me to the pattern, so I googled images of other people's creations with this pattern, and suddenly an idea formed in my mind. This idea was to add a capelet to the coat - sewn together of course, and then add a faux fur collar too. But this plan of mine was totally ruined when I started cutting my fabric and realised there was not enough fabric to do it. I had to search for a different solution then, and it ended up by changing the collar entirely. The original pattern has a stand up collar, which I skipped and replaced by this one I drafted - there's a small tutorial on how I did it at the end of this post. 


O Gabriella Winter Coat, tem um ar clássico dado pelos botões duplos na frente, mas também pelo corte e construção. Forrado por completo tem um ar muito profissional quando terminado. Não vou mentir, é composto por muitas peças sim, são 18 peças e muitas folhas para colar. Torna-se um projeto mais longo de terminar mas que vale muito a pena. As instruções estão ótimas, com imagens claras, tudo bem explicadinho para qualquer um conseguir fazer. A parte mais difícil para quem tem menos experiência, penso que sejam as costuras mais arredondadas, que também não são nenhum bicho de sete cabeças. 

The Gabriella Winter Coat, has a classic look given not only for the double raw of buttons on the front, but also for the princess seams on the bodice. It is fully lined with a very professional look when finished. I won't lie to you, it is made of a lot of pieces, there are 18 total, and a lot of pages to tape together. It is a long project to make, but hell it is worth it to. The instructions are great, well illustrated and everything very well explained, so anyone can do it. The hardest part for the less experient ones might be sewing the rounded seams, but apart from that, it ain't hard at all. 


O molde vai dos 6 M aos 12 anos e fiquei bem tentada a fazer um para mim, já que estou mesmo ali nas medidas dos 12 anos, tenho um pouco mais de anca só, mas o casaco tem bastante roda para acomodar esses poucos centímetros a mais, já que a peça da parte de trás é um circulo completo que dá um toque super interessante ao casaco. Para além deste casaco, acabei ontem também um vestido usando o molde Holiday Cutout Dress and Top, da mesma designer. Molde que já tinha usado aqui, e que voltei a usar agora, com uma pequena alteração. Podem vê-lo em breve aqui no blog. 

The pattern goes from 6M to 12Y sizes and I am quite tempted to sew one for myself, since I am right there in the size 12 measurements, I just have a bit more on my hips, but the coat has enough room to accompdate those extra centimeters, since the back is built out of a full circle piece, this gives a very interesting touch to the coat. Apart from this coat, yesterday I finished a dress with the Holiday Cutout Dress and Top, from the designer. I had used this pattern before, in here, and I used it again, with a little twist. You can check it out here in the blog soon. 


E foi assim que alterei a gola do meu. 
1. Para desenhar o molde, utilizar as duas peças frente e trás e unir os moldes pelos ombros.
2. Contornar para uma folha de papel à volta das duas peças.
3. Desenhar o formato desejado para a nova gola - eu optei por fazer assimétrico para que me permitisse manter os botões da parte de cima sem ter de os coser por cima da gola no lado esquerdo.
4. Cortar no tecido principal e no forro e costurar juntos deixando as pontas mais abertas.
5-6 . Virar, vincar com o ferro e pespontar a cerca de 0,50 cm da beira.
Depois é só costurar na gola do casaco entre o forro e o tecido principal, segundo as instruções.

Here's how I changed the collar.
1. To draft the new pattern piece, I used front and back pieces and put them together by the shoulders. 
2. I drew a line around them to a sheet. 
3. I drew the new shape I wanted to give to my collar - I chose to make assymetrical so I could keep the buttons as they were, not having to sew any buttons on top of the left side of the collar. 
4. Cut once on main and lining fabric and sew them RST, leaving the short ends open. 
5-6. Turn them, press and top stitch about 1/4" from the edge. 
Then you just have to keep sewing according to the instructions,sandwishing the collar between the main and lining when you sew those together. 

Agora vai e aproveita para ver as alterações que outras bloggers fizeram aos moldes. Eu estou super curiosa. Há também um sorteio a decorrer e outras novidades... Segue os links abaixo indicados. 

Now go and check other blogger's hacks. I know I am super curious to see them. There's also a giveaway going on and more surprises... Follow the next links. 

Featured Bloggers:


Sponsors:

Birthday Blog Tour 2016-04


Prize Number 1:

once-upon-a-yard

Bella Sunshine Designs - 2 Patterns of Choice Once Upon A Yard / Sew It Seams Facebook Group - Grab Bag of 7 yards of fabric

Prize Number 2 (Just for the USA):

Birthday Blog Tour 2016-10

Bella Sunshine Designs - 2 Pattern of Choice Bethany Lane - 3 Sets of "Cute as a Button" wooden buttons (30 buttons total)

Prize Number 3:
BSDLogo


Bella Sunshine Designs - 2 Patterns of Choice Sofilantjes Patterns - 2 Patterns of Choice Knot Sew Normal - 1 Pattern of Choice Muffin Head Patterns - Any 1 pattern up to $12.00 Itch To Stitch - 1 Pattern of Choice Rachel Rossi - Squared Fashion Wrap Sewing Pattern FABulous Home Sewn - 1 Pattern of choice Seaside Notions - 1 pattern of choice Laela Jeyne Patterns - Pattern of choice (excludes bundles) Pickle Toes Patterns - 1 Pattern of choice.

Enter the giveaway:

Hurry, the giveaway ends on Sunday, February 28th at midnight! 


Celebration Sales:

Mabel Madison - 10% off their website with coupon code BELLABIRTHDAY until February 29th. Sew It Seams - 15% off their website with coupon code BELLASUN until February 29th. 
And of course, you can get 40% off all Bella Sunshine Designs patterns on our website until February 29th. No coupon code needed! 
Ready for one more surprise? Check the Bella Sunshine Designs's website on Friday for a new release or two!

2014-01-12

PR&P S8 week 1: Winter Wonderland


I love red. Don't you love red? I mean, who on earth wouldn't like red? 
And I love a girl's red coat... or jacket... and what about velvet? 
Do you like like velvet? 
I do. 
A lot!

Now, imagine how happy I was when someone gave me a bag of clothes they didn't want - and wouldn't fit me of course - so I could refashion, and I found these:


... a pair of red velvet pants! I started imagining all I could do from them, but I after all I knew what I could turned them into. Actually it was with that idea in mind that I went looking for them, after checking my fabric stash a few days ago only to find none of the reds I had was satisfying enough for what I wanted.


What little girl (and big to be real) wouldn't love a red jacket? A red velvet jacket? I know I'd like one for myself, I know I think all girl's should have one. It's one of those things I always almost buy in stores, but always stop myself from doing it when I look at their prices. I do have a red cardigan though. lol

These buttons were meant for a daddy's coat many many moons ago. I even asked him if it was okay to use them. I promissed him a coat years ago, but that has been an unfinished project ever since. It was these or bigger (3 then) black ones. I guess daddy's got a taste!

So, having Project Run & Play, season 8 themes in mind, and knowing what piece I wanted to make, I had to decided in which week theme would I sew it for. I went with the first week's theme Winter Wonderland. I made plans for a jacket, a pair of skinnies and a sweater. Of course I was dreaming when I thought I could get that all done for the first week. Only the jacket came to life. Those previous too long, too wide pants that did not fit me at all, turned into the most beautiful little red jacket I could imagine for my little miss. I am in love with it, and so proud of how it turned out. 

I love the collar and even my tag looks so much cuter!

While constructing it, I told her I was making her a jacket. She was all excited about it, and told me "now you make one for the baby too", I melted, she's already sharing with the baby. As for the jacket, she really liked it too, last night I told her we would be out taking pictures today and she was all happy and excited about it. 

Sorry, bad weather, a bad photographer (that's me of course) and red velvet aren't really a good mix for photos. 

I used a Burda's pattern, smallest size they had was a 98 cm child measurement, which is a 3 years size here. I thought it'd be too big on her yet, but this girl keeps tricking me, she's always bigger than I think. I made the smallest size, believing it would fit perfectly by next winter, but it does fir her already. It is only a bit too long on the sleeves, all the rest isn't that bad. And did I enjoy seeing her modeling this for me? 

The original jacket from Burda's wasn't lined, but I wanted it to be warm enough for the colder days, so I used a full flannel linning for my own. The flannel was, of course, in my stash already and I actually had to sew together 2 little scraps so that I had enough fabric for the collar, but you can't tell. After finishing the jacket, I didn't get anything worth saving from the pants either, too bad... I could have made her a bag or something, she's really into bags lately. It feels great to have such a beautiful piece done for free. everything was from my stash. 


And, just in case you're wondering: yes! She's also wearing the Sad Cat Dress I designed for the All Stars edition of Project Run & Play. Still fits and surely will for a bit longer. She's even wearing the same leggings she used for last year's photo shooting. The dress was just about her knees last year!


2013-07-23

|day 23| Refashion Month Guess: Melissa from Melly Sews

Melissa's blog, Melly Sews, must be one of those blogs I follow for years and can't get enough. Not only does she refashion, but she shares a lot of sewing tips, tutorials, blog tips... And, do I need to mention she's the owner of Blank Slate Pattern Shop? I'm pretty sure you've heard or used her patterns before, right?!

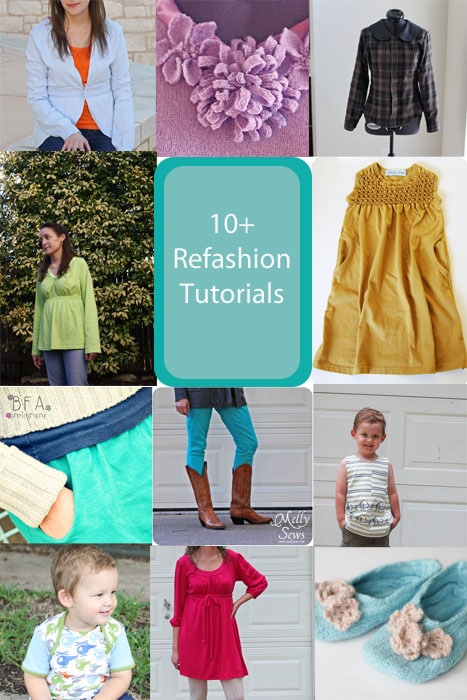
10 Refashion Tutorials 

Hello House of Estrela readers! I'm Melissa, from Melly Sews, and I love to refashion. I didn't realize how much until I started looking through old blog posts to find refashioning posts I've done. So I'm so excited to be here during Refashion Month.


So, click on any picture to go to the post and see some of my favorite refashions.

   
flannel feltedslippers24 dyedjeans
violetflowers1 mellysews033copyweb Snail t-shirt knock off with free printable iron on t-shirt transfer by Melly Sews
gold3 Melly Sews dress refashion

Labels

About us Acessories Adult Adults Advent Calendar Appliqué Baby Baby Acessories Baby Doll Acessories Baby Doll Sling Baby Shoes Back Warmer Pillow Backpack Bags Barbie Beading Beads Bedsheets Beret Bibs Bikini Blankets Blazer Bleached Blog Tour Blogs Blouse Bolero Book Covers Book Review Boots Bowling Game Boxers Boy Bracelet Bralette Breastfeeding Pillows Briefs Button Shirt Button Up Shirt Cap Cardigan Carnival Causes Cell Phone Stand Challenge Create Charger Support Chevron Christmas Clutch Coats Commitments Constant Change Contests cookies Corset Cose+ Costumes Cowl CraftingCon Crochet Crossstitching Cushions Dance Outfit dashiki Dia de Los Muertos Diaper Pouch Doll Clothes Dolls Drawstring Bags Dreamcatcher Dress Duvet Cover e-book E-Zine Review Easter Embroidery EnglishPaperPiecing Fabric Baskets Fabric Chess Game Fabric dolls Fabric Flowers Fabric Games Fabric Memory Games Fabric Printing Fabric Stash Fabric Three in a Row Game Fabric Toys Features Felt Flamenco Dress Flamenco pants Food Free PDF Pattern Fun Cakes Funny Fur Gifts Girl Giveaway Glasses Case Granny Squares Guest Posting Hair Clips Hair Clips Hanger Halloween Hand Warmer Pillows handbag Handmade Cards Harem Headband Henley Highlow Home Homemade Liquid Soap Hoodie How to Inspiration Jackets Japanese Sewing jeans Joggers Jumper KCW Keyring Kid's Choice Series Kid's Crafts Kimono Kleenex Purse Pouch knitting Knock it Off Leather lederhosen Leg Warmers Leggings lunchbag Maratón Telaria MashUp Series Maternity MeMadeMay; Men Mending Challenge Mini-Sofa Cover Mobile Mobile bag Mom's Monthly Wrap Up Needle Rolls Nightgown No Sew Nursery One Thimble Onesies Operation: Project 0$ Other Crafts Ottobre Overalls Pajamas Pants Paper Crafts Party Favours Party Time Patchwork Pattern Pattern Testing Pattern Tour Pear Puff Seat Pencil Case Pencil Rolls Peplum Peques de Cine Peter Pan Collar Pijamas Pillow Covers Pillows Piñata Cake Pinterest Challenge Pipe Cleaner Crafts Placket Pockets Plastic bags Dispenser Pleats Pocket Slings Podcast Pompoms Pouch Practising ´n Improving Project Run and Play Project Sewn Projects Pt Refashion Week Quilting Recipes Recycled Ribbon Organizer Recycling Refashion Month 2012 Refashion Month 2013 Refashion Month 2014 Refashion Month 2014 (2) Refashion Month 2015 Refashion Month 2016 Refashion Runway Refashioning Retro Reverse applique Reviews Ribbon Roses Robe Romper Romper Dress Romper Week Roots Round up Rucksack Saving Series Saving while Sewing Savings Made By Sewing Scarf ScrapsBusting Sequins Sew 20's Sew Along Sew Geeky Sew In Tune Sew-a-bration of Womanhood Sew-vivor Sewing Tips Shirt Shorts Skirt Skort Sleep Sack Slings Slippers Snowflakes & Lace Sock Monkey Socks Stitching Suit Surprise Sweater sweatshirt Swimsuit swimwear T-shirt The Hearties The Sew Off Thrift shopping Tights Tips Tissue Case Toddler Top Top 12 of 2012 Top 5 of 2013 Top 5 of 2014 TOP 5 of 2015 top 5 of 2017 Top Stitchers Trousers TSNEM Tunic Tutorial Tutu underpants Underwear Upcycling Vest Videos Vintage waistbag Wallet When things go wrong WIP Women Wreath Year Wrap Up

Cose +

Cose +
Magazine de Costura em Poruguês