
Back in September, I guest posted for Tasha over I Seam Stressed, while she was adjusting to her new life as mom of two. For that post, I've put up a tutorial on how to do your own pocket sling. Today's, I am bringing it home, since all we think about now is Christmas and all the handmade presents we have to make, i think this should be a good idea to gift a new mom or a pregnant relative/friend in your life. Enjoy!
Since my appearence here is due to Tasha's baby boy's birth, I thought I'd come up with something every mom should have. Especially when they are still newborns (even though I used mine until my little one was around one year old, then she just wanted to walk everywhere and we slowly left it aside). I am talking about a baby pocket sling, of course.


I prefer pocket slings over ring slings by far, it gives me a better sense of security, but that might be just me. And today I will share a tutorial on how to do your own.


So, the first thing you have to do is take your measurements! - a bad thing about the pocket sling is that it will only fit you, in my case I had to make one for me and one for hubby, since he's much bigger than I am. To take the measurements correctly, you should use a sewing tape, place the edge on your shoulder's bone (the highest on your shoulder, it is), and cross the tape from your shoulder to the opposite hip bone. Like in the picture below.


After sewing your two pieces of fabric you have created two tubes. Turn them to the right side, and pin your loop on the stitched line (image 10). Put fabric together wrong sides (one will be inside the other), pin and sew all around (image 11). Turn it right sides again. One edge will be sewn together the other will look like picture 12.
This can get tricky now, you have to put the seams together (right sides), but not turning the pieces inside out. I really don't know how to explain this in a better way, but I hope the pictures help (image 13 & 14), it will look all twisted but that's how it should be. Just keep pinning all around. We will sew this edge too but you might need to leave a little hole to turn your piece the right wy later.


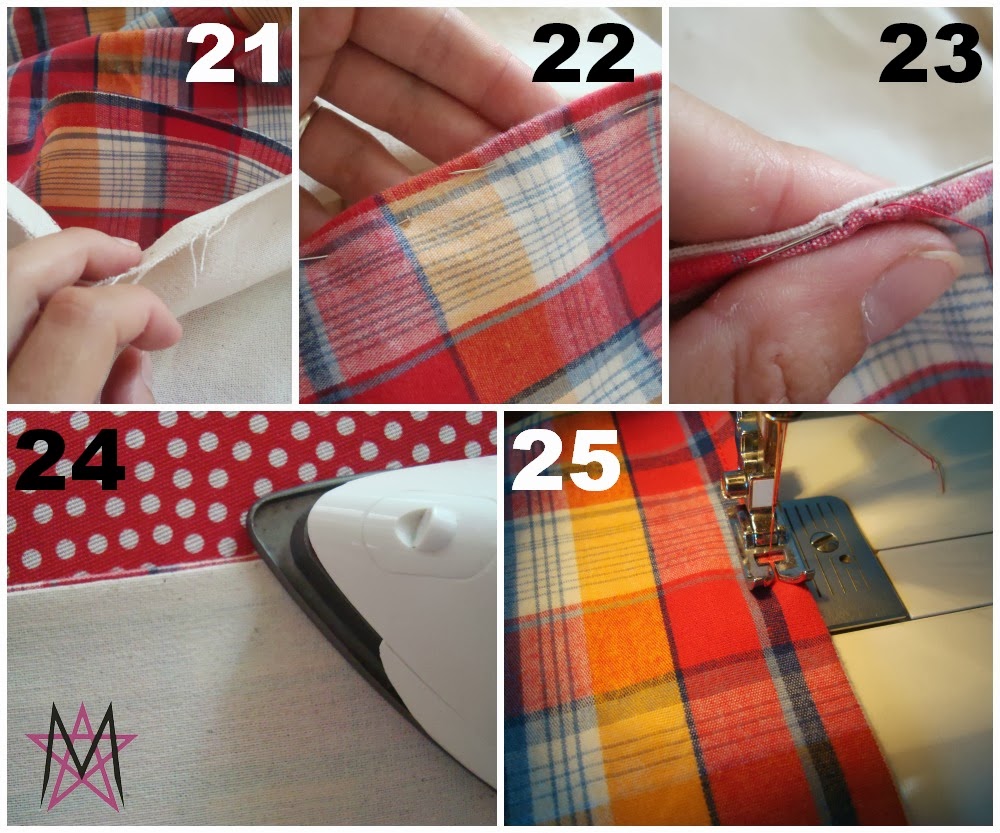
You can rip the stitches from your opening and turn the sling to the right side (image 21). Pin your opening (image 22) and close it with an invisible stitch (image 23). Press your seams flat all around (image 24) and topstitch it (image 25). And you're ready to carry your baby anywhere. I remember I would make household duties with my daughter in the sling, or I would breatfeed her as we walked in a market - no one could tell and she was always so happy.
Slings also make a great gift in baby showers. Just make sure you know the correct size for the person you'll be making one to.


For my sling I used a 28" measurement because I made it for a friend, and she's a large size, contrary to me, I believe my sling is 22", so if your measurements are somewhere between these, you probably got them right. That is important so your sling won't become uncomfortable when you use it.*
You'll need two cordinate or contrastic fabrics. I used linen for the lining and a plaid cotton for the main (though it is reversible, you can pick pretty fabrics and use them both ways - my advice is use as much natural fabrics as you can, because the skin of your newborn will be highly in touch with the fabric and you'll want the baby's skin to breath (I would often use flannel for winter babies).
Start by folding your fabric (check image 1). The black arrows measurement should be at least 4" longer than your measurements (the one we took above). And between those two white arrows it should be 21" long. Fold again, this time the 21" in half (clearer on image 4 I believe).
Start from the first fold and mark your measurements, in my case it was 28", add seam allowance (3/8" is enough - image 2). In the raw edge, the other one is folded. You should measure it in that side too, and add about 3" more (image 3). If you plan to make a few of these than it could be a good idea to make a pattern, I made one out of cereals cardbox (image 4) a while ago when I was selling slings and would make a lot of them. This was really handy. Pin it and cut off excess fabric (image 5). Unpin and open that last fold. Pin rounded edges and sew with a 3/8" seam allowance. Repeat it all over again with the other fabric. Press seams open.

The next step is optional, you might just skip it. I don't usually add loops to my slings but I thought I should show you that option and besides, for people who get really confused (first times) on how to use your sling, it might help to know how to place it.
Cut a small stripe of fabric (really as long as you wish, and about 1 1/2 wide). Fold it in half, and press. Open, fold one edge towards the center, press with your iron, do the same with the other edge (image 6). Fold in half again, press and sew as close to the edge as possible (image 7). You can do another row of stitches in the folded edge, but it's up to you. Place your loop and fold like shown in pictures 8 & 9. Press it.

After sewing your two pieces of fabric you have created two tubes. Turn them to the right side, and pin your loop on the stitched line (image 10). Put fabric together wrong sides (one will be inside the other), pin and sew all around (image 11). Turn it right sides again. One edge will be sewn together the other will look like picture 12.
This can get tricky now, you have to put the seams together (right sides), but not turning the pieces inside out. I really don't know how to explain this in a better way, but I hope the pictures help (image 13 & 14), it will look all twisted but that's how it should be. Just keep pinning all around. We will sew this edge too but you might need to leave a little hole to turn your piece the right wy later.

HINT: I usually use two pins together to mark my opening starts and ends (image 16).
Sew until you get to your opening, then switch to your longest lenght stitch (image 17) and sew the opening too. This will only be used to help you later, when it comes to hand stitch your opening. Once you've sewn, press your seam (the opening bitonly - image 18), open the seam and press to one side (image 19), and then to the other (image 20).

Slings also make a great gift in baby showers. Just make sure you know the correct size for the person you'll be making one to.
* you can see in my dress form, the sling is too big for it, so it looks like the baby is about to fall down at anytime. That shouldn't happen when you get the right size.


quando precisar de um é a ti que vou recorrer para me fazeres um, isso te garanto eu !! Pois não gostei de marsúpio e acho que nesse tipo de sling estamos mais libertas para outras tarefas e eu também não me sinto muito bem a usar os de argola. beijinho ;o)
ReplyDeletee farei um para ti com todo o gosto. eu adorei usar o meu! E usei muitooooo beijinhos
DeleteGreat tutorial! I love my carrier but have never tried a sling. I've always thought it would be too heavy for one shoulder.
ReplyDeleteOoh great tutorial! I've heard much better reviews for non-ring slings so this is great!
ReplyDeleteThis is great tutorial - pocket slings are awesome carriers, however the positioning on baby on this picture is way off. Baby should be up right and close enough to kiss, with a m shape to their legs. Position your child low in a carrier like this can lead to positional asphyxiation, and even death. Please google proper wearing postioning and the acronym TICKS - this is about babies safety and what people see they copy!
ReplyDeleteHello Courtney! Looking at pictures in a post only can lead you to unnecessary comments. if you read it, you would have noticed that I mentioned that this one is way too big because it was made for a friend who is much larger than my dress form. I am not trying to teach anyone how to wear it in this tutorial, I am showing how to make one. But thanks for your comment. Babies can be carried in different positions in a sling, depending on their age.
DeleteI'm going to make this for my almost seventeen year old Pomeranian! Thank you for posting!
ReplyDeleteI'm sorry, but this tutorial is a pain to follow. I tried making one with one layer (as its only for a pet), but I dont get 12-14-15 at all. What would make this tutorial better would be more overview images! I cant understand how this tube with two bulks can end up as a sling.
ReplyDelete