2019-02-27

Tutorial: How to add extra lenght to your kids pants

Scroll down for english, please. 

Todos sabemos que num dia os nossos filhos vestem as suas calças preferidas, e no dia a seguir ficam-lhe demasiado curtas, certo? Eu, pelo menos, acho que já passámos todos por ai. E isso é o que aconteceu recentemente com todas as calças de ganga da minha filha. Continuam a servir-lhe, excepto no comprimento. Para resolver esse probleminha, e evitar ter de comprar calças novas tão cedo, optei por alongá-las um pouco. 

We all know that one day your child is wearing his fave pants and the next they are too short, right? Well, I think we've all been there. That's what recently happen to most of my girl's jeans. They still fit her except for lenght. To fix this little issue and avoid buying new ones so soon, I decided to add in some extra lenght.

Fica aqui um breve passo a passo de como o fazer, caso também precisem.
Here's a quick tutorial on how to do it, in case you need to as well. 

1. 
Começa por descoser a bainha e apenas um pouco das laterais das pernas das calças. 
Start by unpicking the hems and a bit of the legs side seams. 

2. 
Mede a largura da perna da frente e de trás. 
Measure the width of front and back leg piece. 

3. 
Corta duas peças (uma para a frente e uma para trás) para cada perna. Cada peça deverá medir de largura o mesmo que as vossas pernas e de comprimento o extra que querem acrescentar às calças x2 + 2cm para as costuras. Imagina que queres deixar as calças 5cm mais compridas, então cortas 12cm de comprimento. Dobra essas peças ao meio no comprimento, com o avesso com avesso, e vinca com o ferro. 
Cut two pieces (one front and one back) for each leg. Each piece should be width the same as your leg's, and lenght the one you need to add to your kid's pants x2 +2cm for seams. Image you need to add 5 cm more, you should cut a 12 cm piece. Fold them lenght wise, wrong sides together and press.

 4. 
Prende cada uma das peças às calças, e cose-as, chulei-a as costuras (se o tecido tiver algum padrão, certifica-te que ao virar para o direito este fica na posição correta). 
Pin it to your pants and sew, finish seams (if there is a pattern on the fabric, make sure it won't be upside down once you sew). 


5. 
Cose à máquina o lado que tem o pesponto na costura primeiro. Passa a ferro. 
Sew the side with the topstitching first. Press seam. 

6. 
Pesponta por onde já estava antes. Fecha o outro lado das calças e vinca a ferro a costura para cima. Podes pespontar a faixa que adicionaste ou deixar assim. 
Topstitch in the same place it was before. Close the other side of legs and press seams towards the top. You can either topstitch the band or just leave as it. 


Parabéns! Acabaste de arranjar as calças da tua criança e evitaste uma visita à loja mais próxima. No próximo post trago-vos outra forma de remendar umas calças e prolongar a sua vida. 
Congratulations! You have finished fixing your kid's pants and avoided a trip to the nearest store. I will bring you another quick fixing tip, that will allow you to extend pants life, in my next post. 

2019-02-26

A different blanket

Scroll down for english, please. 


Antes de costurar qualquer prenda, costumo procurar alguma inspiração na net. Quem não? Ideias para prendas para miúdos custam-me sempre a ter, por isso foi com alegria que me deparei com esta no blog It's Always Autumn. Guardei-a durante antes, mas nunca cheguei a experimentar. Uns anos depois, voltei a cruzar-me com ela. Não fiz exatamente a mesma coisa mas serviu-me como ponto de partida. 

Before I sew any gifts, I usually search for inspiration online. Who doesn't? Finding gifts for boys is always hard for me, so I was pretty happy when I found this ideia by It's Always Autumn. I saved the link for years but I've never really got to make it. All this years forward and I came across this again. I didn't exactly make it as in the original but it was my starting point to what I actually came up with. 


Primeiro pensei em fazer o jogo, tal como na inspiração, para o filho mais velho de uma amiga. Mas como tinha de fazer outra prenda para o mais novo também, acendeu-se-me a luzinha. Porque não transformar isto numa coisa para os dois? Para jogarem precisamente juntos. Então criei uma manta que é também um jogo de tabuleiro com duas caras, de tamanho gigante. Infelizmente estava de chuva quando tirei as fotos e não consegui fazê-lo na rua, que era o que pretendia para dar uma perceção mais realista do seu tamanho. 

First I thought about making a chess board game as in the original idea for a friend's oldest son. But I had to think about a gift for the little one too and that's when I hit the light button. Why not putting them together?! So they could actually play together. So I created a two sided huge fabric board game for both kids. It was rainy when I took these photos so I couldn't take them outside, which I wanted to, so its size would be more perceptible. 


Num dos lados da manta fiz um jogo, o três em linha, com círculos em feltro em cinzento e em preto para jogar. No outro lado da manta, o segundo jogo, as damas. Para este usei círculos de feltro, ligeiramente mais pequenos em cinzento e branco. Já não estou 100% segura, mas penso que a manta mede 80x80cm, e comecei por fazer o lado das damas. Depois fiz as contas para que o do três em linha ficasse certinho também. 

In one side of the blanket there is a game, three in a row, with grey and black felt circles to play. On the other side of the blanket there's a second game, chess board. For this one I cut slightly smaller white and grey felt circles. I'm not really 100% sure anymore, but I believe the blanket is 80x80cm, and I started with the chess side. After doing the patchwork for that one, I made the math to make the other side even. 


De forma a ter os círculos organizados quando não estão a jogar, fiz também uma pequena bolsa com os restos dos tecidos que usei nos jogos. Também pensei em fazer uma mochila para que pudessem carregar a manta para diferentes sítios se necessário (tal como o parque, a praia ou algo assim), mas fiquei sem tempo. Como quase sempre, a minha filha pediu-me logo para fazer uma igual para e para o irmão. Só mais uma coisa para adicionar à lista. Não admira que seja tão extensa. 

To keep the circles organized when the the kids aren't playing, I also made a little pouch using scraps from the main fabric used in the games too. I also thought about making asmall backpack so they could carry it if needed (for a trip to the park, the beach or so ever), but I got short on time. As often happens, my girl loved it so much she recuested one for her and her brother too. One more thing to add to my list. No wonder it is so long. 

2019-02-19

Glasses Case

Scroll down for english, please. 


Se há coisa que gosto mesmo é de dar presentes feitos à mão aos amigos e família. Gosto especialmente, de dá-los àqueles que sei que apreciam as prendas feitas à mão tanto quanto eu. Uma das melhores partes do processo - a meu ver - é tentar acertar em algo que a pessoa em particular vá gostar ou achar útil (tenho tentado esforçar-me para ter este ponto mais em conta ultimamente para evitar o acumulo de coisas desnecessárias em casa dos outros, tal como procuro fazer na minha). Assim, se acertares, todo o tempo e dedicação que colocaste na peça valem mesmo a pena. 

I really enjoy making handmade gifts for my friends and family. I especially like to dedicate time to those I know appreciate a handmade gift as much as I do. One of the best parts of the process - as I see it - is to look for something that particular person will like or find useful (I've been trying to work hard on this last matter to avoid clutter at other people's houses, just like I try to do in my own). Then if you get it right, then all the time and dedication you put into it is so damn worth it. 


A prenda de hoje, foi feita para a a minha querida amiga Susana. Ela cria coisas maravilhosas, e tem imenso jeito para tudo aquilo que mete na cabeça fazer, seja lá o que isso for. A minha amiga usa óculos, e imaginei que pudesse gostar de uma capa para os proteger mais um pouco. Não fazia ideia se já tinha alguma ou não, mas fiz. Fiquei feliz por assim ter sido, uma vez que me disse depois que queria uma. 

Today's gift was made for my dear friend Susana. She creates wonderful things, and she's quite handy at anything she sets her mind in to make, whatever that is. My friends wears glasses, and I figured she might enjoy a case to keep them safer. I had no clue if she had any already but I went for it. I am happy I did because she then told me she wanted one. 


Enquanto procurava ideias giras na internet para me inspirar, curzei-me com um passo-a-passo de capa para óculos, que acabei por mais ou menos seguir. Não me apeteceu ir até à impressora e imprimir o molde que o site fornece, por isso desenhei o meu próprio molde olhando para o da imagem no pap. Usei tecidos que já tinha em casa. Tinha este dos gatos que adoro, e que era um daqueles que gostamos tanto que nem o queremos cortar, sabem como é - mas sei que ela também gosta de gatos, por isso usei-o como forro, para que tivesse uma pequena surpresa ao abrir a capa. 

So, as I was searching for cool inspiration ideas on the internet, I came across this tutorial for the glasses case, and I sort of followed it. I was lazy to use my printer and print the pattern, so I drew my own pattern guided by the image on the tutorial. I used fabric from my stash. I had this one with the cats which I adore, and was saving, because you know, you love your fabric so much it gets hard to cut it - but I know she loves cats too, so I used it for the lining so she could have a nice little surprise once she opened it. 

2019-02-08

Tea Bag Pouch Keyring Tutorial


Há uns dias publiquei a carteirinha para chás e porta-chaves que fiz para a minha colega e pelo menos duas pessoas mostraram interesse em querer fazer uma igual. Isso é o quanto basta para que eu faça um passo a passo aqui para o blog. Queria fazer uma para mim também, e assim que vi os comentários, meti mãos na massa e comecei. Foi o empurrão que precisava, de outra forma, poderia continuar a adiar fazer a minha. 

A few days ago I posted the tea bag pouch keyring I made for a friend and two readers showed interest in making their own. You know that is enough to get me working on a tutorial for the blog. I wanted to make one for myself too, so as soon as I read their comments I strarted working on it. It was the motivation I needed, otherwise, I would probably keep on postponing it. 


Caso queiram fazer uma, deixo-vos então aqui os passos para isso. Antes de mais nada, há que reunir o material necessário e cortar as peças de tecido necessárias (e já vou assumindo que têm o básico como linhas, máquina, etc). Para a minha parte exterior usei um painel em patchwork que já tinha costurado antes, mas claro, podem usar um pedaço de tecido simples.

Anyway... if you want to make one too, here's how to. First of all, gather your supplies and cut your fabric (I am assuming you have all the sewing basics like thread, machine, etc). On the picture above there's everything you need. For my main (outside) fabric I used a patchwork panel I had put together, but you can just cut a piece of fabric, of course. 


Na imagem acima têm tudo o que vão precisar com excepção de um pedaço de entretela termocolante, de resto está tudo descrito. Vamos começar por cortar todas as peças. Eu usei tecidos diferentes mas podem usar tudo da mesma cor também.

In the picture above, you have all the supplies needed for the project except for a little bit of fusible interfacing. We'll start by cutting all the pieces. I used different fabrics but you can use just one of course. 

1. Dobrar os bolsos ao meio na altura e vincar com o ferro. 
2. No tecido do forro, vamos medir 2cm para dentro de cada lateral em cima e em baixo. Marcar uma linha. 
3. Colocar um dos bolsos (com a dobra virada para o meio da peça) e prender com alfinetes. Repetir para a outra margem. 
4. Coser a 0,5cm. 
5. Colocar em cada ponta mais um bolso, desta vez mesmo encostado à margem da peça do forro. Prender com alfinetes. Coser. 

1. Fold the pockets in half height wise and press with the iron. 
2. Measure 2cm from each edge on the lining fabric, and mark ta line there. 
3. Pin one of the pockets, with the folded edge facing the center of the piece, on the line you created. Repeat for the other edge. 
4. Sew at 0,5cm. 
5. Place another pocket on top of the previous, but at the very edge of each side. Pin in place, and sew it. 


|Quando andei a editar as fotos apaguei a seguinte sequência sem querer, por isso não têm número, mas sigam a ordem das fotos| Vamos fazer a tira para prender a argola do porta-chaves, para isso, cortamos uma tira de entretela e colamos ao tecido com o ferro. Dobram-se 0,5cm do tecido para dentro nos lados mais compridos e marcam-se com o ferro. Depois dobra-se a peça ao meio, volta a marcar-se com o ferro e leva-se à máquina a correr a cerca de 3mm da beira a cada lateral. Passa-se a tira pela argola do porta-chaves, dobrando-a ao meio e colocando a argola mesmo no centro,  cose-se o mais perto possível (como na foto), o uso de um pé calcador de fechos poderá ajudar. Para terminar, prende-se a tira precisamente a meio dos bolsos, com alfinetes, ou então com pespontos. 

|When I edited these photos I accidentaly deleted the steps above so they have no numbers on each photo, but you just follow the sequence and everything will be fine.| SO, let's make the keyring strip, and for that, we have to cut a small fusible interfacing piece and press on to our main piece. Fold 0,5cm at each of the longest edges, and iron on. Then you fold the piece in half, press it again, then topstitch it on your machine at a 3mm lenght in each side. Fold the strip in half and slide the ring, so it stays right in the center. Sew it as close to the ring as possble (as seen on picture), using a zipper foot may help. To finish, pin the strip to the lining piece, right in the center. You can baste it in place too. 

6. Agora com a peça do fecho, colar também um pedaço de entretela no meio.
7. Usar a chapinha do interior da mola como molde e marcar os dois buracos que vamos abrir a seguir. Cortar com a ponta da tesoura com muito cuidado.
8. Passar a parte exterior da mola pelas aberturas acabadas de fazer pelo direito do tecido. No avesso, colocar a argola nos ferros. Dobrar as abas com a ajuda de um alicate.
9. Dobrar a tira ao meio e cose deixando uma das pontas mais estreitas aberta para virar a peça.
10. Antes de virar aparar as costuras para baixar o volume.
11. Virar a peça com muito cuidado. Não é fácil, em alternativa podem sempre usar outro tipo de fecho, como as molas de plástico.

6. On the closure strip, iron on a little piece of interfacing. 
7. Use the small plate for the inside of your snap, as a guide and mark two holes you should carefully open. Use your scissors with care. 
8. Slide the snap front piece through the holes you just opened on the right side of your fabric. In the back, slide thr plate in place and fold the tabs with a pliers. 
9. Fold the stip in half, and sew. Leave one of the edges open so you can turn your piece outside out. 
10. Before you turn it, trim your seams to avoid bulk. 
11. Turn the piece very carefully. It won't be easy if you're using a magnet snap like I do, so you can probably use KAM snaps like I did in my previous or whatever you feel more comfortable with. 


12. Medir e marcar com um ponto 5cm do top no tecido exterior (de cima para baixo na que será a frente da carteira).
13. Vamos colocar a outra parte da mola e para isso voltamos a repetir o processo, chapa em cima do ponto que acabámos de marcar, marcar as duas aberturas, passar a mola pelas mesmas pela frente, colocar chapa por detrás e apertar com alicate.
14. Descobrimos o meio na outra lateral. 
15. Prendemos a fita com a mola virada para fora.
16. Deve ficar assim.

12. Measure and mark 5cm from the top on the main fabric (from top to bottom, which will be the pouch front). 
13. Insert the other part of the snap repeating the same process, use place as guide, mark holes place, cut them, slide snap on front, slide place on the back and fold with pliers. 
14. Find the center of the opposite edge, 
15. Pin the strip with the other part of the snap facing out. 
16. That's how it should look like. 


17. Prender o enchimento no lado direito da peça de tecido principal. 
18. Adicionar a nossa etiqueta se o quisermos fazer e onde quisermos fazer. 
19. Colocar tecido exterior e forro, direito com direito.  
20. Alguém comeu este passo! ahahah
21. Alfinetar tudo à volta e cose, deixar uma pequena abertura na base com cerca de 4cm. 
22. Virar a peça pela abertura, passar a ferro. 
23. Fechar a abertura com pontos invisíveis à mão. 

17. Pin the filling to the right side of your main fabric piece. 
18. If you want to add a tag do it now, where you want to. 
19. Put lining fabric on top of main fabric piece, right sides together. 
20. Someone ate this step! ahahah
21. Pin all around and sew, just leave a small opening with about 4cm to turn it around. 
22. Turn it around and press. 
23. Close the opening with invisible stitches. 


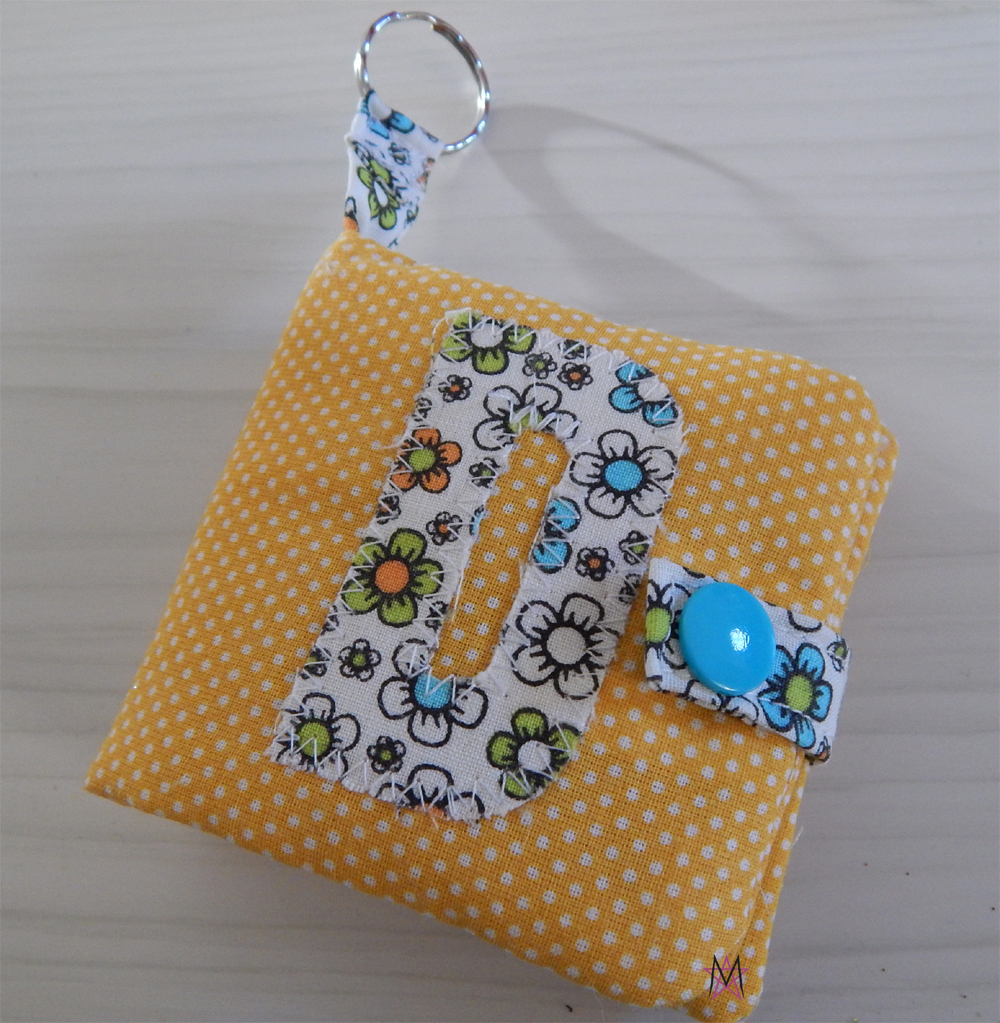
Parabéns, o vosso novo porta-chaves está terminado. Podem guardar os vossos chás preferidos na bolsa e desfrutá-los sempre que vos apetecer. Espero que tenha sido tudo claro. Já nem me lembro quando fiz um passo a passo, nem me lembrava da trabalheira que dá, mas se puder ajudar alguém, já valeu a pena.

Congratulations, you have a new keyring. Keep your fave tea bags in your new pouch and enjoy them wherever you are. I hope everything was clear. I can't even remember the last time I made a tutorial, or the work it requires, but if by any chance this is helpful to anyone, it's worth it. 

2019-02-01

Tea Bag Pouch Keyring

Scroll down for english, please! 


E chegamos a Fevereiro e eu ainda tenho prendas de Natal para mostrar... como já tinha mencionado, vai aos poucos, aos poucos. Desta vez trago a prenda que fiz para a minha colega de trabalho. Reparei que o porta-chaves dela estava velhinho, é um D feito também em tecido, a inicial do seu nome.Além disso, gostamos muito de beber cházinho nos dias de inverno durante o nosso lanche, assim que lembrei-me de misturar tudo isto e fazer isto para ela.

And we're in February and I am still sharing Christmas gifts... as I mentioned before , it's coming slowly, slowly. This time there's the gift I made for my co-worker. I noticed her keyring was too old, it is a fabric D, her names initial. Besides, we both like to have a tea on our break in winter, so I thougt I could mix it all and make her this. 


Fiz-lhe uma carteirinha para chás que é ao mesmo tempo um porta-chaves. Usei o tecido amarelo que tinha comprado para fazer a prenda do filho dela, o jogo de bowling que já mostrei aqui, e mais uns retalhinhos que já tinha de há anos. Criei o molde à medida que o fui fazendo e correu muito bem. 

I made her this little teabag pouch which is at the same time a keyring. I used the same yellow fabric I bought to make her son's gift, the bowling set I showed here, and also a few little scraps I've had for years. I made the pattern as I sewed and it went pretty well. 


Na parte da frente da carteira, apliquei com um ponto em zigue zague a letra do nome dela para fazer lembrar o porta-chaves que ela já tinha. Acho que preciso de fazer um para mim também e ter sempre um par de chás à mão. Acredito que é uma lembrança engraçada para quem como nós, gosta de beber o seu. E vocês, o que acharam?

On the front of the teabag pouch, I've sewn with a zig zag stitch her name's initial, to remind her of the old keyring she already had. I think I need to make one of these for myself too, and have my tea bags always at hand. I believe it is a cute gift to someone like us, that loves to drink their tea. What do you think? 

Labels

About us Acessories Adult Adults Advent Calendar Appliqué Baby Baby Acessories Baby Doll Acessories Baby Doll Sling Baby Shoes Back Warmer Pillow Backpack Bags Barbie Beading Beads Bedsheets Beret Bibs Bikini Blankets Blazer Bleached Blog Tour Blogs Blouse Bolero Book Covers Book Review Boots Bowling Game Boxers Boy Bracelet Bralette Breastfeeding Pillows Briefs Button Shirt Button Up Shirt Cap Cardigan Carnival Causes Cell Phone Stand Challenge Create Charger Support Chevron Christmas Clutch Coats Commitments Constant Change Contests cookies Corset Cose+ Costumes Cowl CraftingCon Crochet Crossstitching Cushions Dance Outfit dashiki Dia de Los Muertos Diaper Pouch Doll Clothes Dolls Drawstring Bags Dreamcatcher Dress Duvet Cover e-book E-Zine Review Easter Embroidery EnglishPaperPiecing Fabric Baskets Fabric Chess Game Fabric dolls Fabric Flowers Fabric Games Fabric Memory Games Fabric Printing Fabric Stash Fabric Three in a Row Game Fabric Toys Features Felt Flamenco Dress Flamenco pants Food Free PDF Pattern Fun Cakes Funny Fur Gifts Girl Giveaway Glasses Case Granny Squares Guest Posting Hair Clips Hair Clips Hanger Halloween Hand Warmer Pillows handbag Handmade Cards Harem Headband Henley Highlow Home Homemade Liquid Soap Hoodie How to Inspiration Jackets Japanese Sewing jeans Joggers Jumper KCW Keyring Kid's Choice Series Kid's Crafts Kimono Kleenex Purse Pouch knitting Knock it Off Leather lederhosen Leg Warmers Leggings lunchbag Maratón Telaria MashUp Series Maternity MeMadeMay; Men Mending Challenge Mini-Sofa Cover Mobile Mobile bag Mom's Monthly Wrap Up Needle Rolls Nightgown No Sew Nursery One Thimble Onesies Operation: Project 0$ Other Crafts Ottobre Overalls Pajamas Pants Paper Crafts Party Favours Party Time Patchwork Pattern Pattern Testing Pattern Tour Pear Puff Seat Pencil Case Pencil Rolls Peplum Peques de Cine Peter Pan Collar Pijamas Pillow Covers Pillows Piñata Cake Pinterest Challenge Pipe Cleaner Crafts Placket Pockets Plastic bags Dispenser Pleats Pocket Slings Podcast Pompoms Pouch Practising ´n Improving Project Run and Play Project Sewn Projects Pt Refashion Week Quilting Recipes Recycled Ribbon Organizer Recycling Refashion Month 2012 Refashion Month 2013 Refashion Month 2014 Refashion Month 2014 (2) Refashion Month 2015 Refashion Month 2016 Refashion Runway Refashioning Retro Reverse applique Reviews Ribbon Roses Robe Romper Romper Dress Romper Week Roots Round up Rucksack Saving Series Saving while Sewing Savings Made By Sewing Scarf ScrapsBusting Sequins Sew 20's Sew Along Sew Geeky Sew In Tune Sew-a-bration of Womanhood Sew-vivor Sewing Tips Shirt Shorts Skirt Skort Sleep Sack Slings Slippers Snowflakes & Lace Sock Monkey Socks Stitching Suit Surprise Sweater sweatshirt Swimsuit swimwear T-shirt The Hearties The Sew Off Thrift shopping Tights Tips Tissue Case Toddler Top Top 12 of 2012 Top 5 of 2013 Top 5 of 2014 TOP 5 of 2015 top 5 of 2017 Top Stitchers Trousers TSNEM Tunic Tutorial Tutu underpants Underwear Upcycling Vest Videos Vintage waistbag Wallet When things go wrong WIP Women Wreath Year Wrap Up

Cose +

Cose +
Magazine de Costura em Poruguês