2016-07-27

Refashion Month with Meriel Aho

Scroll down for english, please!


A convidada de hoje é a Meriel, a ser sincera, temos-nos encontrado em várias tours e testes, mas até ela se inscrever nesta série, eu não conhecia particularmente o seu trabalho. Fui espreitar como faço sempre que tenho alguém "cá por casa" que ainda não conheço de um todo ou de quem conheço pouco, e gostei muito das peças que tem feito para as suas crianças. Hoje, ela partilha connosco um apanhado de algumas das reciclagens que já fez anteriormente. Não deixem de espreitar as suas dicas. 

Today's guest is Meriel, and being honest, unless for some tours and tests where we were both in, I didn't really know her work until she signed for the series. I went in to check it out as I always do when I have new guests that I haven't heard of before, or have but not much, and I particurly liked the things she's been doing for her kids. Today, she's sharing a wrap up from previous refashions from her own. Make sure to check out her tips. 


This is a brief look at some quick & easy refashions that anyone can do. I learned to sew 6 years ago, and making over thrifted items such as too-large clothes or even sheets has been one of the best ways for me to get some practice (and even a wearable garment!) without investing a lot of money into my learning process. Pop over to my blog (http://createthreepointfive.com) to read more about what you see here!

2016-07-26

Refashion Month with Heather *Feather*

Scroll down for english, please!


Mais um dia a reciclar, desta vez com a fascinante Heather. Mãe de três crianças e imparável. Adoro a sua simplicidade e praticabilidade, e os looks que cria. Admiro o facto de publicar a vida como ela é sem floreados, sendo verdadeira. Se os filhos se sujam mesmo antes de tirar fotos a uma peça nova, ela simplesmente assume que com crianças é assim e publica-as assim mesmo. E isso a meu ver é bom, uma pessoa sente-se mais ligada a ela com a ideia de que afinal nem todos procuram a perfeição. 

Another day refashioning, this time with the fascinating Heather. Mom to three kids, and unstopable. I love her simple and practicale ways, and her casual looks. I admire the fact that she posts things as they are on real life, she's not fake. If her kids get dirty right before the photos of a new item are taken, she'll just assume that it is a fact from life with kids and post it like so. And that's a good thing to relate to her and see that not everyone is aiming to be perfect. 

º º º
  
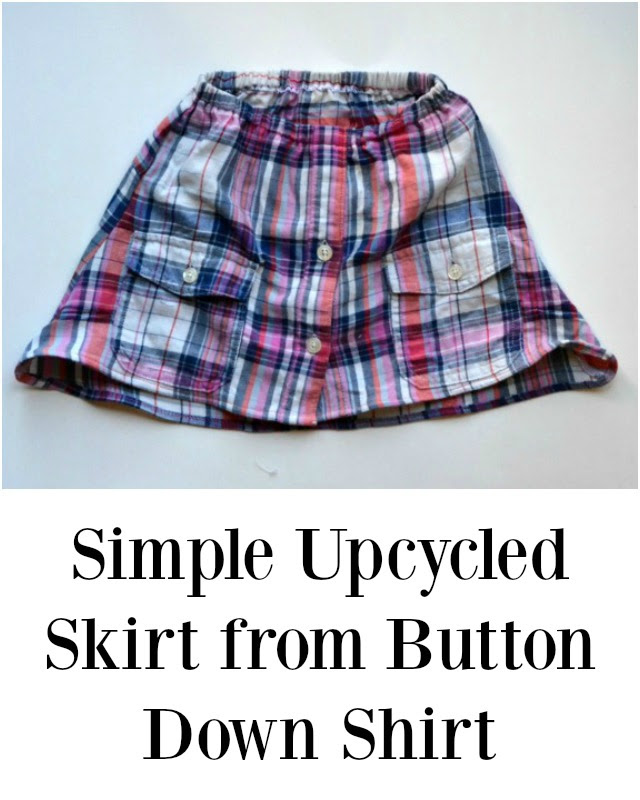
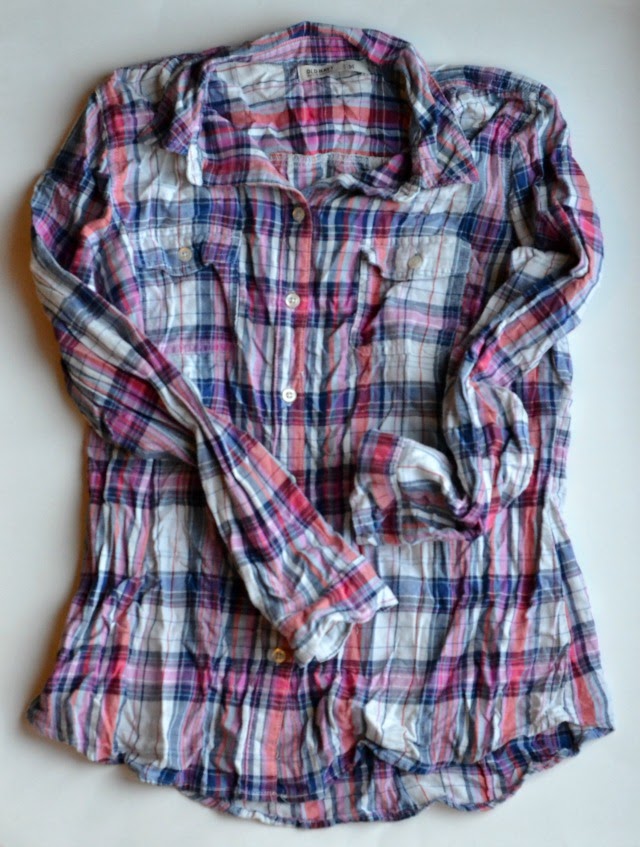
I'm so excited to be here and share a refashion with you! I love reusing the best parts of clothing and making it into something new. Today I'm sharing a REALLY simple button down shirt upcycle to make a skirt. It's great because you can keep the button placket and the pocket or pockets on the front. Besides using the button down for a skirt, you can use the other half to make a baby romper and the sleeves to make pants

Supplies
Button Down Shirt
Sewing Supplies
3/8" elastic

Instructions
1. Get your shirt ready. I used a women's medium and unpicked all the darts. A men's shirt in any size would also work and you wouldn't have to unpick darts.


2. (The bottom half of the shirt, the collar, and the collar stand can be cut off for the baby romper.) Cut at an angle from the sides seams to the shoulders essentially cutting off the sleeves. I cut an extreme angle to get flared sides.
3. Cut straight across the top cutting off the shoulder seams. I cut the back higher than the front to give room for a baby diaper.
4. Remove the tags if needed.


This top picture is what my cut pieces looked like.
5. Sew the side seams right sides together at 1/4" and finish the edges.
6. Straighten the hem if uneven.


7. Sew a 1/2" casing at the top and insert elastic. I sewed the button placket together at the top to make this step easier.
8. Sew a small hem on the bottom. I kept the hem separated at the button placket to keep a real button down look.


It's simple but impactful! The placket and pockets make it looked like I worked really hard. And I love that I can find interesting and unique color schemes that I might not find in the toddler clothing section at the store!
Thanks for having me and letting me share! I can't wait to see everyone else's refashions!

2016-07-25

Refashion Month with Diana Pais

Scroll down for english, please!


A Diana diz que a reciclagem de roupa está muito fora da sua zona de conforto, ainda assim, para mim, a Diana é uma grande inspiração e eu tinha de a desafiar outra vez. Ela inspira-me, não só na forma divertida como costura para os filhos e para ela, mas também pela sua personalidade, o seu empenho naquilo que quer e faz feliz. Para quem estava fora da sua zona de conforto, digam lá se ela não se saiu tão bem? 

Diana says she's way out of her comfort zone when it comes to refashioning, still, she is a great inspirations for me and I really needed to challenge her again. She inspires me, not only through her fun way to sew for her kids and herself, but also through her personality, and her efforts in whatever she wants and makes her happy. For someone who was feeling out of her comfort zone, she did pretty good, didn't she? 

º º º 

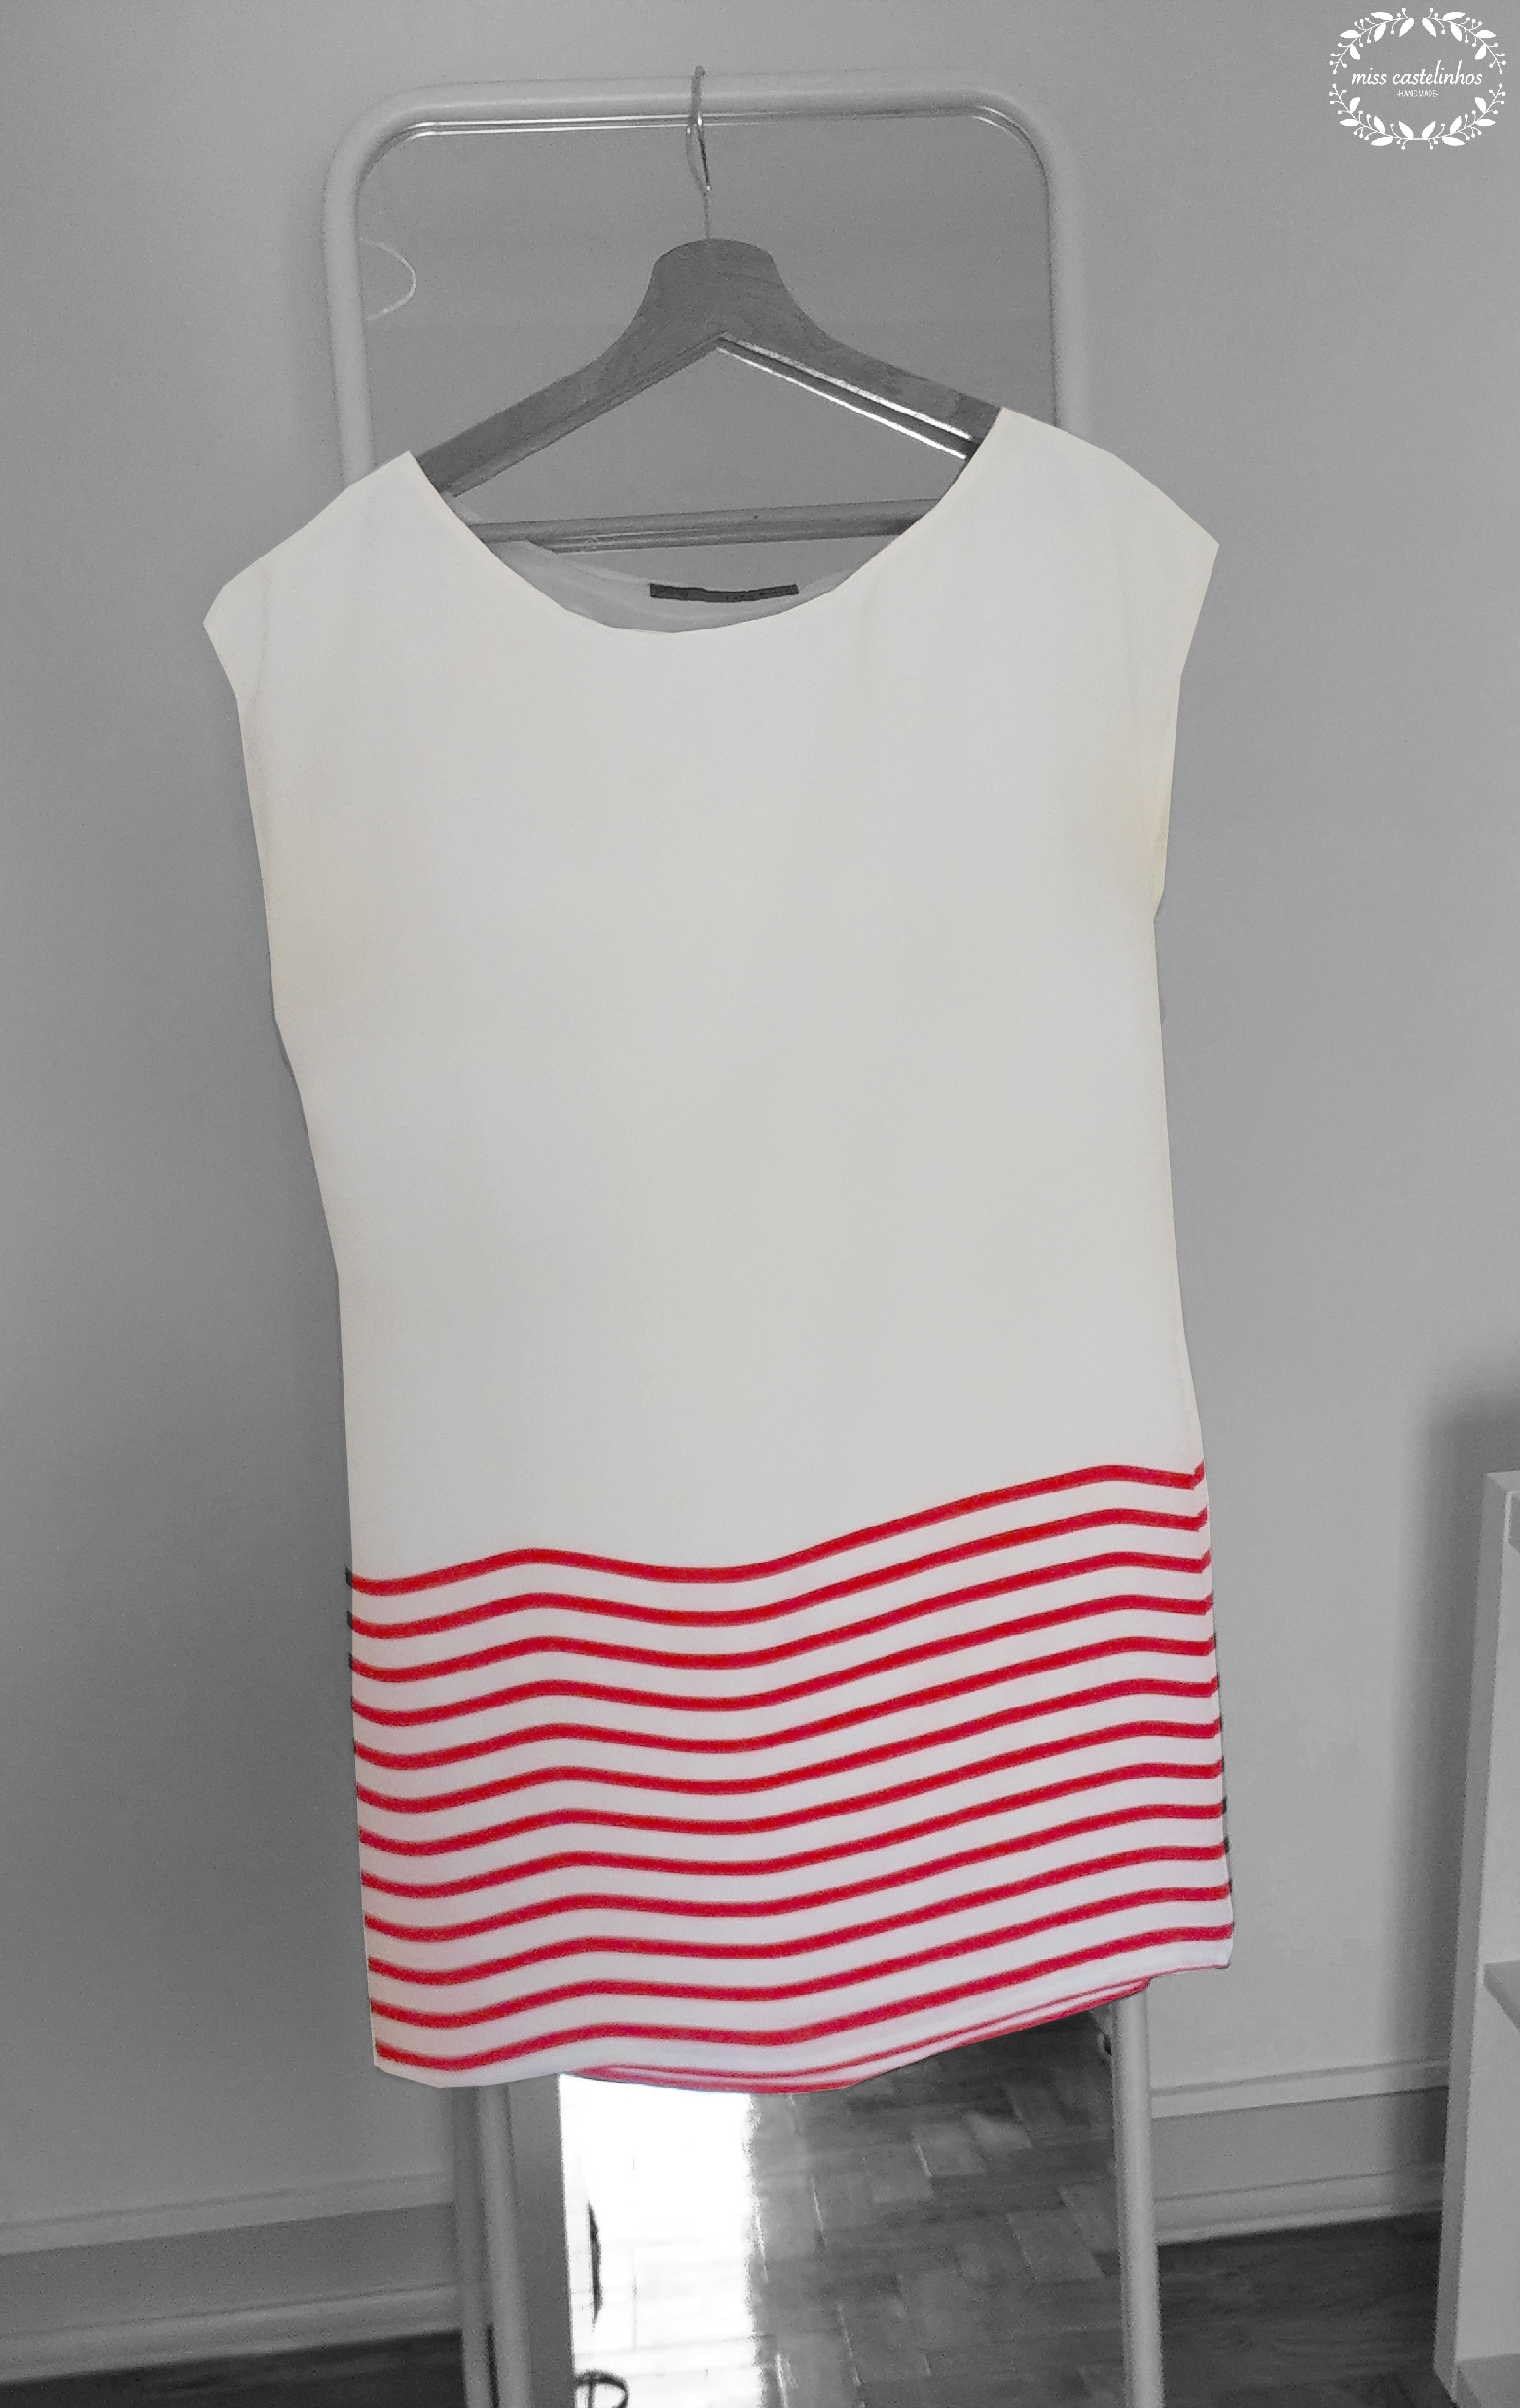
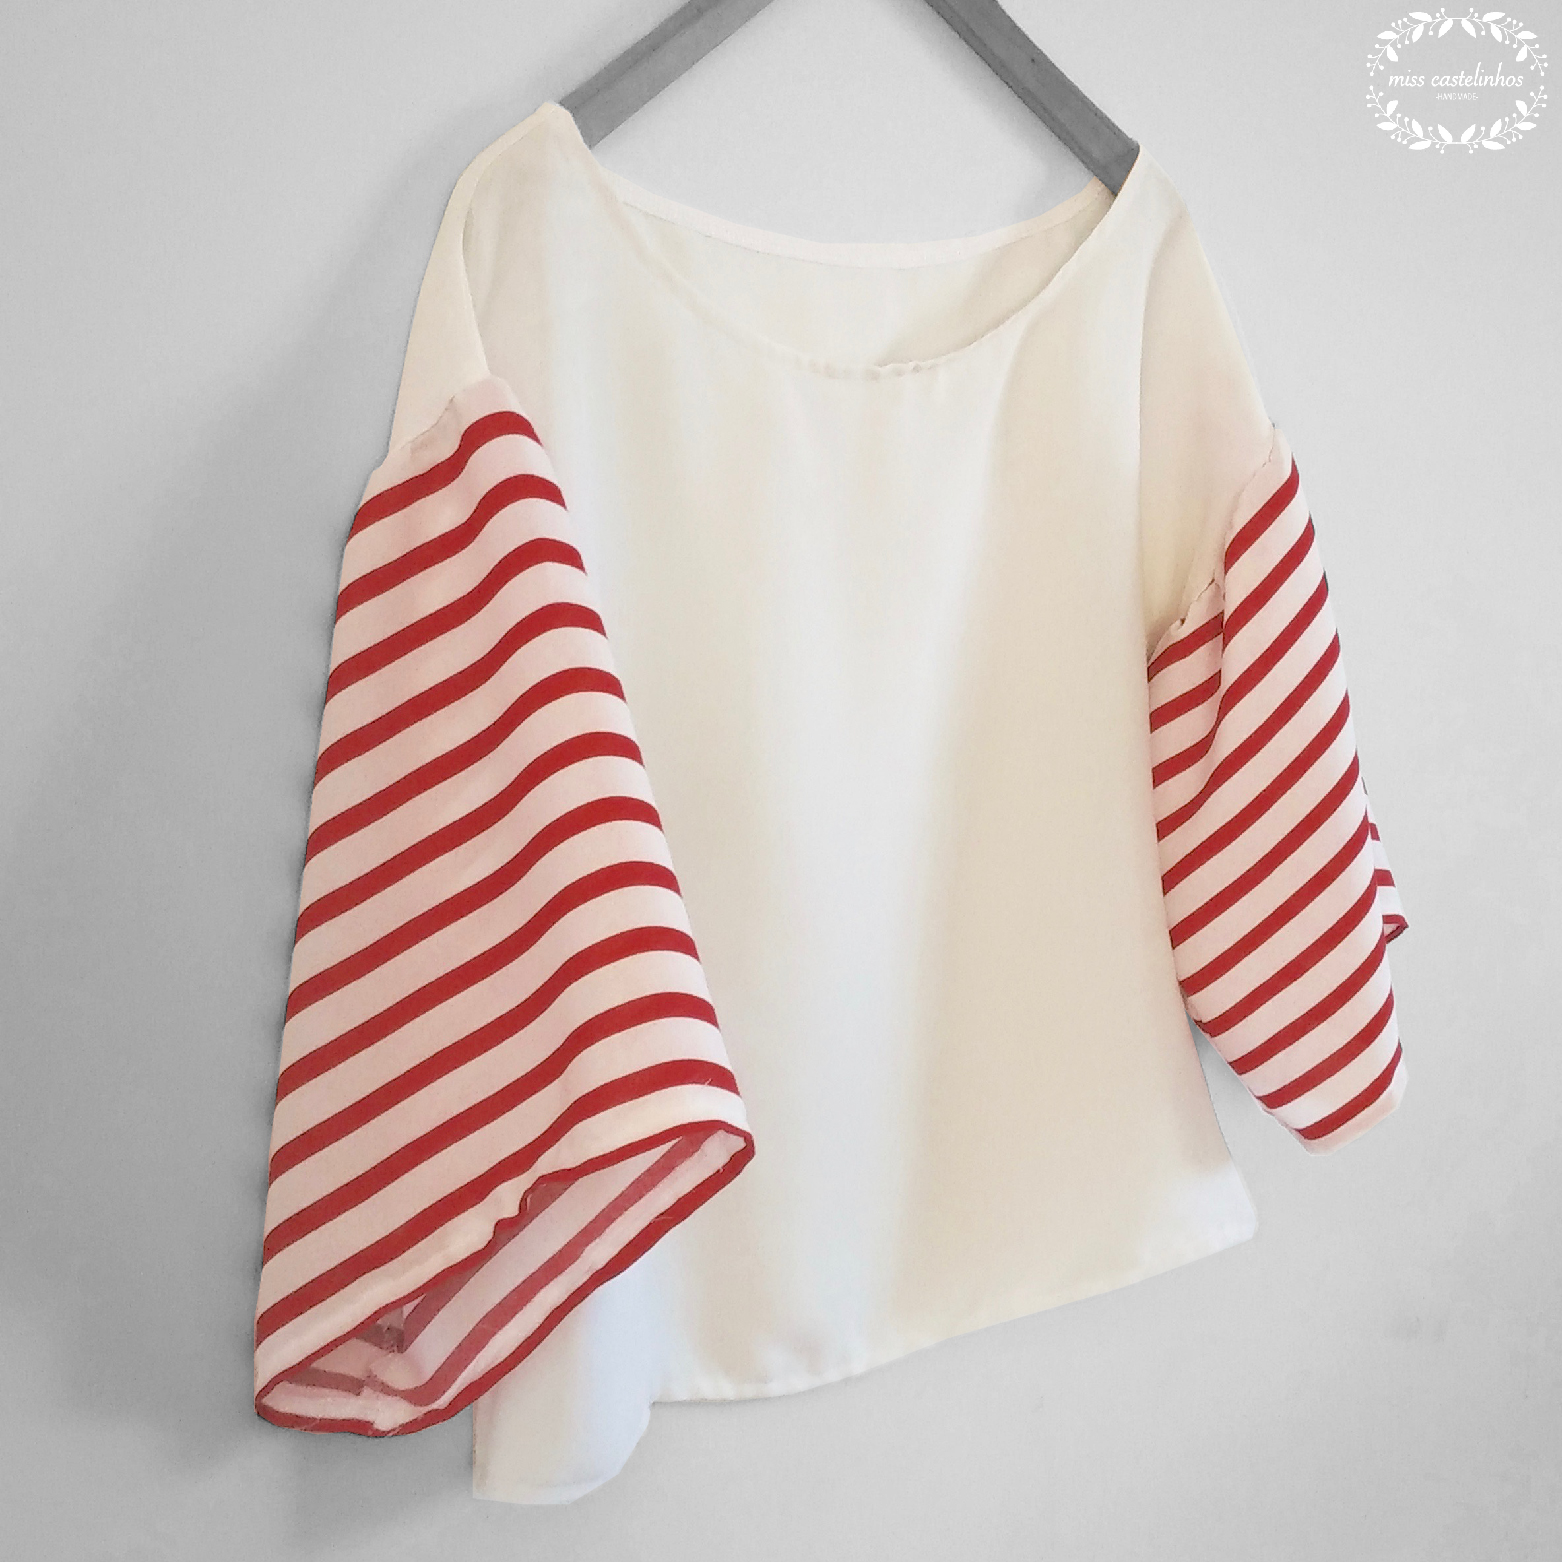
Hi everyone! I'm Diana from the blog Miss Castelinhos. I'm very happy to be a part of House of Estrela's Refashion Month for the second time. I always admire Magda's skills to transform old clothes into something new. Refashion is very much out of my confort zone. Last year I made a shirt for my son, so this year I wanted to try something for myself. I had an old dress from a fast fashion brand... not to name names... it starts with a Z, ends with an A and it has AR in the middle... but that's not important! ;D The dress didn't fit me around the hips anymore, so I thought it could work as a blouse.
  RefashionMonth2016-02

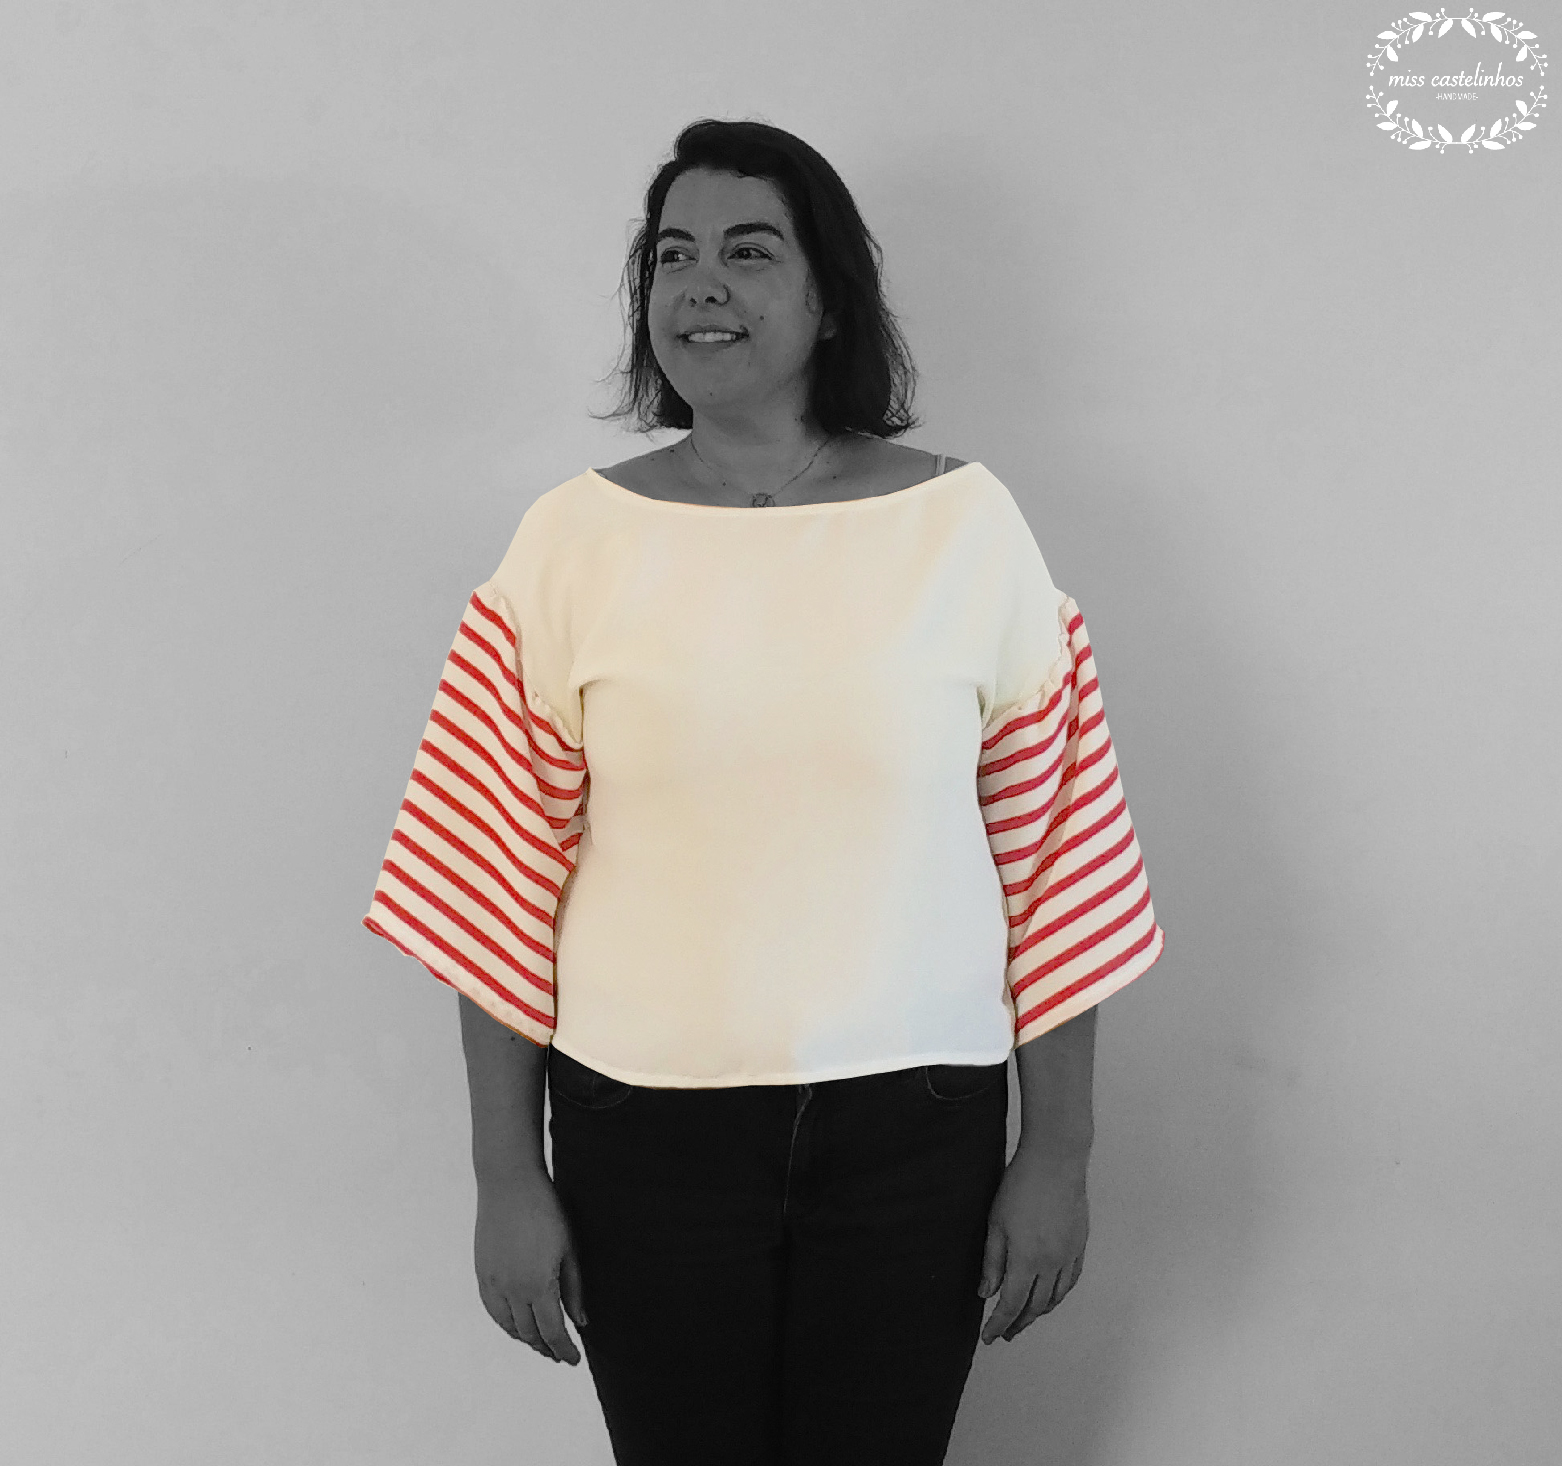
The transformation was very easy! I simply cut the dress above the stripes and used the remaining fabric to make the sleeves.
  RefashionMonth2016-01

The sleeves have quite a dramatic look to it. I gathered them a bit and attached to the armscye.
  RefashionMonth2016-03

And that was it! Because the sleeves were made with the bottom of the dress I kept the original hemline. The only thing left to do was the hem around the waistline.
  RefashionMonth2016-03

If you're anything like me and are not sure if you can transform a piece of clothing, this is an easy start. Just grab an old sleeveless dress, cut the bottom off and add some sleeves. You can't go wrong! :D Thank you so much for having me Magda!

2016-07-22

Refashion Month with Irene (aka MammaNene)

Scroll down for english,please!


Creio que a Irene foi uma das primeiras bloggers refashionistas que eu comecei a seguir, ou pelo menos uma das primeiras com quem comecei a ter contacto. A reciclagem que fez numa edição anterior, de camisa de xadrez para vestido de menina, é para mim ainda, uma das mais originais que passaram aqui pelo blogue. Por isso, acho que fazia todo o sentido convidá-la a fazer parte de mais uma edição, e ei-la com a sua boa disposição contagiante. 

I believe Irene was one of the first refashionista bloggers I started following, or at least one of the first I started interacting with. Her plaid button up shirt to little girl's dress, is still in my opinion, one of the most original from all past seasons. That's why I believe it makes total sense to have her as a guest today, and here she is with her infectious good mood. 

º º º 

Hi there! It's Irene here, from Serger Pepper! I'm so happy to be here again for this Refashion Month (thanks Magda for inviting me!). After two refashions for my girl (the plaid & ruffles shirt to dress and the posh beach robe) I have decided it was time to sew something for me! I started browsing my refashion pile to find something that might suggest me an idea and I've found this huge man's T-shirt I have found on a thrifty barter/shop. I took it home without a precise plan for it, just knowing that:
  • it was made in a nice fabric, soft and mostly cotton with a small percentage of polyester that will keep it almost wrinkle-free ;)
  • it was in a basic color and pattern, easy to mix and match
  • it was the right length to be worn on top of leggings and to eventually double as a swim cover
BUT
  • it was too big to be worn as it was (look at the shoulders and the width at the bust height)
Serger Pepper - Refashion July - Man's shirt to tank dress - too wide on the shoulders and at the bust height
  • it was too masculine
  • its sleeves were way too long and wide
Serger Pepper - Refashion July - Man's shirt to tank dress - too long sleeves
These days here in Italy, summer is hot and I needed more tanks to wear... so a refashion idea was blooming: a tank mini-dress to be worn on top of leggings, fitted at the bust and the shoulders and loose at the bottom, so it doesn't accentuate my back and thighs.  
  Serger Pepper - Refashion July - Man's shirt to tank dress - fitted where it needs to be


How can you recreate the look? It's easy and fast to whip up, just a couple of hours and you have your new tank mini-dress! First, put the shirt on and mark with pins where you want the shoulders to sit. Mark it on both sides. Decide also the neckline depth but make sure you leave some room on top of a button/buttonholes so you can finish the raw edge with the bias tape without sewing onto the buttonhole! Go down to the bust height and pin on both sides so it's fitted on your bust: this won't make it look baggy anymore!
   Serger Pepper - Refashion July - Man's shirt to tank dress - mark with pins where you want the tank to hit


Once you take off the shirt, check that pins are mirrored on each side. If not, sum both sides measurements and split in two even measurements so they are perfectly the same! Using chalk, design the neckline curved shape and the new armhole. Try it on again, if you want, to be sure you like it! Cut out the exceeding fabric (don't forget seam allowances!). Cut out the sleeves (put them aside, along with the collar... you never know when you might need them!). Sew the new side seams (a 4-thread overlock stitch is perfect but you can do a straight stitch + zig-zag on seam allowances) right sides together, starting at the armhole and going down to nothing to the old side seams. You can pin this line so it will visually guide you when sewing.
  Serger Pepper - Refashion July - Man's shirt to tank dress - pin the new side seam from the armhole going down to nothing

To finish the neckline and the armholes, use some single fold bias tape (I had store-bought leftovers from my daughter's bibs). Start pinning it at the front opening, all around the neckline. 
  Serger Pepper - Refashion July - Man's shirt to tank dress - start aligning the bias at the front opening of the neckline

Make sure the other end (the one that goes under) is not peeking out.
  Serger Pepper - Refashion July - Man's shirt to tank dress - make sure the other end of the bias is not peeking out

Sew in place, then press the seam open. Use a tailor's ham, if you have it, for a hassle-free steam pressing on curves (if you don't have one, let's DIY!). Tip: Don't skip this step for a professional-looking finish!

Serger Pepper - Refashion July - Man's shirt to tank dress - press the bias tape with a ham  
Turn the bias tape toward the wrong side, steam press again and pin in place, before you go to the sewing machine.

Serger Pepper - Refashion July - Man's shirt to tank dress - pin toward the wrong side the bias tape, press and topstitch 

 While a regular presser foot will work just fine,a nice one to use is this "guide stitch foot" that has markings on the left that will help you topstitching at a consistent width from the folded edge. To decide the perfect width:
  • slide the neckline under the foot on the bias tape side
  • lower the foot and the needle so it goes into the fabric in the right spot
  • mark the right groove to follow with a sharpie or something like that
  • lift up the foot and place the neckline under it again, this time on the outside of the tank
  • sew and admire!
Serger Pepper - Refashion July - Man's shirt to tank dress - mark the width of the topstitch
Let's finish the armholes in the same way. The only difference is that you start with folding one end of the bias tape toward the wrong side so, when you reach that point with the other end of the bias tape no raw edges will show. Stitch, press, fold, press, pin, and topstitch, exactly as shown for the neckline. Repeat for the other armhole.
  Serger Pepper - Refashion July - Man's shirt to tank dress - finish the armhole with bias binding

You are done! Here's your new flowy tank mini-dress, fitting your body as a forgiving glove, made by refashioning an old man's shirt. Look at these details: don't you like the subtle peeking of the contrasting bias tape? And how perfectly fits my shoulder bones, now?

Serger Pepper - Refashion July - Man's shirt to tank dress - detais  
Do you like how the front neckline opening came? I love it!

Serger Pepper - Refashion July - Man's shirt to tank dress - front neckline opening detail  
I hope this has inspired you to go and sew something from your refashion stash!
  Serger Pepper - Refashion July - Man's shirt to tank dress - and loose where I don't want to enfatize my curves

2016-07-20

Refashion Month with Michelle White

Scroll down for english, please!


É impossível não gostar da Michelle. Ela é meiga, divertida, honesta e super criativa. Quando penso que não me consegue voltar a surpreender ela vem e bam, lá fico eu de queixo caído com a sua capacidade de reinventar e criar. Exemplo disso mesmo, são alguns dos looks que ela reciclou no último ano e que nos mostra hoje aqui no blog. Visitem mesmo todos os links para os mesmos, aposto que também vão ser apanhadas/os de surpresa com alguns dos materiais que ela usou. Agora, passo-lhe a palavra a ela mesma. 

It is impossible not to love Michelle. She's kind, funny, honest and so creative. When I think she cannot surprise me anymore, she comes and bam, there goes my jaw down again with her reinvent ing and creating skills. Good examples are the ones she's bringing us today, some of the looks she recycled/refashioned in the past year. Please visit all the links for each of them, I bet you too will be amazed when you find out how some of the supplies she used. I am letting her speak now. 

Hi House of Estrela Readers! I am Michelle and I blog over at Falafel and the Bee, as well as take care of things behind the scenes as one of the Virtual Assistants at Project Run and Play.
If you know me already, you will know how I absolutely love everything about refashioning and I do it as often as I can. Not only is it extremely cost effective and speaks to my frugal side, it saves existing garments (and sometimes even trash) from the landfill.
Today I am here to share a little round-up of some of the refashions I have done, since last July. Click on the link below the photo to take you to the individual posts.

refashionCollage

refashion2Collage

refashion3Collage

I cannot believe how many I have done this past year! I hope you'll come over and check out some of these posts as well as explore the "Upcycle" category I have where you can find things other than garments. Thank you so much, Magda, for having me here. I look forward to this series every year.

Keep on reusing and refashioning, everyone!

2016-07-19

Desert Island Sew

Scroll down for english, please!


Tal como no passado mês, juntei-me a outras bloggers para mais um tour divertido. Se no primeiro mês nos pediram para mostrarmos as nossas peças a serem usadas no dia a dia e algumas perguntas por responder, desta vez, apenas nos questionaram uma coisa:
Se fosse para uma ilha deserta e só pudesse levar um molde, que molde seria esse? Podíamos levar todo e qualquer material de costura, mas apenas um molde. E agora?

Just like last month, I joined a few bloggers for another fun tour. We were asked to share our sewn pieces in our daily life and we had a few questions to answer as well. This time though, we were only asked one thing:
If we were going to a desert island, and we could take only one pattern, what would it be? We could take as many sewing supplies as we'd wish, but were only allowed to take one pattern. What now? 

Azur Swimsuit 
by Petit a Petit and Family & Titchy Threads

Escolhi o molde do fato de banho Azur. Um molde resultante de uma colaboração entre as designers Celina Bailey e Laura Titchter, mas levei tanto tempo para me decidir. Existem tantos moldes maravilhosos. A minha ideia inicial era escolher um molde básico, que eu pudesse alterar e costurar imensas peças diferentes com ele: versatilidade era o meu foco, portanto. No entanto, cheguei a outra conclusão. Uma ilha deserta pede pouca roupa, não? E porque não levar um molde apropriado para o local? Ninguém disse que eu ia ficar perdida na ilha para sempre e precisar todo o tipo de roupa, pois não? Imagino essa ida para a ilha deserta como uma espécie de retiro costuril. Eu, a minha máquina, os meus tecidos e a parafernália toda que eu conseguisse levar para lá. 

I chose the Azur swimsuit. This is a pattern brought together by two designers, Celina Bailey and Laura Titcher. It took me quite a few time to decide though. There are so many wonderful patterns out there. My first thought was going for a versatile pattern I could hack as much as needed. However, my conclusion was otherwise. A desert island calls for little clothes, right? And whay not taking an approriate pattern then? Nobody said I would stay lost in the Island and need all sorts of clothes, right? I imagine going to that island for a sewing retreat. Me, my sewing machine, my fabric and all the supplies I could carry. 


Eu fiz parte do grupo de testers do molde, desde a primeira ronda. Quase um ano depois houve uma segunda e finalmente o molde ficou pronto e perfeito. Fiz 3 durante a fase de testes, e o primeiro que fiz foi o que apresento na foto acima. O fato de banho é reversível, e eu adoro a conjugação das cores que escolhi. Na altura foi um bocadinho medricas no que diz respeito a adicionar o elástico e como era opcional dispensei. Arrependi-me claro. Vê-se sempre um bocadinho do outro lado a espreitar, para além do facto de não assentar tão bem e parecer até um pouco largo. O tecido azul tinha-o comprado e usei as sobras que ficaram depois de costurar dois pares de leggings - tanto que para a peça da frente fiz mesmo um remendinho, por isso se vê uma costura na cintura, o tecido não era suficiente para cortar a peça inteira. Já a lycra preta do outro lado, veio de um vestido de mulher comprido ao qual também meti tesoura e transformei neste fato de banho. 

I was part of the testers for this one, since the first round. Almost a year later there was a second one and finally we had this perfect pattern ready. I made 3 of these through the tests, and the first one is the one I shared above. The swimsuit is reversible, and I love the fabric mix I used. Back then, I was a bit of a chicken to try to use the elastic and since it was optional I skipped it. Of course I regret it. The other side is always showing and it doesn't fit as good as it could. I bought the blue fabric and for this I used the scraps I was left after making two leggings - so much so that I had to sew two pieces together in order to be able to cut a front piece, that's way there's a sewing line in the waist of this one. The black lycra I used came from a women's long dress I refashioned into this. 


Mais tarde e com o aperfeiçoamento ao molde, foi-nos pedido que fosse costurado mais uma versão, e eu queria muito fazê-la mas tinha um problema... estava difícil encontrar lycra capaz por aqui. Por isso, comprei um retalhinho branco e preto que adorei a nível de padrão, mas era tão fino que me dava impressão. Juntei restos do vestido usado para o anterior também. Para o outro lado do fato de banho vi-me aflita, não tinha tempo de encomendar online e por aqui não havia nada. Felizmente, num monte de roupa para reciclar que me deram, vinha um fato de banho de mulher, suficientemente grande para eu conseguir fazer a versão em color block do molde. A esse lado juntei retalhos de um tecido jersey fino e até um pouco brilhante que tinha por casa. 

Later and with the perfecting of the pattern we were asked to sew another one and I really wanted to make it but struggled with something... It was quite hard to find the perfect fabric around here. I ended up buying a black and white scrap I adored in print, but was way too thin. I used scraps from the black dress here too. For the other side, I almost fell into despair, I had no time to order it online and I just couldn't find anything at all. Happily for me, I was given a pile of clothes to refashion, I found a women's swimsuit large enough for me to use some of it and do the color block in the swimsuit. To that same side, I used scraps from a thin and slightly shinny jersey from my stash. 


E passado um ano veio o último, o meu preferido. Depois de dois fatos de banho lá perdi o medo do elástico e apliquei neste último. O que vos posso dizer sobre isso? Nunca mais faço fatos de banho sem eles. Fazem toda a diferença no cair da peça. Os tecidos comprei-os em Espanha, e agora depois de algum uso, percebi que o das fotos de baixo não vale nada e desbotou ao fim de duas idas à praia ou coisa assim. Tanto que o uso como forro para todos os fatos de banho que vou fazendo. O tecido das bolas brancas é uma lycra pesada, que dura e dura. Foi uma excelente compra. Eu mesma fiz um outro bikini para mim o ano passado usando os mesmos tecidos. O tecido rosa, veio de uma t-shirt de mulher e apesar de não ser lycra tem-se aguentado perfeitamente à água salgada da praia e ao cloro das piscinas. 

And then, one year later, there was the last one, my fave. After two swuimsuits I finally lost my fear of elastics and applied it to this last one. What can I tell you about it? I will never make another swimsuit without it. They make a huge difference in the fit. The fabrics I used were both bought in Spain and after going twice to the beach, I realized that the one from the lower photos is really crappy, and lost the bright colours right away. I've been using it as a lining for all the other swimwear I made after this. The white polka dots fabric is a heavy lycra, that lasts and lasts. It was an excellente purchase. I made a bikini for myself in those same fabrics too. The pink fabric, was reused from a woman's t-shirt and although it's not lycra, it has been lasting and resisting the salty water from the beach and the chlorine from swimming pools. 


E pronto, é isto, eu levava o Azur comigo e fazia uma dúzia deles, para a minha filha, mas também experimentaria fazer um para mim, já que desde que fiz o último, que digo que gostava de experimentar fazê-lo para mim mesma, já que as minhas medidas, excepto nas ancas, cabem no número maior (12 anos). E vocês? Que molde escolhiam para levar para uma ilha deserta? Vejam as escolhas das bloggers que se seguem... 

And that's it, I would take the Azur with me ans would make a bunch of them for my daughter, but also for myself, as since I made the last I've been wanting to. My measurements, except for the hips, totally fit the biggest number (12 years). What about you? What pattern would you choose for a desert island? See the choices from the next bloggers... 

Refashion Month with Elizabeth Elliot

Scroll down for english, please!


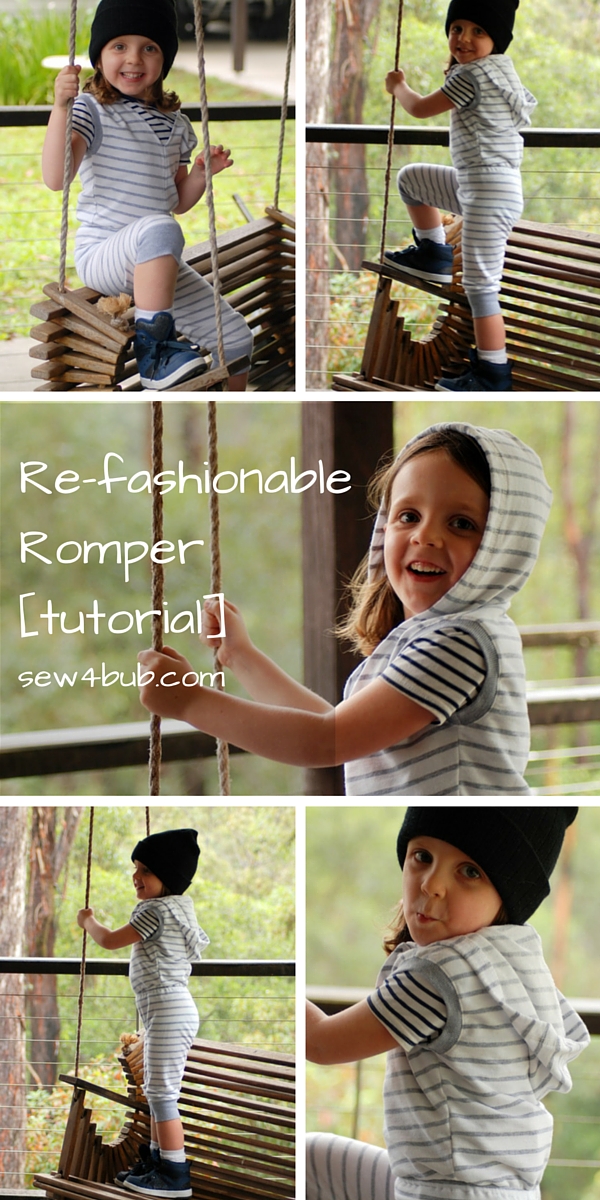
Sabem o molde M is for Motto Joggers, aquele sobre o qual estou sempre a falar? E os últimos moldes super para a frente que usei ultimamente para a G.? Bem, são todos desenhos da Liz. Adoro o seu estilo e aposto que vocês também. Esta é a sua estreia nesta série e eu estava muito curiosa para ver o que tinha feito. Aqui o temos, não está um espetáculo? Ela transformou um hoodie em macacão para criança. Têm o link mais abaixo. 

Do you know the M is for Motto Joggers pattern I am always talking about? And the coolest latest patterns I've used for my daughter lately? Well, they were all designed by Liz. I love her designs and I bet you do too. It is her first time as a guest and I was really curious to see what she'd come up for the series, and here we got it. How cool is that? She turned a hoodie into a kid's romper. Visit her here and check out her tutorial. 


Labels

About us Acessories Adult Adults Advent Calendar Appliqué Baby Baby Acessories Baby Doll Acessories Baby Doll Sling Baby Shoes Back Warmer Pillow Backpack Bags Barbie Beading Beads Bedsheets Beret Bibs Bikini Blankets Blazer Bleached Blog Tour Blogs Blouse Bolero Book Covers Book Review Boots Bowling Game Boxers Boy Bracelet Bralette Breastfeeding Pillows Briefs Button Shirt Button Up Shirt Cap Cardigan Carnival Causes Cell Phone Stand Challenge Create Charger Support Chevron Christmas Clutch Coats Commitments Constant Change Contests cookies Corset Cose+ Costumes Cowl CraftingCon Crochet Crossstitching Cushions Dance Outfit dashiki Dia de Los Muertos Diaper Pouch Doll Clothes Dolls Drawstring Bags Dreamcatcher Dress Duvet Cover e-book E-Zine Review Easter Embroidery EnglishPaperPiecing Fabric Baskets Fabric Chess Game Fabric dolls Fabric Flowers Fabric Games Fabric Memory Games Fabric Printing Fabric Stash Fabric Three in a Row Game Fabric Toys Features Felt Flamenco Dress Flamenco pants Food Free PDF Pattern Fun Cakes Funny Fur Gifts Girl Giveaway Glasses Case Granny Squares Guest Posting Hair Clips Hair Clips Hanger Halloween Hand Warmer Pillows handbag Handmade Cards Harem Headband Henley Highlow Home Homemade Liquid Soap Hoodie How to Inspiration Jackets Japanese Sewing jeans Joggers Jumper KCW Keyring Kid's Choice Series Kid's Crafts Kimono Kleenex Purse Pouch knitting Knock it Off Leather lederhosen Leg Warmers Leggings lunchbag Maratón Telaria MashUp Series Maternity MeMadeMay; Men Mending Challenge Mini-Sofa Cover Mobile Mobile bag Mom's Monthly Wrap Up Needle Rolls Nightgown No Sew Nursery One Thimble Onesies Operation: Project 0$ Other Crafts Ottobre Overalls Pajamas Pants Paper Crafts Party Favours Party Time Patchwork Pattern Pattern Testing Pattern Tour Pear Puff Seat Pencil Case Pencil Rolls Peplum Peques de Cine Peter Pan Collar Pijamas Pillow Covers Pillows Piñata Cake Pinterest Challenge Pipe Cleaner Crafts Placket Pockets Plastic bags Dispenser Pleats Pocket Slings Podcast Pompoms Pouch Practising ´n Improving Project Run and Play Project Sewn Projects Pt Refashion Week Quilting Recipes Recycled Ribbon Organizer Recycling Refashion Month 2012 Refashion Month 2013 Refashion Month 2014 Refashion Month 2014 (2) Refashion Month 2015 Refashion Month 2016 Refashion Runway Refashioning Retro Reverse applique Reviews Ribbon Roses Robe Romper Romper Dress Romper Week Roots Round up Rucksack Saving Series Saving while Sewing Savings Made By Sewing Scarf ScrapsBusting Sequins Sew 20's Sew Along Sew Geeky Sew In Tune Sew-a-bration of Womanhood Sew-vivor Sewing Tips Shirt Shorts Skirt Skort Sleep Sack Slings Slippers Snowflakes & Lace Sock Monkey Socks Stitching Suit Surprise Sweater sweatshirt Swimsuit swimwear T-shirt The Hearties The Sew Off Thrift shopping Tights Tips Tissue Case Toddler Top Top 12 of 2012 Top 5 of 2013 Top 5 of 2014 TOP 5 of 2015 top 5 of 2017 Top Stitchers Trousers TSNEM Tunic Tutorial Tutu underpants Underwear Upcycling Vest Videos Vintage waistbag Wallet When things go wrong WIP Women Wreath Year Wrap Up

Cose +

Cose +
Magazine de Costura em Poruguês